Making the 22-inch telescope visible on this site caused me to write the article that appeared in Amateur Astronomy issue number 20. The purpose of that article was to briefly explain the possibilities of "composite" Dobsonian construction using plywood and Styrofoam. This method to make a DOB was described by Steven Overholt in his book, "Lightweight Giants". In that book the author described the manufacture of his 22-inch, “Magellan”, which has been replaced by the 30-inch “Starship”. While building my 22-inch telescope some tips and tricks were discovered that are not explained well and feel I should provide a more detailed explanation of the process. Those remarkably compact and lightweight instruments drew my attention four years ago. For some time now, I’ve wanted to rebuild a friend’s Coulter. It is a relatively well-known model, a 17.5-inch F/4.5. Similar Dobsonians are available in France sold under the Meade and Celestron trademarks. They are made using a large Sonotube, a kind of rolled paperboard, and a rocker box often consisting of very dense and thick plywood. The altitude bearings are of a relatively modest size and the materials employed to control the friction are not Formica and Teflon, but plastics. The combinations of poor bearing materials and excess weight produced a scope with jerky movement that does not allow a smooth motion required to observe under very good sky conditions. The weight of the instrument is also a source of other problems that are encountered when it is necessary to remove and re-install the mirror in the telescope. This is regrettable because the mirror is relatively light. Transportation was also a problem because it's not easy to move a 22-inch diameter heavy tube. The goal was to obtain a rigid and transportable telescope and to increase its observation capacity thru improved movement. It's of no use to have a light telescope if the movement is not smooth. The search for a light instrument design was based primarily on its ease of use and handling.
|
 |
| Sectional view of future 17.5-inch of Yann’s During the manufacture of the 22-inch, I didn't want to use plywood of 3 or 5 mm (0.12 or 0.20 inch) because I did not know what rigidity could be obtained. With a thickness of 9 mm, (0.354") it is perfect, as I cannot deform the mirror box. Moreover, the foam placed between the plywood makes the composite structure much more resistant to flexure. Of course, if the stress is very strong, there is some flexure, but for normal use and transport, the risk is close to zero. I now have no doubt about the feasibility of a telescope with plywood of 3 or 5 mm. The combined use of foam plus plywood however, has two disadvantages: One, it increases the thickness of the component panels of the telescope and two, it's slightly more difficult and time consuming to build compared to a traditional system. It does have its advantages though. Mainly it is easier to cut plywood of 5 mm than larger widths. Making a light telescope has its advantages, especially with a Coulter mirror, for these mirrors are thin and this result in a mirror with a lower mass that doesn't require a lower positioning of the center of gravity. This makes it possible to fix the altitude pivots at a higher position on the mirror box, thus allowing a higher fork arm at the rocker box.
|
 |
| The polystyrene foam is available in various forms extruded or expanded. The first one is the best. Using the expansive foam has its problems as the power of its expansion tends to deform the boxes in which it is deposited. So extruded foam is the better choice. It's possible to find it in many stores. It is often blue but also available in a yellow or green color. This variety of polystyrene works very well with sandpaper and thus allows it to have a good finish for gluing the edges. It is also available in a thickness from .5(12.7 mm) to 3 (76.2 mm) inches. It’s not always pleasant to cut the parts using a power saw as a lot of dust is created and it is not easy to guide the saw through the material. A better practice is to make tests before starting the cutting of important elements. Some astute amateurs can experiment using a hot wire heated by electrical power to achieve a remarkably precise cut. It is necessary to use electrical power with only enough power to generate the heat required to cut the foam. A cable of stainless wire approximately .5mm(.02 inch) is works well. We have experimented using a .2mm (.0079 inch) special wire using less power with good effect. It's possible to use alligator clips to transmit the power. This system works something like a band saw. It is possible to cut curved shapes, like circles for example, very accurately. The tension of the wire is ensured by a system using a pulley and a counterweight. If the cable heats too much, it will break. Using a guide of reference to move the foam against creates perfect results.
|
|
|
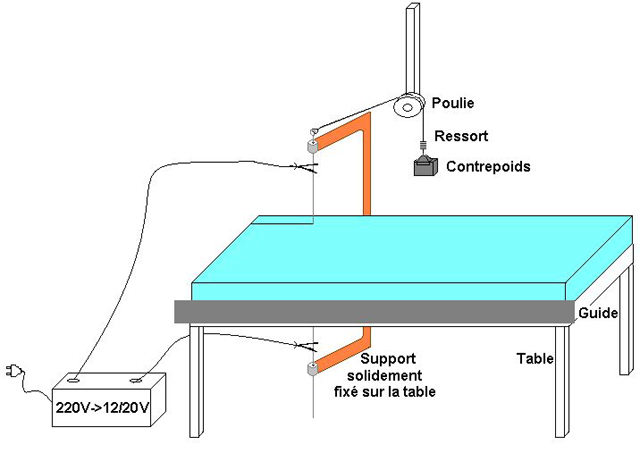
Plywood is the second component of the structure. There is a difference in thickness and quality to consider with plywood. It's best to use "marine plywood" but it's not an required. If it is not plywood of that type, it should be abundantly varnished and sealed to protect it against moisture, which will make the wood swell and thus deform the structure. Plywood also exists with an exterior wood veneer in order to obtain a very neat appearance. If plywood is of an "interior grade” then it must be varnished carefully as the glue used in its manufacture is very moisture sensitive. It's not necessary to use thick plywood to gain strength, like the traditional construction using double thickness, as was the habit to use with the first generation of Dobsons. Using a foam/plywood composite with plywood of 9mm(0.354 inch), 5mm(0.20 inch) or 3.2 mm(.126 inch) are perfectly acceptable. What is necessary to understand is that the rigidity of the components is obtained mainly by the thickness of the composite. The medium is generally a dead space, which is filled by the foam in order to better resist flexure. This foam increases rigidity and also dampens vibration. It is necessary to obtain the best possible squaring of parts in order to have an assembly of quality. In order to preserve a center of gravity that is not too high, it is possible to add counterweights or springs, as seen on some instruments, but they are not always a practical solution. A spring counterweight system done by Tom Krajci,http://education.gsu.edu/spehar/FOCUS/Astronomy/krajci/krajci.htm, is probably a better solution. Also, one can calculate all the dimensions of the panels before going to the store and ask to have it cut there. They have all the equipment required providing a better result.
|

|
| The
gluing of the different parts is much tricker than for a conventional
designed Dobson scope. First of all, it's important to use an adhesive
that doesn't destroy the foam. Neoprene glues are quite bad because the
can dissolve the foam quite easily. Epoxy is possible but the cost is
really high and the best choice seems to be ordinary wood glue, as
mentioned in Steven Overholt’s book. Two are commonly available,
white and yellow glue. Either type is ok, however I’ve
found the yellow type is faster drying and has superior bonding
qualities
|
|
| It's important to cover, as much as possible, the whole surface with a very thin layer of glue. It's possible to apply some glue and spread it with a thin piece of cardboard. Use the white glue the same way. The yellow type is polyurethane based and rated as an exterior grade glue. An important thing about the yellow type is it tends to make some foam when it dries. This "foam" is very strong but gives some trouble as the parts glued will slip and move. It's better to use “C” clamps to keep parts in position. For white glue, most of the time, a lot of weight on the parts is enough to hold to shape. If you have to use screws on assembly and need a hard point, don't forget to cut the foam and add a piece of wood. This gives you a strong spot to receive the screw. |
|
|
|
|