A B/W CCD on a Vesta-Pro ???

Pour la version Francaise,
Cliquez ici :o)
|
A B/W CCD on a Vesta-Pro ??? |
Pour la version Francaise, Cliquez ici :o) |
|
In 2002, April, a mail on the QCUIAG internet group was sent saying that "there is a B/W Sony CCD, ICX098BL that should be compatible with the originally color CCD of the Vesta Pro"... I immediately seen the opportunity of this mail... Effectively, if this sound good, the sensibility of this CCD should be a lot better than the color version with the little color filters keeping a lot of luminosity !!! Problem: Who will be crazy enough to try this mod without knowing exactly the result, and how to find this CCD ??? Crazy enough... i am :o))) But to find someone selling this CCD, that was really hard... Some month later, another mail from QCUIAG talking about a CCD vendor kept my attention... ;o) "Framos.de" in Germany... I thought again to the B/W CCD, and i made a search on their website... nothing :o(, no ICX098BL online :o( But as there was a very big choice of Sony CCD here, i had the idea to send them a mail talking of my project, and "OH MIRACLE", a quick answer of them tell me that they have the ICX098BL-6 in stock !!! :o))) |
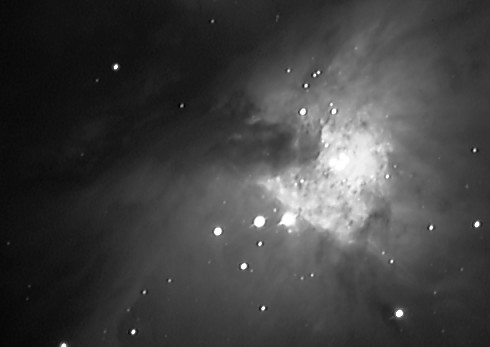
1st real test: The center of M42, in 76x10 seconds... |

2nd real test: M42 left wing, in 34x30 seconds... |
So it is only at the end of 2002, October, that i could try this new adventure, getting out the color CCD, replacing it by my new just received B/W CCD, and first light in my livingroom... WHAT SENSITIVITY !!! This is really transforming an already long exposure modded webcam in a real little Astro CCD 8 bits B/W camera :o))) After my first tries, i think this B/W CCD is almost three time mor sensible than the color version... Those first pictures, acquiered with my Meade LX-90, a 0.33 Reducer and a IRB Filter, within really bad conditions, (Wind and high clouds) just make me feel good with my first thoughts :o) We will now have the possibility to catch "quickly" high magnitudes with our cheap webcams !!! ;o) |
|
The detailed mod, or "how to lose colors" :o) (They are really crazy those amateur astronomers... ;o) ) |
|
DISCLAIMER !!! I'm not responsible for damages you could cause to your webcam because of errors in realizing this project !!! |
|
If you want to see pictures of this mod, you should go to this (French) link : Vesta Pro... L'arme Fatale !?! This is the EXCELLLLENT webpage of my friend Frederic Guinepain, about the B/W - Color replacment !!! You have just received your Sony ICX098BL-6 CCD ? So let's go :o) This is really "easy": You have to take out the original color CCD, and replace it by the new B/W CCD... There is no more thing to do, this will work with the same software used for color webcam modded or not, the only things that will change, this is the sensitivity, and of course no more colors on your pictures !!! ;o) First, touch a grounded metal thing to discharge eventual static electricity, the CCD are theorically extremely sensitive to electric chocs... 1) After oppening the Vesta Pro, you must desolidarize the front vertical part of the webcam with the CCD from the electronic horizontal board... 2) Now you must unscrew the Aluminium part from the CCD board... 3) To take out the color CCD, the solution i retain is to cut the pins of the CCD on one side with a good scalpel or even a little electric circular saw, but pay attention to go slowly by the way ;o) When the pins are cutted on this side, you just have to fold about 6 time up and down the CCD to broke all the other pins :o) WARNING !!! remember well on what side is the little notch on the CCD, you will have to solder the B/W CCD in the same positionning ;o) 4) Now you must push out of the board the 14 short pins still soldered, from the opposit side of the CCD positionning, each pin one by one with your soldering iron and a little screwdriver for example to push the pin down... 5) We have now 14 little holes, but there is still solder in... Two possibilities: - Use desoldering braid - or use a very little drill with your hands !!! to remove solder without dammaging the little brass holes who cross the printed board :o) 6) Now you can insert the B/W CCD in place, solder new pins on the other side after verifing the good positionning of the little notch !!! ;o) For soldering the CCD, the more simple proccess is to put the soldering iron on the first pin, and gently move the solder and the soldering iron on all the pins of a side in one pass, you will see that the solder will not make bridges if you do that enough quickly with very little solder, and that there will be just enough solder on each pin :o) By the way, if there is a bridge between two pins, no problem, you can restart moving the solder iron on the 7 pins to equalize the solder on each pins :o) If there is really two much solder, use again desoldering braid to remove the excedent, and a last pass with the soldering iron will give you 7 nice solders :o))) Do the same on the 7 other pins, and all is done !!! Theorically, it is not good to heat too much the pins of the CCD, but in fact, after all i have done to my webcams, i can say that this is really stronger than all you can ear... :o> That's all !!! Now you can remove the little protect plastic film on the CCD, screw the aluminium part who maintains the original lens, put the CCD board on the main webcam board and re-close the webcam to make a test of your new astro CCD camera !!! :o) You are ready to make nice B/W DSO pictures, or even color LRGB pictures with a second color long exposure modded webcam, or using Luminance, Red, Green and Blue filters as with the real CCD astronomical cameras :o))) Regards, Etienne Bonduelle ;o) |
|
Back to "Trucs et Astruces" Page (French)
|