QCfocus
I would like to thank Philippe Martinole for providing code for star image modeling, and Axel Canicio for his information on programming the Vesta-SC camera. Thank's to Pete Albrecht for the English translation of this help file.
The interface language may be selected from French, Spanish or English.
To use the English or Spanish interface, open the menu “Affichage” (Display) – “Langue” (Language), select the language and restart the program.

This page is about the configuartion of the software. Please look also at the page dedicated to focusing on a star.
When the
program is launched, it asks which video capture driver you wish to
use.

The proper
driver must be selected from the list, and for certain cameras it is
also essential to select appropriate options using the “Camera
Options” button.

Frame Decompression Method: Users are urged to conduct tests or change this parameter only in the event of problems in reading an image. Not all options are available in every case.
Vesta-SC:
Check this box if you use a Vesta SC connected to a parallel port.
Indicate the parallel port used, as well as the hexadecimal values to
use to mark the beginning and the end of the exposure sequence (00
and 01 for the standard modification).
With Windows 2000/XP you must copy the file porttalk.sys
to the folder C:\windows\system32\drivers to gain access to the
parallel port. Then start the program normally, you must no longer use
allowio.exe with this version.
If you not have administrator privileges you must also install porttalk.reg
as describe in porttalk.pdf, section "Starting and installing the driver".
Checking debug file
records the arrival time of each frame during a long exposure
sequence, and helps solve problems that may be encountered in reading
image. Be careful not to activate it under
normal conditions.
End exposure delay: the time
that the program pauses at
the end of the exposure
Frame
rate: the time in
milliseconds between
two frames.
Normally,
the image is saved
at the end of exposure given any small value (50 to 100) for
the two above parameters (end exposure delay, frame rate).
Camera in RAW color mode: Use
this setting with a color ccd in raw
mode. The preview, focusing and
recording of reformated images will be in color. But the recording of
standard images and video is in RAW format to speedup the recording and
let you to use more sofisticated sotware afterward.
Tips: If you really want to always record a color image use the Reformat
option but specify a size equivalent to the original one.
Mode : The color order in
the Bayer matrix. In case of doubt do a daytime recording on a very
colored subject.
Each camera model requires its own set of options. It is therefore recommended that if you are using several different camera models, copy the program to separate folders and create a shortcut for each copy. This way, known-good settings are saved for each camera model.

Most functions are available from the menu, the toolbars, a right mouse click, or keyboard shortcuts (the letter underlined in the menus). They are described here in the order in which the buttons appear on the screen.

It is necessary to always keep the image visible without these, one is likely to lose the image.
The display window can be resized to fill the screen by means of the Display menu, or by double clicking on the image.

Activation of the image preview and choice of preview image size must be done by resizing the window.
The refresh rate is in frames per second for normal cameras or in seconds for the Vesta SC. With the Vesta SC, an exposure time from 5 to 10 seconds is useful for centering objects before image capture.
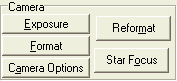 Exposure: Clicking on the Exposure button
calls up the camera driver’s
video source menu. This is generally used to set exposure time.
Exposure: Clicking on the Exposure button
calls up the camera driver’s
video source menu. This is generally used to set exposure time.
Format: This calls up the camera driver’s video format menu, enabling changes of image format or pixel depth.
These
two menus are dependent on
your specific camera model; you will find more information in the
documentation provided by your camera manufacturer.
Camera options: Open this
menu to configure your camera connection.
Focus: Open this window for focusing. The principle is to measure full width at half maximum (FWHM) and intensity of a star image by modelling it as a Gaussian distribution. See this page for more details on the method used.
Reformat: Allows carrying out certain image processing steps before recording as either AVI video or BMP images:
 Direct
Video: This box must
be unchecked to reach the remaining options, unless the video
recording is to be made directly by the driver, which is generally
faster.
Direct
Video: This box must
be unchecked to reach the remaining options, unless the video
recording is to be made directly by the driver, which is generally
faster.
Add capture time (UT): Insert in the images the date and
time of each image. For long
exposures, this is the time
of mid-exposure. Click on the round button to change
text color.
Clipping: Cuts out a portion
of the center of the image; only this window will be recorded.
Binning: Allows collecting pixels in groups of four (2x2) to decrease image resolution. Often the Video Format menu of the camera driver permits choosing a lower resolution, which is more effective than this option.
 Images menu: Permits
recording a sequence of images in BMP format. Indicate a generic
name for the images; sequential frame numbers are automatically
incremented to avoid overwriting existing files.
Images menu: Permits
recording a sequence of images in BMP format. Indicate a generic
name for the images; sequential frame numbers are automatically
incremented to avoid overwriting existing files.
Start: Start image capture. The button changes to Stop to permit interrupting the sequence.
Param: Modify image capture parameters.
 Indicates
the number of images in
the sequence, as well as the directory
where they will be stored.
Indicates
the number of images in
the sequence, as well as the directory
where they will be stored.
All other options refer only to the Vesta SC.
When this mode is selected, the video functions is
deactivated. It is necessary to set
the camera driver to 5 frames per second (it
is possible to view 1 frame/sec).
Exposure time in seconds for each image.
 This
permits recording a video in AVI format. Type in the generic file
name; the sequence number is automatically incremented to avoid
overwriting existing files.
This
permits recording a video in AVI format. Type in the generic file
name; the sequence number is automatically incremented to avoid
overwriting existing files.
Video:
Start image capture. The button changes to Stop to permit
interrupting the sequence.
Param: Modifies image storage parameters.
 Audio: Normally, to produce the smallest
possible files, this should not be
checked. However, it can be useful in recording time signals.
Audio: Normally, to produce the smallest
possible files, this should not be
checked. However, it can be useful in recording time signals.
Frame
rate: Number of images per
second. Note: with Vesta cameras
(and perhaps others), this must be set to the same value as used in
the camera driver.
Milliseconds
per frame: Essentially the
same as frame rate but permits values
in excess of one second, for example set to 10000 for an image every
ten seconds (if permitted by the camera driver).
Capture
time of the video sequence, in seconds.
Index
size: permits forcing the size
of an AVI file index. If set
to zero, size is calculated
according to the duration of recording and the frame rate.
Video
directory: Directory in
which AVI file is to be saved.
Known problems:
- B/W QuickCam are no longuer supported. Use the last version
0.91 with this camera.