
Once the electronic boards are carefully wired and tested, and the CCD put in place, you start getting images. Images taken in complete darkness allow to verify the camera works OK. But you might feel frustrated with dark images, without any optical instrument in front of the CCD.
In the mean time, you can mount the camera, which is an important step to start acquiring real images. Don't run to a telescope to catch a magnitude 15 galaxy, specially if you are a beginner with CCD. It is wise to start with less ambitious goals and much closer. As a matter of fact, it is rare than the first object observed with a very new camera is anything else than a poster on the wall.
On the front part of Audine, there is a 42 mm diameter, with a 1 mm thread. Photographic lenses with such a thread can easily be found on the market. A short focal length, from 28 to 50 mm, is better to reduce focus errors. Try to get a set of rings for macrophotography, in order to fix it. A 30 mm long ring is probably necessary to get sharp pictures.
Mount all of it on a photographic tripod, with the help of the screw (be careful, there are 2 threads, one is a metric one, the other is a photographic one).

The first issue is focus. To easily operate, choose objects with contrasted details (a black text on a uniformed white background). Make sure it's half-light, because the camera is very sensitive, you may saturate it with day light even with a sub second exposure. Start integrating several seconds, eventually strongly adjusting aperture to get large depth of field. Usually image is blurred. Keep adjusting focus again. After a few tries, you should get a pretty sharp image. When starting from scratch, the first focus is always painful. You will experience this again with the telescope.
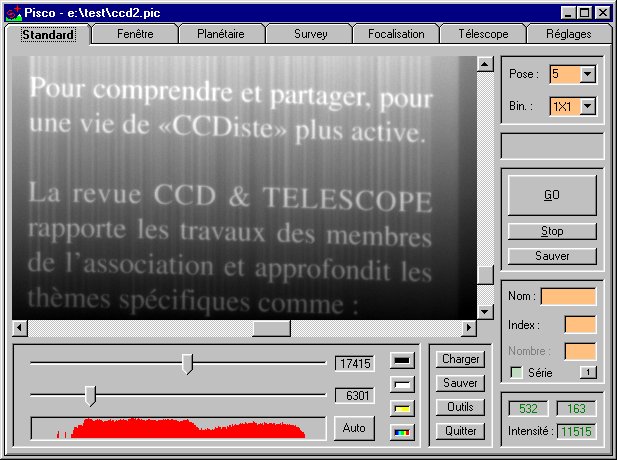
The smearing phenomena are due to exposure of the CCD sensible surface while image is transferring
The text is legible, but at the same time it looks like a vertical move effect. This is because during the transfer (about fifteen seconds in binning 1x1 mode), light has reached CCD while charges were moved line after line, along the vertical axis, leading to this moving picture result. This is what is called smearing. The top of the image contains lines transferred last, therefore this area is often brighter than the bottom. Consequently, if the object is too light, bottom can be well exposed while top is saturated.
If image is not satisfactory because of smearing effect, there are 2 ways to fix it. One is to proceed with a special treatment on the acquired image in order to compensate the moving effect which was recorded during CCD transfer. The other way is more obvious, it solves the problem at the root : just block light with a mask during CCD transfer.
For the first solution, click on the image right corner and start "Console" command. Remove offset signal with "offset" on-line command, then compensate smearing effect with "deconvflat" command. The offset level value to be entered is the signal value corresponding to an image taken in complete darkness with minimum exposure time. The "deconvflat" command parameter is the ratio between one line transfer duration and integration time. The easiest is probably to try different parameters with the goal to avoid as much as possible luminous trails, and at the same time low down the image areas supposed to be lit in a uniform way.

Same image after "deconvflat" command processing. Parameter value is typical of an image acquired after 5 seconds integration time. This sample shows it is quite possible to work with a CCD camera without any shutter
For the second solution, it is necessary to block light at the right time. Start with a shutter in front of the lens with an opaque mask, expose it during 5 seconds, take the shutter off for 1 second, then put it back until the end of CCD transfer. The manual exposure to light is therefore about 1 second. The image should be sharp enough and without any noticeable moving effect.

Train yourself in the images acquisition process with different exposure and illumination conditions. Play with the different binning and PISCO acquisitions modes. Try to subtract the darkness current from images. Try also to figure out the importance of darkness current while cooling down the camera. This training will be very valuable when you start taking pictures with telescope.

|
|
|
|