THE PLANETARY ACQUISITION MODE
The Planetary Tab makes available some acquisition functions specifically
designed for planetary observations.
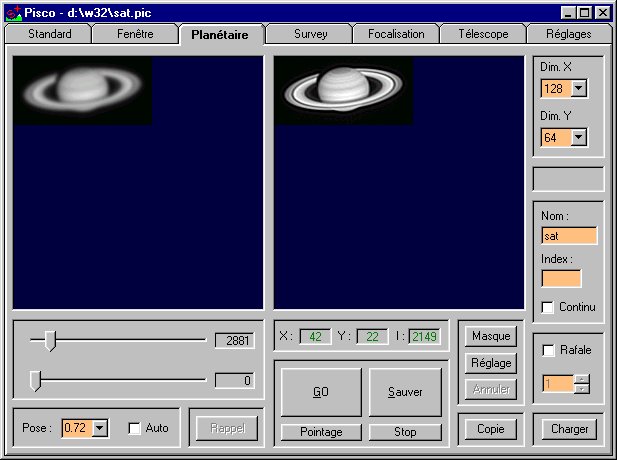 When performing acquisitions with the Planetary Tab, the Audine camera is used
in half-frame mode. In this mode, the planet must be put in the top half
part of the CCD. When reading the CCD, after the integration phase, PISCO performs
a quick transfer of the image from to top part to the bottom part. Almost no
light comes down in the bottom part, and the CCD can be read normally without
additional parasite light that would affect the image. The drawback of this
method is that only the top half part of the CCD can be used to actually produce
images. As an example, it is impossible to get a full image of the Moon in this
mode (most of the time, the Moon requires the full frame). However, this method
allows you to perform quick exposures (typically 0.05 second) without any mechanical
movement. This eliminates all the vibrations usually observed with an obturator.
Reliability is also very good.
When performing acquisitions with the Planetary Tab, the Audine camera is used
in half-frame mode. In this mode, the planet must be put in the top half
part of the CCD. When reading the CCD, after the integration phase, PISCO performs
a quick transfer of the image from to top part to the bottom part. Almost no
light comes down in the bottom part, and the CCD can be read normally without
additional parasite light that would affect the image. The drawback of this
method is that only the top half part of the CCD can be used to actually produce
images. As an example, it is impossible to get a full image of the Moon in this
mode (most of the time, the Moon requires the full frame). However, this method
allows you to perform quick exposures (typically 0.05 second) without any mechanical
movement. This eliminates all the vibrations usually observed with an obturator.
Reliability is also very good.
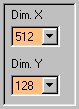
Before performing an exposure, you must define the image size. You must choose
for the X axis between 64, 128, 256, 512 and 768 pixels and for the Y axis between
64, 128 and 256. The smaller the window, the quicker the image acquisition.
You must choose the windows size according to the size of the planetary image
(that defines the sampling) and also according to the ability of your telescope
to perform an accurate tracking with a long focus.
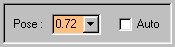
 As usually, you must define the exposure time. This time will usually be quite
small for a planetary exposure. The check box Auto indicates that you
let PISCO choose the exposure time so that the planetary image represents 80%
of the CCD dynamic range.
As usually, you must define the exposure time. This time will usually be quite
small for a planetary exposure. The check box Auto indicates that you
let PISCO choose the exposure time so that the planetary image represents 80%
of the CCD dynamic range.
 In order to make easier the positioning of the planet in the top part of the
CCD, you can use the Pointing button. By using this button, you run a
command that performs a very quick digitization of the whole image (resolution
is poor in that case). Image is displayed in a reduced format with a rectangle
that indicates where you must position the planet with respect to the format
in the normal acquisition mode.
In order to make easier the positioning of the planet in the top part of the
CCD, you can use the Pointing button. By using this button, you run a
command that performs a very quick digitization of the whole image (resolution
is poor in that case). Image is displayed in a reduced format with a rectangle
that indicates where you must position the planet with respect to the format
in the normal acquisition mode.
The buttons GO, Save and Stop allow you, as in the other
modes, to launch an exposure, to save it (in the current directory) and to stop
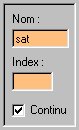
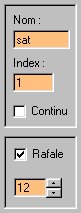
it. Furthermore, if the text box Index contains a value, the image name
will be indexed with an automatic increment each time a save is performed.
You can perform image acquisition in a continuous mode by checking the Continuous
button. This is useful for centering or focusing. Note that it is not possible
to save images in this mode.
 In order to save a series of images, you must check the Burst box. In
the example below, you are going to perform 12 exposures automatically and give
the names sat1, sat2, ..., sat12 to the images.
In order to save a series of images, you must check the Burst box. In
the example below, you are going to perform 12 exposures automatically and give
the names sat1, sat2, ..., sat12 to the images.
 Usually, when using the Planetary mode, you can decide whether you want to keep
an image and save it to the disk (button Save), depending on the turbulence.
Usually, when using the Planetary mode, you can decide whether you want to keep
an image and save it to the disk (button Save), depending on the turbulence.
It is always possible to recall the previous image in case you regret not to
have saved it. Use for that purpose the Recall button.
 The button Copy displays the last image that has been exposed in the
display window on the right. This allows you to have a reference image for the
next exposures.
The button Copy displays the last image that has been exposed in the
display window on the right. This allows you to have a reference image for the
next exposures.
The series of buttons Mask, Setting and Cancel allows
you to apply an unsharp masking to the last image exposed. This increases the
image contrast.
 You must first use the Settings button to adjust the unsharp mask settings.
A dialog box is displayed:
You must first use the Settings button to adjust the unsharp mask settings.
A dialog box is displayed:
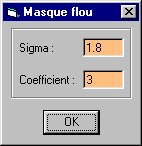 The unsharp level can be adjusted using the Sigma parameter (the higher
Sigma is, the sharper the image, even if the noise increases in the same
time). Contrast can be adjusted using the Coefficient parameter (a value
between 2 and 8 is usually correct). Finally, click the OK button. Note
that all your settings are saved for your next session with PISCO.
The unsharp level can be adjusted using the Sigma parameter (the higher
Sigma is, the sharper the image, even if the noise increases in the same
time). Contrast can be adjusted using the Coefficient parameter (a value
between 2 and 8 is usually correct). Finally, click the OK button. Note
that all your settings are saved for your next session with PISCO.
To actually apply the filter, click the Mask button. To go back to an
unfiltered image, click the Cancel button.
Back