THE STANDARD ACQUISITION MODE
The PISCO interface has several Tabs. The first one, called Standard,
makes available to the user the most traditional commands to perform astronomic
exposures: acquisition of a single image or a series of images.
 However, before using PISCO for the first time, you must configure a few parameters.
For this purpose, use the Tab Settings then click the button Advanced
Settings.
However, before using PISCO for the first time, you must configure a few parameters.
For this purpose, use the Tab Settings then click the button Advanced
Settings.
Indicate first, from the Printer Port section, at which port the Audine
camera is connected to. Usually, the Audine camera is connected to the port
LPT1.
 The second parameter to be defined is the file type used to save your images.
You must select the type you want to use in the Image File Type section.
You can choose either the proprietary format PIC or the standard format FITS.
If you decide to use the FITS format, you have the choice to use an extension
.FIT or .FTS for your files (PIC image extension is always .PIC).
The second parameter to be defined is the file type used to save your images.
You must select the type you want to use in the Image File Type section.
You can choose either the proprietary format PIC or the standard format FITS.
If you decide to use the FITS format, you have the choice to use an extension
.FIT or .FTS for your files (PIC image extension is always .PIC).
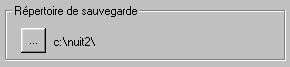
 Finally, you must define the directory that will be
used by default to save your images on disk. Go back in the Tab Settings
by clicking the OK button. Then click on the button that has 3 dots in the section
Save Directory. In the dialog box, select the directory you want to use.
In the example below, this is the directory night2 on the C disk that
has been chosen.
Finally, you must define the directory that will be
used by default to save your images on disk. Go back in the Tab Settings
by clicking the OK button. Then click on the button that has 3 dots in the section
Save Directory. In the dialog box, select the directory you want to use.
In the example below, this is the directory night2 on the C disk that
has been chosen.
 The other parameters in the Settings Tab are not critical and
you can ignore them for the first images you are going to make with PISCO. Note
that the parameter values are saved when you exit PISCO and that you get the
same values at the next working session.
The other parameters in the Settings Tab are not critical and
you can ignore them for the first images you are going to make with PISCO. Note
that the parameter values are saved when you exit PISCO and that you get the
same values at the next working session.
Go back now to the Standard Tab.
You must first indicate the exposure time (in seconds) along with the binning
factor. For instance, if you want to set a 5 seconds exposure time and a 2x2
binning, here is what you will have to do:
 You can define exposure times that have decimals, for instance 0.3 or 12.34
seconds. An exposure time of 0 is valid and it represents the minimum exposure
time. This value is typically used to expose the offset images.
You can define exposure times that have decimals, for instance 0.3 or 12.34
seconds. An exposure time of 0 is valid and it represents the minimum exposure
time. This value is typically used to expose the offset images.
The binning factor corresponds to an aggregation of pixels within the CCD chip.
The larger the binning factor, the most the pixels are grouped together and
the smaller the image is. The CCD sensitivity increases while resolution decreases.
The table below provides the image size according to the binning factor used:
Image Size
|
Binning Factor
|
Horizontal
|
Vertical
|
|
1X1
|
768
|
512
|
|
2X2
|
384
|
256
|
|
3X3
|
256
|
170
|
|
4X4
|
192
|
128
|
You must now provide PISCO with the name of the file that will contain the image
to be exposed. An index number can be specified. In such a case, the index number
will be appended at the end of the image file name. In the example below, the
image will be saved as m42-1. On the disk, the file has of course and extension
.PIC, .FIT or .FTS according to the choice made in the
Settings Tab.

You can now run an exposure simply by clicking the button GO. PISCO
displays all the operations that are performed, for instance the CCD cleaning
before the exposure or the number of seconds spent since the beginning of the
exposure.
 It is possible to stop the exposure at any time just by clicking the Stop
button. This action immediatly cancels the exposure and launch the image digitization.
It is possible to stop the exposure at any time just by clicking the Stop
button. This action immediatly cancels the exposure and launch the image digitization.
During exposure time, you are free to display other images, perform some image
processing actions, open other applications, ... However, while reading the
CCD, the computer is totally dedicated to the data transfer. This is a very
critical phase that can last from a few seconds to 15 seconds according to the
binning factor that has been selected.
Just after the digitization phase (on 15 bits with the Audine camera), the
image is displayed on the screen. To save the image to disk, you must click
the Save button. If an index has been specified, it is automatically
incremented each time an image is saved to disk. This is a good way to ensure
that you will not overwrite a previous image when saving the current image.
 Below the display window, you have access to two scroll bars that allow you
to adjust the display thresholds. The image intensity histogram is displayed
in red below the thresholds scroll bars (more exactly, the is the intensity
logarithm). If you click the Auto button, PISCO computes its own display
thresholds for an optimal display in the case of a deep sky image (assuming
that you have correctly configured the parameters from the Display Thresholds
section in the Settings Tab). Note that it is possible to reverse the
high and low thresholds so that you get a negative image.
Below the display window, you have access to two scroll bars that allow you
to adjust the display thresholds. The image intensity histogram is displayed
in red below the thresholds scroll bars (more exactly, the is the intensity
logarithm). If you click the Auto button, PISCO computes its own display
thresholds for an optimal display in the case of a deep sky image (assuming
that you have correctly configured the parameters from the Display Thresholds
section in the Settings Tab). Note that it is possible to reverse the
high and low thresholds so that you get a negative image.
 The 4 buttons on the right allow you to select the display palette.
By moving the mouse cursor over the image, you get at all time the position
and the intensity of the pixel at the mouse cursor position. Note that the cursor
can be moved using the keyboard direction keys (for a faster move, press the
Ctrl key at the same time).
 A set of buttons allows you to load an image and display it, to save the result
of an image processing (note that this command pops up a dialog box), to display
a tool box to control a telescope and to exit the program.
A set of buttons allows you to load an image and display it, to save the result
of an image processing (note that this command pops up a dialog box), to display
a tool box to control a telescope and to exit the program.
 Except for the settings or to center an object, it is quite usual in astronomy
that one wants more than just one image of an object. Therefore, the Standard
Tab provides a specific mode to perform the acquisition of several images in
an automatic manner. This frees you from tedious operations. Using this mode
is very simple. All what you have to do is to check the box Series then
to specify how many images you want in the series. In the example below, we
are going to get 5 images of the M42 nebulae, the first one having the index
1. The images saved on disk will therefore be: m42-1, m42-2, m42-3, m42-4 and
m42-5.
Except for the settings or to center an object, it is quite usual in astronomy
that one wants more than just one image of an object. Therefore, the Standard
Tab provides a specific mode to perform the acquisition of several images in
an automatic manner. This frees you from tedious operations. Using this mode
is very simple. All what you have to do is to check the box Series then
to specify how many images you want in the series. In the example below, we
are going to get 5 images of the M42 nebulae, the first one having the index
1. The images saved on disk will therefore be: m42-1, m42-2, m42-3, m42-4 and
m42-5.
 It is of course possible to start the indexing at a value different from 1.
A value for Number equal to 0 is the same as not checking the Series
box. For any value greater than 0, PISCO automatically saves images on the disk
just after the digitization process. You do not have to press the Save
button after each exposure. The small button labeled "1" allows you
to quickly set the current index value to 1.
It is of course possible to start the indexing at a value different from 1.
A value for Number equal to 0 is the same as not checking the Series
box. For any value greater than 0, PISCO automatically saves images on the disk
just after the digitization process. You do not have to press the Save
button after each exposure. The small button labeled "1" allows you
to quickly set the current index value to 1.
If you select the option Series and enter a negative number of images (-1 for
instance), the acquisition process is performed indefinitely without saving
the images. This can be useful for centering an object for example.
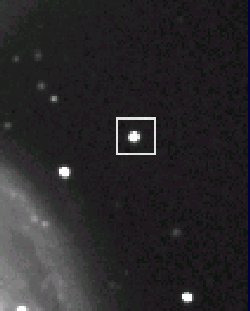
Clicking the mouse right button popups the following menu:
 The functions PSF and Statistics apply to the image currently
in memory (an image in memory is required to have these commands active). The
PSF command allows you to figure out what is the spreading of a stellar image
along with the exact position of this star (at a fraction of pixel). It also
provides you with the intensity and the local sky background level. Before applying
the PSF function, you must isolate the star by surrounding it with a selection
rectangle (drag around the star with the mouse left button pressed).
The functions PSF and Statistics apply to the image currently
in memory (an image in memory is required to have these commands active). The
PSF command allows you to figure out what is the spreading of a stellar image
along with the exact position of this star (at a fraction of pixel). It also
provides you with the intensity and the local sky background level. Before applying
the PSF function, you must isolate the star by surrounding it with a selection
rectangle (drag around the star with the mouse left button pressed).
 Then activate the contextual menu by clicking the mouse right button and selecting
the PSF command:
Then activate the contextual menu by clicking the mouse right button and selecting
the PSF command:
 In the same manner, the command Statistics provides some statistical
information about the area inside the selection rectangle.
In the same manner, the command Statistics provides some statistical
information about the area inside the selection rectangle.
 The commands Zoom+ and Zoom- from the contextual menu allows you
to enlarge or shrink the displayed image.
The commands Zoom+ and Zoom- from the contextual menu allows you
to enlarge or shrink the displayed image.
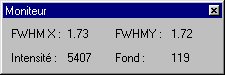
The command Monitor continuously displays on the screen a small window
where is indicated the half-height width of the object below the mouse cursor
according two directions (FWHM X and FWHM Y), the object intensity and the sky
background level. This function is useful to control the telescope focusing
since a focus defect spreads the stellar images.
 The commands Console and Hand Controller are described further.
Back