
The Survey mode is specialized in the acquisition of a large number of sequential images that make a mosaic in the sky. This allows you to observe a large region of the sky with a minimum effort. Of course, PISCO must be able to control your telescope in order for you to use the Survey Mode. A very simple electronic interface has been developed for this purpose. You can connect it to a serial port of your PC and it simulates an electronic version of the telescope hand controller. Even if this interface has been initially designed for the Takahashi EM200 and NJP160 mountings, it is easy to adapt it in order to simulate on your computer screen the hand controller of many different telescopes.
The first operation to be performed is to parameterize the serial interface and to check it works properly. Go to the Telescope Tab and click the button Display in the Hand controller section.
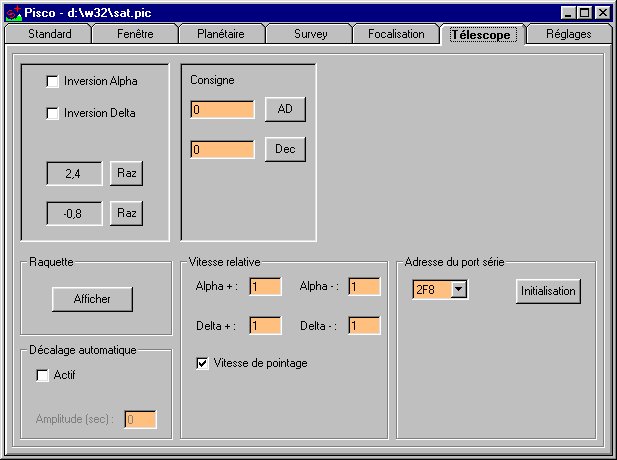

Note that you can popup the telescope hand controller at any time by running the command Hand controller from the contextual menu (mouse right button in the image zone).
The second operation to be performed is the calibration of the telescope for the Alpha+ and Alpha- movements. For this purpose, you must select a bright and isolated star (a star that saturates the CCD in 4 to 5 seconds). Position it at the center of the CCD matrix using the Standard acquisition mode. In the section Right Ascension Speed Estimation of the Survey Tab, enter an exposure time so that you are sure to be below the saturation level for the chosen star. Define the time the hand controller button will be pushed. This time must be expressed in seconds and it must be chosen so that the star will drift of 100 pixels in the CCD field. Finally, enter the estimated declination of the star in decimal degrees.
When you press the GO button, PISCO moves the star in one direction (Right Ascension) then in the other and accurately measures its position in the image. From this information, PISCO is able to determine the speed of the telescope and displays the result (you can also manually edit these fields). Furthermore, PISCO provides you with the camera orientation. It is advised to have a value close to 0° so that the CCD lines are parallel to the Right Ascension axis. If needed, change the camera orientation and perform the calibration again. It is not necessary to calibrate the system each time you observe with PISCO since the computed parameters are saved from one session to the other.
You must then define the parameters of your acquisition.
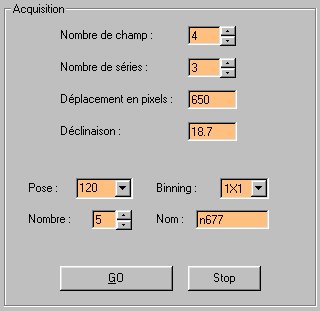
For each image exposed in a given field, PISCO increments a numeric index (1, 2, 3, ...). For each field, PISCO increments an alphanumeric index (a, b, c, ...).
In the example, PISCO starts by exposing 5 images in the first field et name these images as follows:
N677A1
N677A2
N677A3
N677A4
N677A5
Then, the telescope moves to the next field and the following images are generated:
N677B1
N677B2
N677B3
N677B4
N677B5
For the two last fields, we get:
N677C1
N677C2
N677C3
N677C4
N677C5
N677D1
N677D2
N677D3
N677D4
N677D5
Then PISCO moves the telescope back to the first field and starts a new series. The following images are generated:
N677A6
N677A7
N677A8
N677A9
N677A10
For the second field:
N677B6
N677B7
N677B8
N677B9
N677B10
And so on until the 3 series are complete.
While performing the exposures (this can be quite a long process...), PISCO reports the current status of the survey. During the exposures, you have the possibility to view the last exposed image by using the Standard Tab. You can also load the previous images, perform image processing or watch TV...