TELESCOPE CONTROL
The tab Telescope gives access to all the parameters related to the
telescope control. In order to control a telescope with PISCO, in relation with
the Audine camera, you must develop an interface to link the PC with the telescope.
This interface must be connected to the serial port of your PC. It is quite
easy to build, and the instructions are provided in
these pages.
PISCO and its electronic interface allow you to control the two axis of an
equatorial mounting. PISCO provides you with a virtual hand controler to make
the control of your telescope easy from your PC.
 By clicking the button Display in the dialog zone Hand Controler,
you trigger the display of a small permanent hand controler window.
By clicking the button Display in the dialog zone Hand Controler,
you trigger the display of a small permanent hand controler window.
 The arrow buttons move the telescope in the selected direction. If you release
the button, the telescope movement stops. The round buttons allow you to lock
the telescope movement. To unlock, simply click again the button. In the lower
part of the popup window are displayed the number of seconds during which a
right ascension and declination movements have been performed. This is a cumulative
display that is increased or decreased according to the movement direction.
The arrow buttons move the telescope in the selected direction. If you release
the button, the telescope movement stops. The round buttons allow you to lock
the telescope movement. To unlock, simply click again the button. In the lower
part of the popup window are displayed the number of seconds during which a
right ascension and declination movements have been performed. This is a cumulative
display that is increased or decreased according to the movement direction.
The dialog zone below allows you to figure out what is the movement direction
of the telescope according to the button used on the hand controler. This allows
you to have a logic usage of the different buttons on the hand controler whatever
are the optical system or CCD camera orientation. The durations of button pressing
are also displayed in this zone. You can reset them to zero by clocking the
Raz button.
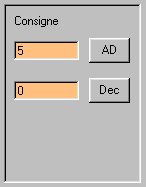
 The dialog zone Orders allows you to program a movement in seconds, either
in right ascension or declination. To actually perform the movement, you just
have to click either the RA button or the Dec button. If you enter
a negative value, the telescope movement is reversed.
The dialog zone Orders allows you to program a movement in seconds, either
in right ascension or declination. To actually perform the movement, you just
have to click either the RA button or the Dec button. If you enter
a negative value, the telescope movement is reversed.
 When selecting the option Active, the dialog zone Automated Shift
alllows you to produce a small random movement of the telescope on the two axis
just before each exposure. This is very useful to prevent having the observed
object always on the same pixels when exposing an image sequence (which is never
a good thing to have). This is because, when adding the images together during
the image processing work, the fix noise of the CDD are not averaged.
When selecting the option Active, the dialog zone Automated Shift
alllows you to produce a small random movement of the telescope on the two axis
just before each exposure. This is very useful to prevent having the observed
object always on the same pixels when exposing an image sequence (which is never
a good thing to have). This is because, when adding the images together during
the image processing work, the fix noise of the CDD are not averaged.
You must enter the duration of the random movements in seconds. A fraction
of a second is usually enough. This possibility to perform random movements
between exposures can be used to create a super flat field. In this case, the
shift between two images must be important so that you are sure that the stars
are removed after having performed a median adding process. The movement duration
will be typically 10 seconds.
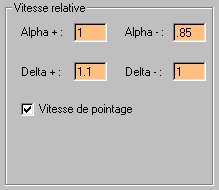
 The dialog zone Relative Speed allows you to set the relative speed according
to the axis and direction. The parameters to be entered are only useful for
the Automatic Shift mode. In the example below, the programmed duration
for the automatic shift is multipled by 1 for the axis Alpha+, by 0.85 for the
axis Alpha- and so on. This capability allows you to correct the speed defects
on the different axis and movements. This type of defect is commonly observed
on most telescopes. The option Pointing Speed allows you to select a
fast movement mode for the telescope for a given pressing time on a button of
the hand controler.
The dialog zone Relative Speed allows you to set the relative speed according
to the axis and direction. The parameters to be entered are only useful for
the Automatic Shift mode. In the example below, the programmed duration
for the automatic shift is multipled by 1 for the axis Alpha+, by 0.85 for the
axis Alpha- and so on. This capability allows you to correct the speed defects
on the different axis and movements. This type of defect is commonly observed
on most telescopes. The option Pointing Speed allows you to select a
fast movement mode for the telescope for a given pressing time on a button of
the hand controler.
 The selection of a port address is performed through the dialog zone Port
Address. Before the first usage of the function related to the telescope
control (just after having launched PISCO), you must click the button Initialization.
The selection of a port address is performed through the dialog zone Port
Address. Before the first usage of the function related to the telescope
control (just after having launched PISCO), you must click the button Initialization.
 As always with PISCO, all the settings you have performed are memorized and
used the next time you use the software.
As always with PISCO, all the settings you have performed are memorized and
used the next time you use the software.
Back