
Page (2/3)
7. The pretreatment of the images of the deep sky
7.1 Decoding of a sequence of RAW images
IRIS can only process images which are in a scientific format: the PIC proprietary format of IRIS, or the FITS, the standard format in astronomy. In addition strategy employed by IRIS for the preprocessing is to exploit the images in their CFA form, i.e. with more close to the information which really comes out of the sensor. This approach, most rigorous, makes it possible to exploit the camera in the same way as the most sophisticated CCD cameras. An obligatory stage thus consists in converting all RAW images to be treated in one of the foregoing formats. IRIS has an effective and interactif tool for that. Run the command Decode RAW file... from the Digital photo menu. The IRIS window disappear then to leave room to the only conversion tool (if the latter does not appear it is that it must be hidden by another window located at the front of them, closes or moves those):
Open then the Windows Explorer and by a simple drag and drop copy the desired files into the convert window:

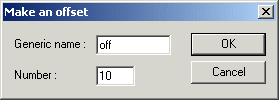
You can make multiple selections. Only the files corresponding to the type of digital camera selected can be to copied. The generic name is the principal name of the output images sequence. IRIS will add a index number to the generic name (the first index is always 1). For example let us suppose that you enter generic name like OFF (for offset sequence image):

You have selected 10 files RAW. Il you click on Decoding... IRIS produce in the working directory 10 files having names OFF1.PIC, OFF2.PIC, OFF3.PIC..., OFF10.PIC. They are image the CFA version of selected RAW files.
The contents of these files can be visualized individually by using the Load... command of File menu. You can also use a command line like: LOAD OFF3.
Tips: If you do not know how much images form part of a sequence, type command NUMBER followed by the generic name of the sequence. For the example NUMBER OFF will return value 10.
7.2. Synthesis of the master offset
Let us suppose that you carried out 10 frames of signal offset (very short exposure in the darkness) and that they have the generic name OFF after decoding the RAW. The master frame is the median stack of the individual frame. Call the dialog box Make an offset... from Digital photo menu and fill in the following way:
After computation the result is displayed. Save this master image (use the name OFFSET for example):
SAVE OFFSET
Note 1: the use of the median rather than the average of the images of the sequence this justifies by the best rejection of the aberrant points. It is necessary to use several elementary images to carry out the master in order to well minimize the noise. A number of elementary frame between 5 and 15 is a good choice.
Note 2: a remark which is general as for the use of the range of sensitivity in ASA of digital camera. To modify the sensitivity in ASA is equivalent to modify the electronic gain of the camera and thus, that influences the level of offset signal, of the dark signal... It is very highly recommended to limit once for all to one sensitivity (400 ASA or 800 ASA for example). Without that you can mix disparate data, which little to lead catastrophic results. Note that increase ASA is a lure in general. The important point for detectivity is the signal to noise ratio. However, by increasing the sensitivity you increase the signal as much as the noise, so that the signal to noise ratio remains nearly constant. Avoid the too use very high sensitivity (1600 ASA, ...) which cause dynamics reduction of your camera. A value of 400 ASA or 800 ASA is generally a good choice.
7.3. Synthesis of the dark master
The solution to carry out the dark frames (i.e. thermal signal map) is to prevent the light arriving on the sensor (to carefully close the opening of the telescope or the objective lens) and employing an exposure time close to that of images which you want to treat. Also verify that the ambient temperature does not change too much between these two sequences.
Let us suppose that you have 7 dark frames with a generic name DARK (i.e. on the disc a sequence of images DARK1.PIC, DARK2.PIC, ... DARK7.PIC). Run the command Make a dark... from the Digital photo menu:

In addition to the generic name of the dark frames you must provide the name of the master offset calculated at the preceding stage. Indeed, the master dark must be an image removed from his own offset signal.
Several methods are offered to carry out the combination of the images, the median stacking is generally the most convenient. But the imperative condition for the median method is that the elementary dark images are tacking exactly under the same conditions, in particular the exposure time must be the same one. No the problem if one uses an electronic intervalometer or a computer to control the camera, but the situation is less healthy if time is counted with a watch (...). In this last situation it is to better calculate the mean signal of the images of the sequence or even the sum (but note that the max value of a digital count accepted by IRIS is 32767).
Save the result. For example enter the following command line:
SAVE DARK
what create the file DARK.PIC in the working directory.
Here a typical EOS 10D dark frame (30 seconds exposure at 12 degrees C) with only some hot pixels and an edge raised related to a characteristic electroluminescence problem (the sensor circuits emit a faint light during exposure):

7.4. Synthesis of the flat-field master image
With a digital camera the best way for realize a flat-filed is to point the telescope toward a white screen located at a few tens of centimeters of the aperture of the instrument. This screen must be lightened uniformly by a white lamp, typically a domestic halogen lamp can make the deal. The exposure time is generally short, some fractions of second:

Call the dialog box Make a flat-field... from the Digital photo menu:
In this example one process an images sequence F1.PIC... F11.PIC. The name of the offset master must be provided. The normalize level if the median level of the final produced flat-field. This value is arbitrary, but to avoid problems of round-off during processing it is recommended to take it high. However, it should absolutely be taken care that no point of the flat-field exceeds the value of 32767 (to know the intensity of the most intense pixel of the current image type command STAT).

When you click OK the process sequence is:
(1) the offset is subtracted with all the images of the
sequence.
(2) All the pixels of a given image are mutiplied by a coefficient
so that the median level reaches 20000 (in this example).
(3) the median of the image
stack is calculated and the result is displayed.
Store the flat-field on the disc:
SAVE FLAT
Here a typical flat-field a Canon EOS10D at the focus of Takahashi FSQ-106 refractor. One sees the shade of defocused dust and some optical vignetting (the sensitivity on the edges is lower of 25% approximately compared to the value in the center of the image):

Note: normally the master images for a given instrumental configuration and do not have to be acquired and treated at each observation session. However, it is very recommended to make at least the flat-field every night in particular to avoid the effects of dust which moves all alone on optical surfaces. Prudence also if there are temperature great variations concerning the dark.
7.5. Preprocessing the images
We will treat the field of the great Orion nebulan (M42) observed at the date of full Moon (...) and in an urban conditions with Canon EOS 10D associated to Takahashi FSQ-106. I take only 5 images exposed each 30 seconds. Between each line of sight of the refractor is shifted, which is the rule in deep-sky imagery in order to statistically erase the fixed defects of the sensor during the stacking of individual images.
The RAW images were converted with the decoding tool (see paragraph 7.1). The files are named I1, i2, I3, I4 and I5. Here one of this images (a small part):

The CFA array is quite visible (succession of the red, green and blue filters).
We for each image successively you will remove the offset signal, you will remove the dark signal, then finally you will divide the result by the flat-field.
A particular mention must be made with regard to the subtraction of the dark signal. You have the possibility of asking IRIS to optimize the thermal map so that the residues of subtraction is minimized. For that IRIS multiply each dark images by an appropriate coefficient to have an optimal result. The procedure used to treat CFA images is different from that employed normally on the images coming from black and white CCD camera (see for example IRIS command OPT). The algorithm takes into account the particular texture of CFA image to arrive at a result of high quality. The fact of choosing optimization allows tolerated a certain level of variation in temperatures of the digital camera between the moment of the acquisition of calibration frames and the acquisition of sky frames.
A mention also about the flat-field division: is it even adapted to CFA structure. Before carrying out division by the flat-field, IRIS normalize the level of the pixels of this flat. The result is that the pixels red, green and blue the same weight in the flat-field has, exactly as if the screen on which point the telescope is absolutely white and as if the response of the pixels is perfectly identical according to the color. So the flat-field division is no dependant of the temperature color of the screen. To see the effect of the normalize of the flat-field made the following experiment:
LOAD FLAT
GREY_FLAT
All the preceding operations are carried out in once and automatically from the Preprocessing dialog box of Digital photo menu.
But before opening this dialog box it is necessary to define with the mouse a image area of 50 to 200 pixels wide for the calculation of optimal dark subtraction parameters (drag the mouse by maintaining the left button left). Choose if possible an image zone with a minimum of stars. Now open the Preprocessing dialog box:

The generic name of the input sequence is I (for example). We in addition provide the name of master calibration images and we choose to optimize the subtraction of the dark signal (if not the program carries out a simple subtraction). Lastly, the result is a new sequence of 5 images of generic name J (so, the processed CFA images in working directory will have as a name J1, J2, J3, J4, J5). Cliquer on OK and wait the end of the calculation.
You can examine one image of the output for control, for example by making LOAD J1

To the the improvements do not jump to the eyes. However an attentive examination of the whole of the image shows that the trace of dust disappeared, as well the hot pixels. Moreover the signal measured in the sky is now quite representative to the real sky background.
7.6. Align and stack the images
Taking into account the depointing of the telescope between each exposure, it is not possible to add the images directly. It is necessary before to recenter (i.e. register) with precision of a fraction. The registration is always carried out on the first image of the sequence, which is used as reference. IRIS use one or more stars for this operation. You have the choice between these two alternatives.
If you choose the method with one star you must select it by surrounding with a small rectangle (use the mouse). The size of this rectangle must be at least as large as the greatest shift between two successive images of the sequence. This method goes only if one can choose a star well isolated to avoid the risk that IRIS select another object from one image to another. The shifts between the images must be moreover relatively small. Here for example a selection which is appropriate, a well insulated and brilliant star (if possible select an unsatured star for a maximal precision):

If you use the method with several stars, the program is much more tolerant for the shift amplitude in translation between the images. In counterpart the calculating time is longer than with the first method. IRIS uses an algorithm which examines in a certain zone defined with the mouse the stars configuration in the first image of the sequence and tries to find this configuration in the other images. It is a linear registration because this function recognizes only the translation like degree of freedom, which covers the majority of the situations (or the extreme cases of shifts - including change of scale and/or rotation - IRIS proposes specific powerful methods, see for exemple the registration tools of Processing menu or command like COREGISTER or DISTOR - a function for correct high level of distorsion between images). According to the density of stars in the image, the selection box will do something like 50 to 200 pixels of wide:

Here the dialog box for Registration:

First of all indicates the generic name of the input sequence (here J) and the method for the alignment (here we use the multi-stars linear matching method). This function align the images, but also it transforms CFA images into color images, then it carries out also the final stacking itself (a simple addition after registation).
The result is a 48-bits image which is displayed on the screen (the sum of the 5 elementary images in our example).
Note: the program produces also three new sequences which in the example the generic names R, G and B. These sequences are the aligned primary color components. The creation of these sequences per color layers opens the possibility of carrying out a new stacking by a technique more sophisticated than a simple addition (sigma-clippling for example to reduce the noise, see commands COMPOSIT and COMPOSIT2). As an example if you want to add the images containing only the red component you will make: ADD2 R 5
At the end of the registration and satcking a true colors image colors is present in memory. Store this 48-bits result, for exemple : SAVE RESULT . You can also export the image as a JPEG, a TIFF, ... (Save... command of File menu).
Page (2/3)
|
|
|


