The composition of colors images
This pages describes the manner of using
the Tricolor
dialog box which one can
call since the View menu.
The principle of the tri-colour process is to assemble three images distinct from a same object carried out through colored filters to restore an image color of this object. Generally, the filters used correspond to the three primary colors: red, green and blue.
The 3 images following show Jupiter from top to bottom observed through filters infra-red, green and blue (note that the red filter is replaced here by an infra-red filter, which does not change the principle of the processing, simply, the Jupiter aspect which will be restored is different from what the eye would see):

These images were carried out on June 8, 1995 with a 128 millimeters refractor under strong conditions of turbulence.
We will combine these images which have as a name JUPR, JUPG and JUPB, respectively for the components Red, Green and Bleue. Inform Iris for this data and click on the Apply button:

It appears immediately that the 3 color components are not superimposed correctly.
Note: at this stage, it is possible to obtain the same result by typing the command line:
TRICHRO JUPR JUPV JUPB
You can now recenter the images.
In the Step edition enter the precision of displacement in translation. For our matter, a precision of 1 pixel is correct. Enter value 1. Take care has to select the Red option. Consequently, each time you click on the arrows direction, the red component of the trichromatic image will move of a pixel in the direction desired compared to the two other components.
To facilitate the operations strongly increase contrasts while acting the cursors thresholds so as to distinguish the planet limb:

Operate the arrows of the Trichromy dialog box to superimpose the red component with the green component (not to deal with the image of the satellites):

If necessary you can give to the step value the equivalent of a fraction of pixel (0.5 to advance by steps of 1/2 pixel). This adjust the registration with a very high precision.
Move now the bleue component blue so that it merges with the green component (and red now). For that, select the Bleue option and operate the arrows.
Note: the Apply button enables you to immediately see the result of the translation (DX, DY) of a component whereas you entered the value numerical to the keyboard. The Clear button gives to zero the value of translation of all the components.
When you are satisfied on result, click on the button OK.

The red component intensity is higher than both others, which gives the dominant orange one. It is possible of harmonize the relative intensity of the three components before composing the trichromatic image (command MULT or SCALECOLOR for example). You can also act after the composition, but it is arbitrary. Call for Colors adjust... (View menu) and act on the cursors to obtain a result considered correct:

Click on OK, then since the console, enter the following command to save the result of your work in the form of a 24-bits BMP images:
SAVEBMP JUPITER
The following example shows another facet the the Trichromy dialogue which allows composite an image LRVB. The component L is a monochromic image of the object, known as luminance, having a good level of detail and/or a strong signal to noise ratio. Initially the three components RVB are converted in HSI space (Hue, Saturation, Intensité), then image I is replaced by the image luminance L, and finally one turns over in RVB space. The result is an image having a good saturation of the colors and details. For more information on technique LRGB click here.
We will treat the following images carried out with a Thomson CCD TH7852A with the telescope the one-meters telescope of Pic du Midi Observatory on October 17, 1987.


Here the result of the trichromatic composition:

Now process by the unsharp masking technique the R component (command Unsharp... from the Processing menu):


Save this images name LUM (for example). Use now Trichromy dialog box the following way:

Select the option Luminance and enter the name of the luminance channel image. Iris execute the LRGB algorithm each time you click on the Apply button or keys of arrows.
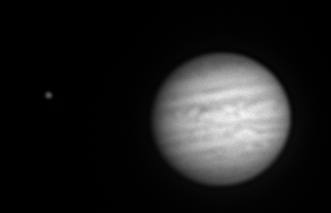
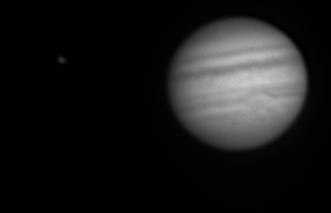
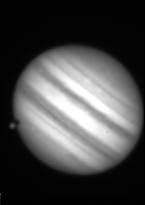
In the representations below one has from left to right:
- The standard trichromatic composition
without raising of contrast.
- The trichromatic composition obtained by technique LRVB (note the level of detail, typical of a red image on Jupiter, and the restitution of fidelity colors).
- The trichromatic composition obtained only by unsharp masking processing (no use of a L layer). The result is probably closer to than would see the eye of an observer compared to image LRVB, but the contents are appreciably less rich.


Well the Trichromy dialog box can be used to composite images of the
deep sky.
For other details, and in particular concerning
the harmonization of the colors, click here.


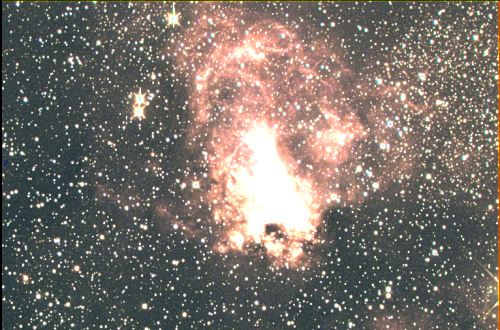
The two following images show use of the luminance layer for increase sharpness of the image. An unsharp masking is applied to image M17R and this one used as image of luminance. The first image below shows nebula with a standard fusion of components RVB. In bottom, the luminance layer was added. The details of nebulas are restored better (images carried out with an Epsilon 160 Takahashi). It is it should be noted that the luminance image could be obtained with another instrument that the used to acquire the images R, V and B In this case it is very necessary to carefully register the components by using for example command COREGISTER.