
Deep-sky images
processing
Cliquer
ici pour une version en français de ce texte
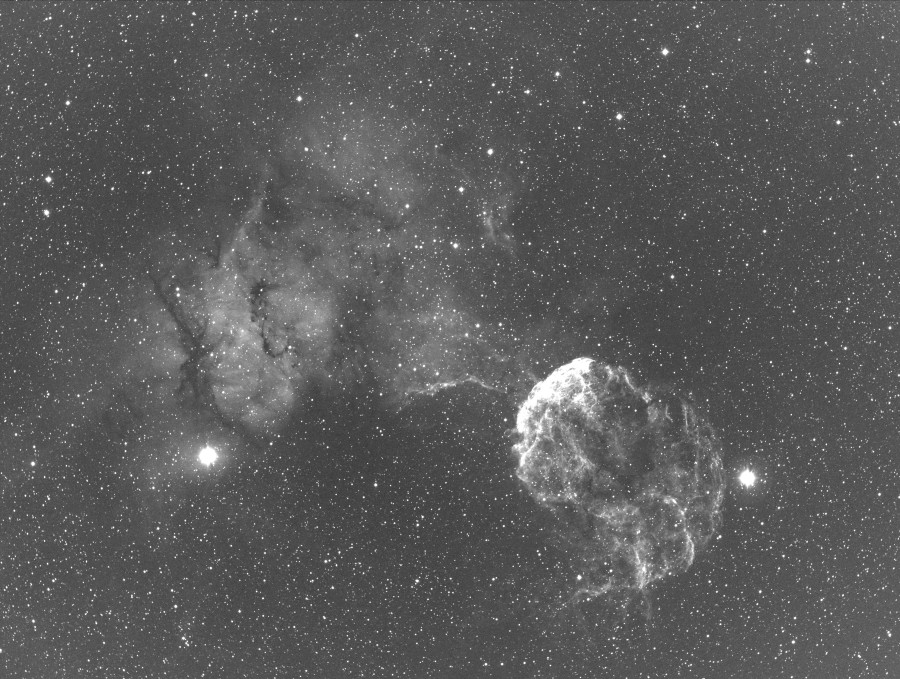
ISIS has functions that can be used for effective processing of deep-sky images. Here
we present how to use a concrete example: a set of nine images of the field of
IC443 nebula (in the constellation
of Gemini), taken with a camera FSQ-85ED refractor
(Takahashi) equipped with a QSI-583
camera. The images were acquired under urban conditions through a
Halpha Astrodom 5 nm bandwidth
filter. The exposure time
is 600 seconds for each image.
Here is a raw image of this sequence:
In the example, the raw images are saved in the directory C:\QSI_IMG5 and are named IC433-1.FIT, IC433-2.FIT, ..., IC533-9.FIT.
Think first to
define the working folder, the same one that contains the images to be processed:
The main functions for process
are located in the "Image Processing 2" tab, accessible from the main "Tools":

We first preprocess
individual images by
a standard method: subtraction of the master map of offset, subtraction of
the "dark" (map of the thermal signal), division by the flat-field (gain harmonization of all
pixels), cosmetic corrections, if any:

The master offset filee
image is named OFFSET_25.FIT in the working directory - it is an example (the name indicates that the sensor temperature is -25 ° C
during acquisition).
The thermal signal master
map is DARK600_25 (a representative image taken in 600 seconds at -25 ° C
in darkness). Just as the parameter OFFSET, DARK image is optional. If
the images are not available, leave the corresponding fields without writing anything in it.
Also filling the
flat-field is optional it (but recommended). This is the map of relative gains of each pixel. In this case the flat-field was made buy
observing a diffusing screen placed in front of the refractor and
Halpha filter in place (hence the name adopted; "flat_ha".
Iindicates a possible cosmetic file (thus still optional).
Finally, give the number of images (9) and the name you want for the preprocessed image sequence. Here, a sequence t i-1, i-2.fit, i-3.fit, ... (note the output
generic name "i-").
Click OK to perform the preprocessing.
By the way here is how to
make master images of
offset, dark and flat-field into ISIS, which is a prerequisite for everything else. Open the tab "Images master":

In the order, calculate the offset
master (in the example we use a sequence of images made in the dark,
short exposure named o_25-1, o_25-2, ..., o_25-19), the dark
master image (note use of the offset image calculated
the previous step), the cosmetic file (it tabulates the hot spots that have a level of darkness above 200 ADU in this example) and finally, flat-field image. It is important to note that ISIS can
use a single master image of the dark, here named dark600_25. This is an image corresponding to a long exposure time if possible (here 600 seconds). If you
must process a sequence of deep sky sequence
acquired with a
300 seconds exposure
time, ISIS automatically multiplies the image dark600_25.fit. by
0.5The operation is transparent and it greatly simplifies the
work of the user.
Now display the first frame of the preprocessd
sequence (here j-1) since the "Image
display" tab:

Double-click with the left mouse button on an isolated star and not too bright. In the example, the coordinates of the star in pixels returned are X = 2016 and Y = 1233 (no need to be pixel-perfect).
Back to the "Tools" then "Image Processing 2"
tab. Note that the X and Y fields of Register
function are automatically filled:

Enter the generic name of preprocessed images "i-" decide the
generic name for aligned images (here "j-"). Take a search area size of the star of a reference frame to another of
reasonable size (here 45
pixels). Click "Go.
Now you add the 9 registered
individual images to form a single image. The easiest way is to do so:
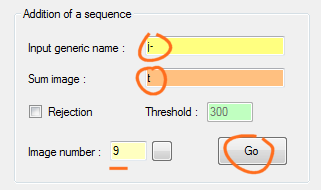
The result is the image t.fit (this is an arbitrary choice,
i.e temporary image). Note that ISIS performs all operations in 32 bits and the file produced is itself is
FITS format 32-bit
image. A more sophisticated procedure can be used at this stage by asking ISIS to
exclude individual image pixels that deviate by more than a certain threshold relative to the median
image. It is a
effective way to erase the artifacts that may be present at random in the individual images (the impact of cosmic rays for example). To do this:

Now ISIS produces a sequence of intermediate images @-1 @-2, ... in which the presence of deviant pixels is greatly reduced. In a second step, ISIS add these images to
produce the image "t.fit". The choice of threshold is empirical, you need to do trial and error (it depends on the level of noise in images). Do not worry too much, take a
typical value between 300 and 600 ADU. Note that
@clip.fit image is binarized image (levels 0 and 255
only) which gives an idea of pixels that have been considered
deviant for all the
images - this document can help to
choose the right thershold:

The areas circled in yellow are typical cosmic ray impacts, which are then eliminated in the image t.fit sum. Do not worry that stars are present in the
set, the processing effect is negligible
here.
You can crop at this stage the effective
area of the image (actually recovered between 9 images). Take the coordinates (x, y) of
valid opposite corners of the image sum:

Then

A good idea is to subtract a constant to the image to
fix the sky background close to 0 intensity. In the example of a constant of
-3500 is added to all the pixels
(and that the constant is
negative, the operation is
equivalent to subtract the value 3500 for all the pixels). Note that the input image can have the same name as the output image:

If necessary, you can eliminate a residual gradient effect in the image by adjusting the sky background with a polynomial model, up to degree 6. In the particular case where the image contains large areas of
nebular object,
must ensure that the adjustment of the sky ignores these part of the image. We fix this value to a threshold. Any pixel having an intensity below this threshold can be used by ISIS to calculate the polynomial adjustment. A
pixel of intensity at or above this threshold are ignored for this calculation:

The threshold value could be adjusted by trial and error. Each time you click "Go" ISIS product image @mask.fit in the working directory. This is a binary image (0, 255) which shows the areas used to calculate the
gradient and those excluded. For example:

White areas are used to calculate the gradient, the black areas are excluded. Note that the critical area occupied by the nebula IC433 is
now ignored in the calculation
(select 0 value for the threshold value for enable binary mask function).
A tip, always use a polynomial of degree just necessary to remove the gradient if it is present. Very often the use of a polynomial of degree 1 will be quite enough (correction of a single grade).
The processing is now
finished. The resulting image is ttt.fit (in our example). You can view this temporary file, and of course save it under another name (this file is a 32-bit):

You can also turn this image into a 16-bit FITS file, compatible with the IRIS software ("Tools" tab, then "Image processing 1"
tab):

Here is a positive
view of the resulat:
and a negative view (note that from
the observatory where the pictures were taken - Castanet Tolosan - you can not see very well that stars of magnitude 2 to the naked eye):

Back
|