The simulation (1)
With advances in computer technology it
is possible to digitally enhance our astronomical images. The process
of
digitization of the images becomes a problem to be seriously
considered.
If we want to get the maximum information from our images, it is much
better
to scan the original negative or slide than to scan a print, which
already
has lost some original detail. Commercial film scanners have
resolutions of 2700 dpi (in the
price range
of under $1000) and 4000 dpi (<$2000) and from
24x36mm film (35mm format) thay produce
files of about 50 and 130 MB (at 16bit/channel, RGB).
Those scanners are considered to produce high resolution scans and with
good reason. But when we look
at high resolution astrophotography with hypersensitized Kodak
Technical
Pan (unfortunately discontinued in 2005), a resolution of 2700 dpi
is found to be inadequate.
Only
the problems associated with scanning Tech Pan will be examined in this
article.
The film
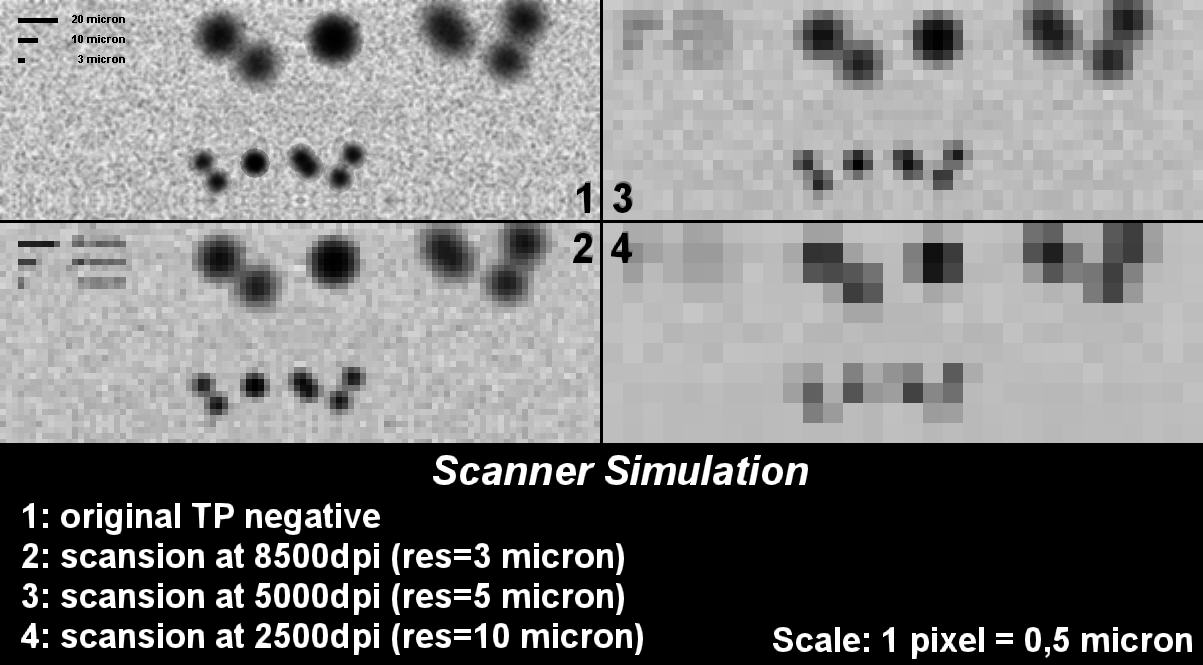
The simulation (1)
The image above shows what we lose when using a scanner. (Click the image for a higher resolution version.) A Tecnical Pan negative is shown at full resolution in box (1); note that it's not a real image but a digital simulation. The stars in the upper row of each box are 20 micrometers and the stars in the lower row are 10 micrometers. Scanner resolutions of 8500, 5000 and 2500 dpi are shown in boxes (2), (3) and (4) respectively. It is easy to see that a scanner resolution of 2500 dpi is completely inadequate to resolve the stars. A scan at 5000 dpi is a good compromise between resolution and file size. At 8500 dpi the grain of the film begins to resolve. Even a scan resolution of 8500 dpi cannot be compared to a traditional print, but there are many advantages to be had by digitizing the image and enhancing it with software like Photoshop.
The simulation (2)
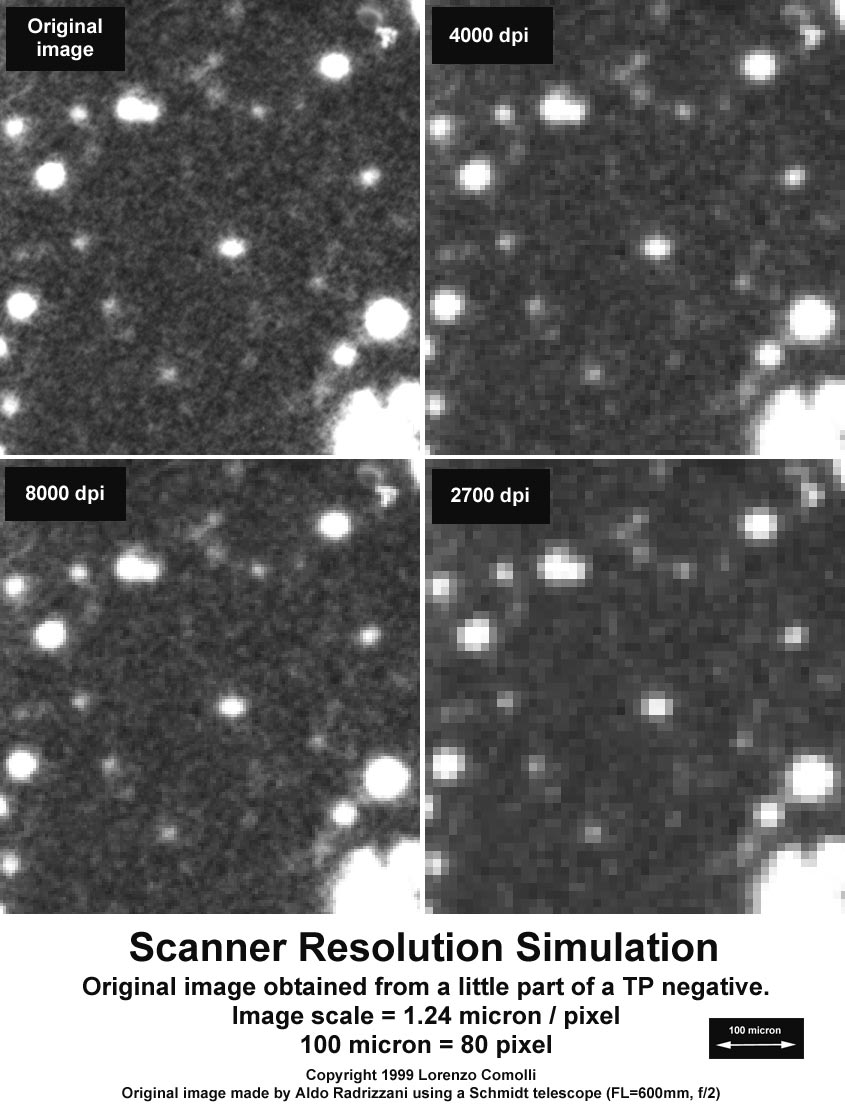 Click on the image for the hi-res version, because this little reproduction does not give a correct idea. |
This simulation is surely more
realistic
than the preceding because it's based on a VERY HIGH enlargement print
from a Technical Pan negative realized from one of the best Italian
astrophotographers:
Aldo Radrizzani (unfortunately passed away in July 2005). The telescope
is a Schmidt camera with 30cm free aperture
at f/2: this instrument gives very little stars, at the limit of film
capabilities.
My idea was to realize a very high enlargement print, to digitalize it and to degrade it to the resolution of various scanners (2700 and 4000 dpi) and to an ideal resolution (8000 dpi). In this way it's evident what we lose in digitalizing a negative. Note that the results are in agreement with the simulation (1): 2700 dpi are not enough for Tecnical Pan, 4000dpi are a little better, but 8000 are much better. |
Now a consideration of dimensions:
Aldo's
negative is a dish of 77x77mm diameter. How large will the files be for
a 77x77mm
image at the various resolution?
| 77x77mm
film |
Scan dimensions [MB] |
|
|
|
|
|
| 2400
dpi |
106 |
318 |
|
|
134 |
402 |
|
|
294 |
882 |
| 4800
dpi |
423 |
1270 |
|
|
1176 |
3529 |
| 9600
dpi |
1694 |
5082 |
With such dimensions it's obvious that
it's hard to work on the images. With actual PCs (January 2006) we can
work on images of max 300-400MB, and also on those we risk to use swap
files and virtual memory that slow down the work considerably. We
have to wait many years, maybe 5, before PCs with the needed power to
work on 8000dpi images will be
available at reasonable prices.
The scansions
Conclusions
Thanks to Alfredo Zanazzo for the long discussion about this problem and to Aldo Radrizzani for his huge film archive.
Send me your comments or critiques on the ideas expressed here, e-mail at: comolli@libero.it. (Send me also any corrections for my not very good English! ;-)
|
|