"QuickCam" Adaptation for use in Astronomy
 QuickCam is a small Web camera provided with a CCD
equal to the one provided on the good and expensive
ST5 ones. Its chip is TC211 and its size is 320X240 pixels. QuickCam is a small Web camera provided with a CCD
equal to the one provided on the good and expensive
ST5 ones. Its chip is TC211 and its size is 320X240 pixels.
Its employment in astronomy is recent and the
QuickCam has proved to be na exceptional tool for
bright objects.

|
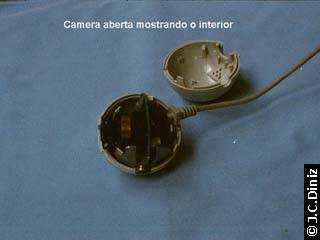
It is very easy to disassemble a QuickCam, and here I show how to do it. Further details may be
obtained in: http://www.kabel.de/~hmueller/qc/disassemble_quickcam.html |
The necessary modifications are:
- To remove the objective and the infrared filter (small bluish plastic)
- To assemble the electronic components (a small printed circuit, circular in shape and with a
diameter of approximately 5 cm, containing the CCD and the circuits), to render the camera more
suited to its new use.
Not all electronic components are within the camera "head" (the analog to digital converter and the
interface with the computer are on the 25 pins connection at the cable end) and may not be replaced.
We may increase the cable length by adding other cables in series, but the original connection to the
computer must be maintained..
The assembly must allow the CCD to be in the center, and perpendicular to the optical axis of the
telescope, so that the CCD area remains in focus and the images suffer no distortion.
In "QuickCam's" the CCD is surrounded by a plastic piece which fixes the I.V. filter and to which the
objective is bolted. If we wish to use the camera for instruments presenting low focal relation (f/D),
that is, bright, this piece may induce vignette and should be removed. On the other hand, the non
removal of the I.V. filter may be the ideal option for those who wish to use the camera basically to
obtain sun images. However, do not forget that the removal of this filter will increase the camera
sensitivity considerably. I chose to maintain said plastic piece (I may reinstall the objective if I so
wish) but I removed the I.V. filter. I place the prepared camera in a plastic box of the type found in
shops selling electronic material.
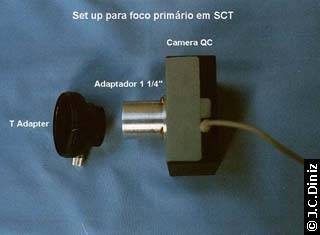
The camera is tiny and may be easily adapted to any telescope or objective. The camera may be used
in primary focus (with or without Barlows ) , ocular projection
(preferable in the case of small instruments) and adapted to teleobjectives. It is worth insisting on the
following: try to avoid, as much as possible, to touch the CCD surface. Clean the CCD surface with a
soft brush to remove the small dust grains which are bound to collect on it . You may also employ
flat-field techniques used on CCDs for digital removal of stains caused by undesirable dust.
Connecting the "QuickCam" to computer
The "QuickCam" (Windows version) communicates with the computer through a parallel door, being
fed (5V CC) by a connector inserted in the keyboard cable (there are 2 types of connectors available).
Many (though not all) portable computers are provided with a socket which allows the connection to
an external keyboard. In case there is such a socket, it may be used to feed the camera; however, there
is always na alternate solution for the remaining computers.
Regarding camera feeding, there are two options: :
- To use an additional feeding cable, the length of which should be equivalent to the extra
"parallel" cable.
- Or choose a new feeding source to be installed next to the camera. I personally followed the
advice of Antonio Cidadão and chose the 2nd alternative.
- I therefore bought a battery rack which enables me to place a set of 4 AA batteries in series. Our
output will be 6V, which is perfectly acceptable for the camera (even though we have to reset the
White-balance); if we use rechargeable nickel-cadmium batteries, we will reach 4.8V, which is
nearer . As a result of the small consumption of the camera, each charge is sufficient for several
sessions (of many hours). You should always have another set of batteries ready for use.
Transformers should not be used because they produce such noise and interference that it is
impossible to obtain images. A DIN nut was adapted to the plastic battery rack presenting 5 holes in a
semicircle (shown here with the convex portion upwards and numbered 1 to 5 from left to right),
numbers 2 and 4 being respectively connected to the negative (-) and positive (+) poles on the rack.
The remaining 3 stay off. This "nut" end is connected to the "screw" end provided with the
"QuickCam" cable.

Software

|
The software controlling the camera, and supplied
together with it must be updated to 2.1 version, which
you may find in the Web in
http://www.logitech.com/us/cameras/
It is a set of two different programs, with very similar
commands: One is used to obtain images -
"QuickPICT", and the other to produce "real time" or
accelerated animations - "QuickMOVIE . The number
of parameters we may control from the computer is
impressive:

|
|
 The number and interval between images to be
automatically obtained in a series, as well as the choice
between "real time" and variable "time-lapse"
animations. The sequence of phtographic pictures
obtained are temporarily kept in a "ciber"- ("Film Roll")
with a capacity of up to 36 exposures.
The number and interval between images to be
automatically obtained in a series, as well as the choice
between "real time" and variable "time-lapse"
animations. The sequence of phtographic pictures
obtained are temporarily kept in a "ciber"- ("Film Roll")
with a capacity of up to 36 exposures.
Antonio Cidadão recommends the use of sequences of
8 exposures, obtained in periods of minimum
turbulence. We may view the Film Roll immediately
through the QuickPICT, choosing and keeping only
the best on the disk, and then emptying the ciber-film to start a new cycle of pictures. This procedure
bears the advantage of a much greater probability of obtaining "decent" images, even in nights
without ideal stability conditions. It is also quite easy to obtain AVI animations:
1-To demonstrate the influence of atmospheric turbulence ( seeing) on star images.
2- To check the telescope collimation using unfocused images.
3- Telescopic observations of Planets using real time animations.
4-To demonstrate the periodic error of assembly .
5-To record the movement of Jupiter satellites , stars and Planets being hidden by the Moon using
accelerated animations( time - lapse). The images are kept unzipped (BMP, TIFF, AVI unzipped).
JPEG zip results in loss of information on images, which becomes rather evident when it is necessary
to "process" them, and the quality degradation in zipped AVI sequences is also irreversible.
Obtaining images with "QuickCam"
"QuickCam" allows you to obtain good quality astronomic images, provided that the object to be
photographed/filmed is bright enough. Such objects include the Sun (CAUTION!! Always use sun
filters of adequate resistance and quality (I use a "type 2 plus" "Thousand Oaks Optical" filter, duly set
before the correcting plate of my 8"opening Schmidt-Cassegrain), the Moon, the brightest planets
(Mercury, Venus, Mars, Jupiter and Saturn), and bright stars.
The image size and zoom, time of exposure (brightness).
Contrast and white balance.
 1- Let us disable the automatic mode (which allows
the camera itself to choose the time of exposure). For
the Moon and planets, the best results are obtained
when contrast is set to zero (0), and the choice of the
adequate offset (white balance) is left to the camera,
and only then choosing the most suitable time of
exposure manually (brightness). For the Sun, or in
case we wish to stress planetary details which are
not very evident, we should increase contrast
appropriately. "QuickCam" in B/W produces 6 bit
digital images, that is, with 64 levels of gray, much
less than the 256 ( 8 bits) detected by the human eye.
1- Let us disable the automatic mode (which allows
the camera itself to choose the time of exposure). For
the Moon and planets, the best results are obtained
when contrast is set to zero (0), and the choice of the
adequate offset (white balance) is left to the camera,
and only then choosing the most suitable time of
exposure manually (brightness). For the Sun, or in
case we wish to stress planetary details which are
not very evident, we should increase contrast
appropriately. "QuickCam" in B/W produces 6 bit
digital images, that is, with 64 levels of gray, much
less than the 256 ( 8 bits) detected by the human eye.
To obtain images with the best possible quality
(chromatic dynamics), it is necessary to proceed to
the adequate adjustments (contrast, brightness and
time of exposure) before we take the picture, as we
do when we take conventional pictures.
Image processing
We use the excellent image processing AdobePhotoShop software (I use version 5), and assuming
there are 8 original images, the average is determined as follows (always combining images two by
two):
1 - Transform the images kept on the disk in BMP format from indexed color to grayscale, going to
Image menu and then to Image Mode, activating the grayscale.
2 - Open two of the original images, one to remain as the active one
3 - Go to "Image" menu
4 - Select the "Apply Image" option
5 - Select "Source:" the name of the second image of the two
6 - Select "Blending: normal"
7 - Select "Opacity: 50%"
8 - Enter "O.K."
9 - In this way, an intermediary image is created, and should be filed
10 - Repeat procedures 1 to 8 for the remaining three pairs of images
11 - Now, each of the four intermediary images behaves as an original one, and procedures 1 to 9 must
be repeated
12- Finally, we take the average of the two images which originated with step 10. It sounds
complicated, but it is not, and allows us to see how the characteristics of the images improve little by
little.
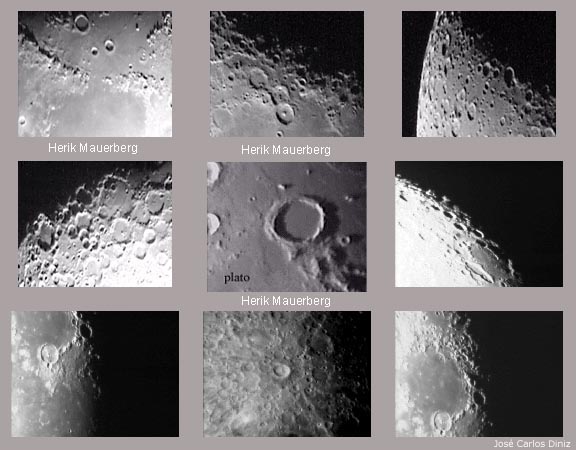
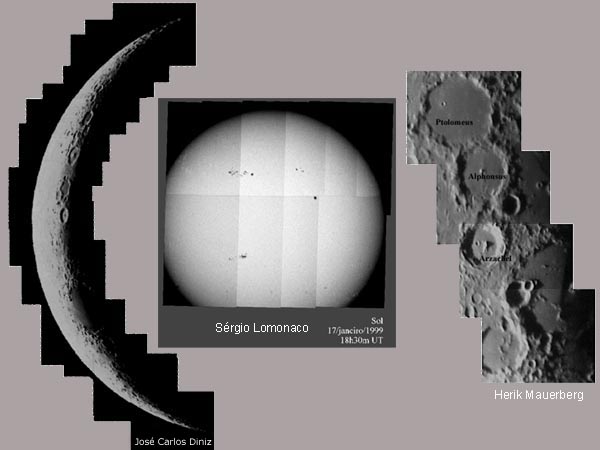
Some images

Thanks
The assembly and adaptation of the camera, its use and software handling were based in the works by
António José Cidadão , a Portuguese amateur astronomer, a pioneer in the use of QuickCam, whom I
thank very much for the encouragement and to whom I send my congratulations for the magnificent
work with CCD.
A visit to his homepages is essential :António José Cidadão ,Member of A.P.A.A. (Associação
Portuguesa de Astrônomos Amadores)
http://www.skypub.com/whatsup/acmovies.html
http://www.geocities.com/CapeCanaveral/5409/
http://www.terravista.pt/Guincho/1177/
I thank my friend Pedro Ré for what he taught me and for the encouragement he gave to create this
homepage. As happens with António Cidadão, his works with QuickCam and CCD crossed frontiers
and made the name of Portugal duly acknowledged by the world's astronomic community.
A visit to this homepage is a must:
http://www.geocities.com/CapeCanaveral/Lab/4171/qc.html
Other interesting links
http://ourworld.compuserve.com/homepages/chas_wray/
http://perso.wanadoo.fr/jf.mourron/astronom.htm
http://www.geocities.com/CapeCanaveral/5409/3d.html
http://www.geocities.com/CapeCanaveral/Hall/1439/qc.htm
http://www.geology.ewu.edu/jpb/lho/lho.htm
http://www3.gamewood.net/astronomy/ccdinfo/qc/
http://www.vub.ac.be/STER/www.astro/AstroCCD/AstroQC.htm
http://perso.club-internet.fr/uranos/disassemble_quickcam.htm
http://www.public.iastate.edu/~sdk/questarpix.html
http://www.mnsinc.com/daolath/astro/astro.html
http://idt.net/~metro6/
http://www.atm.dal.ca/~andromed/sun.html
http://www.egroups.com/list/astrocam
http://www.gfi.net./pryczek/
http://www.astrodurf.com/astrocam
Click here to return