
Before inserting the CCD chip, it is necessary to check for correct operation of the electronic circuits that process the video signal. If then a problem exists, it will therefore not be related to the CCD.
Without the CCD, a small offset signal is produced by the video signal chain. This signal is digital in form and can therefore by visualized on the computer. In this way, you are going to test the amplifier, the ADC and the camera-to-PC link.
Start the PISCO program, connect the camera to the computer's parallel port with the 25-way ribbon cable and apply power to the camera (+/-15V or +/-18V depending on the option chosen).
Begin with an acquisition using PISCO, with an integration time of zero seconds and 2x2 binning (GO button of the Standard sub-menu). After about 5 seconds, an image should appear on the screen. If all is well this image should be uniform with an average digitized level of about 450 (this value may vary by +/- 30 or so). In order to see the image offset, adjust with the threshold level scroll bars at the bottom of the screen. Then press the right-hand button to make another menu appear and press on the command button Statistics. PISCO then calculates and displays a noise level in the image in the window standard deviation. Generally, this value should lie between 3.5 and 4.5.
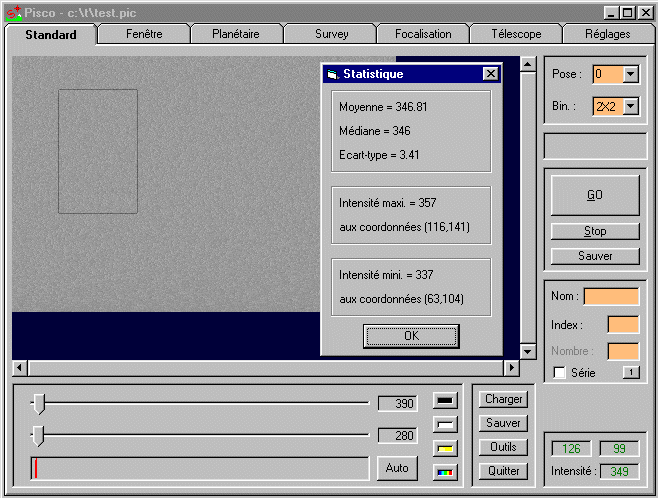 Typical
appearance of an acquired image without the CCD in the circuit.
Typical
appearance of an acquired image without the CCD in the circuit.
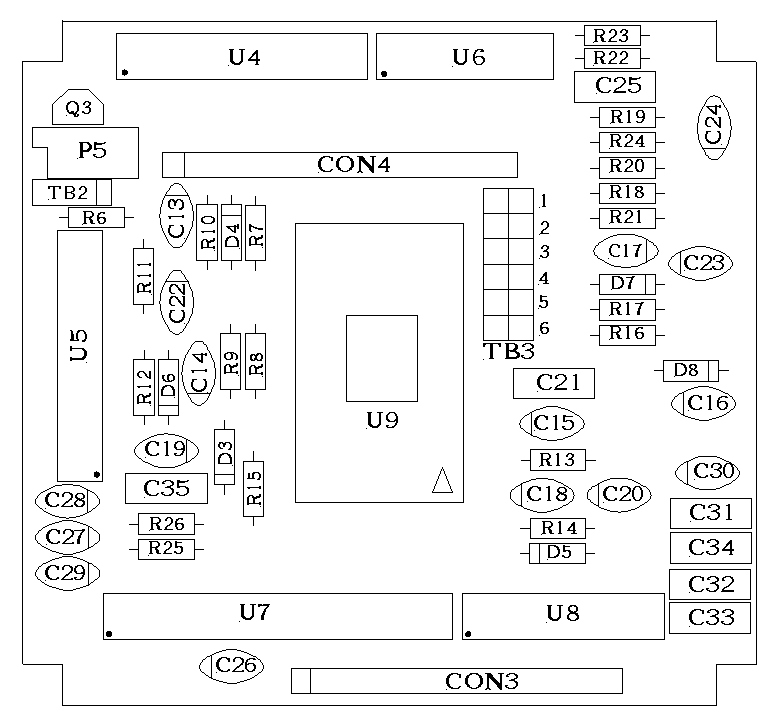
If you have followed so far, and have obtained the above results, then your camera is operating successfully. You can proceed to the next stage: electronic testing with the CCD in place. Otherwise, the image level will be 32767 for all pixels in the image. If this is the case, verify the connection between the camera and the computer. Check all voltages applied to IC's U4, U6, U7 and U8. Use PISCO in its "Console" mode. Make sure that pin 11 of IC U4, pins 23 and 24 of IC U7 and pin 8 of IC U8 change logic state when the SETO and SET255 commands are executed. If this is not the case, check the electrical connections of your circuit board with an oscilloscope, whilst PISCO is performing an image read. Verify also that the signals on pins 15 to 23 of IC U7 and pins 4, 7, 9 and 12 of U8 are rapidly changing state. This indicates that analog-to-digital conversion operations are taking place. At pin 1 of U7 (the ADC input) you should observe a small potential (of the order of 50mV on average).
If you've got this far, and each of the previous tests have passed with success, all is well at this stage. Well done! Now, you have to install the last electronic component: the KAF-0400 CCD. Be extremely careful to avoid electrostatic discharges (ESD). Even if ESD problems are fairly rare with the KAF-0400, you should, nevertheless, take all the required precautions and follow all instructions as to the handling of ESD-sensitive devices.

Make sure that you insert the CCD in the correct orientation. Pin 1 of the chip is indicated by a small triangle or dot on the case. This pin corresponds to pin 1 on the IC support socket. A point to remember is that pin 1 is positioned close to side of capacitor C18. (refer to the circuit diagram).
When inserting the CCD in its socket, make sure that you apply a uniform force along both long sides of the device. All pins of the CCD along both sides must be inserted simultaneously in order to avoid twisting. Do not rush, and don't force it! Spread the force with small pushes, and when properly aligned push steadily and firmly all the way.


|
|
|
|