 Before going into image processing one must address the subject of image acquisition. Processing an image can only make visible the data contained in the original. The trick is to record the maximum amount of data in each raw image, and not the use of software and filtering algorithms, although they are of great importance.
Basically you must deal with three factors: Atmospheric turbulence, the telescope’s maximum resolution and light gathering power and the camera’s image sampling, light sensibility and noise level.
You cannot easily change the factors themselves, only their interplay. This is achieved by finding the right f/ratio to obtain your images, generally by means of using a Barlow lens. The objective isn't getting the aesthetically best image, but the one that records the maximum details possible.
Small magnifications will allow shorter exposure values and noise free images, but the amount of spatial information obtained is low, as the object will be only a few pixels across.
High magnifications demand longer exposures, making the effects of turbulence more visible (a way to shorten the exposures is to use a higher electronic gain level, but the image’s noise level will then rise). Nevertheless, the planet will cover more pixels, and all the spatial information will be recorded.
These two situations will determine the path to follow regarding image processing.
In the case of undersampling, meaning small planetary images that fail to record all the spatial detail possible, a special procedure named superresolution should be employed.
The second case is oversampling, where the planet is large enough to allow all of the details to be recorded. Special image processing algorithms such as Maximum Entropy deconvolution or Wavelet Filters should be used in this case.
Regardless of the situation your first work will be to average the best images obtained in each session together. All images blurred by atmospheric turbulence or out of focus should be discarded. This will remove the random noise present, allowing you to perform subsequent image processing on a "clean" image. Software such as Registax, K3CCD Tools or Iris are able to choose, align and stack the best frames automatically.
This is the basic procedure to follow in processing planetary images. I’ll just add some common operations that are crucial and performed many times. There is no recipe to their use, so experimentation and practice are advised.
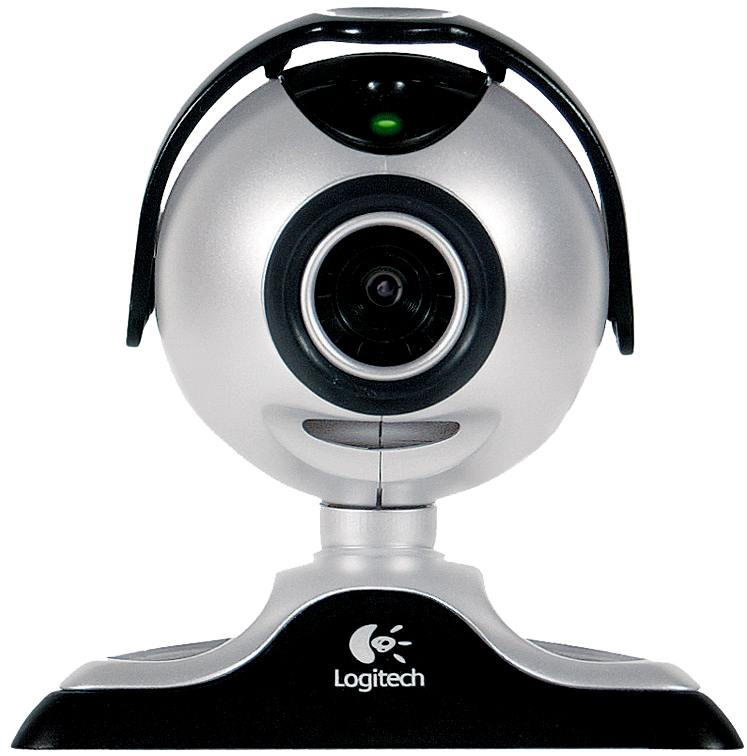
 Amateur astronomers have used the black and white QuickCam since 1997. Today it's obsolete, in terms of resolution, dynamic and noise level. Actually, most of this cameras still work but have developed some interference problems that make them difficult to use. This is the case with my camera, that shows vertical interlace like fixed pattern across every image. Even so I used it in the 2003 Mars opposition, taking advantge of it's sensitivity and spectral response to red / IR light. The results were great for a obsolete camera !!!
The camera's compact "egg" design made its adaptation into an astronomical device a very simple procedure. All that was necessary was to remove the original wide-angle objective and infrared filter and to fix the camera to an eyepiece holder. Generally this meant either housing the camera in a new box with an eyepiece adapter or adding a camera objective adapter ring to the original "egg". I chose the second, as it provided a much more versatile operation, being able to use camera lens and the original objective.
Image acquisition is a very simple procedure. The software driver that interfaces with the camera gives full control over the CCD. Settings are separated into two screens.
One controls the image resolution, number of bits and zoom. For astronomical uses the camera is always used in 6-bit mode (64 gray levels), although it is possible to use 4 bit (16 gray levels). The zoom setting allows transferring just the center of the CCD, speeding up the image refresh and allowing real time focusing and centering of objects. It's also possible to use a half resolution mode to get a fast image display. The maximum image resolution is 320x240.
On the other screen we find the exposure, electronic gain and black level adjustment sliders. The exposure is labeled white level and set in 256 steps. The shortest exposure (1) corresponds to 1/10000 second and the longest (256) to 2,5 seconds. The camera's driver determines this time limit. Dave Allmon developed a new driver and image acquisition program that allows for unlimited exposures. The electronic gain is controlled by the contrast, and works as a signal amplifier. The black level sets the minimal signal level to be digitized.
As the QuickCam only has a 6-bit image dynamic the exposure, gain and black level must be set in a way that all of the available dynamic range is allocated to the object we want to image.
Disconnecting a wire in the cameras parallel port can disable the CCD's antiblooming feature. Again, Dave Allmon describes this modification in detail.
The software AstroQC written by J.P. Goddard is a good help in image capturing. It can apply dark and flat frames and automatically increments the image's file number, making it ideal for planetary image acquisition.
The great problem with this camera is the level of noise present in the images. You need to add about 8 images to get the same results as with a 16-bit camera. Taking in consideration the price factor, the QuickCam clearly wins against all the opposition.
Problems
Advantages
 The evolution of technology allowed the prices of color cameras to drop. The market became filed with new WebCam models making the amateur’s choice harder. Of the new models, only one could rival the original QuickCam, the QuickCam VC. I tried to buy this camera, but it was too expensive at the time.
So I went for the cheapest option, a Creative WebCam II, knowing beforehand that I wasn’t making a great buy.
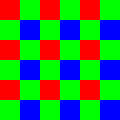
This camera uses a CMOS sensor in stead of a CCD. CMOS are more advanced technologically and less expensive to make. The chip is covered with small color filters in a 2x2 Red, Green, Green, Blue, pattern as shown.
To get accurate color reproduction you also need to add an infrared blocking filter.The image resolution is 356X288, meaning that this camera is based on camcorder hardware. This also explains why the maximum exposure is 1/50 seconds.
The camera has a co-processor that decodes the image and downloads it to the computer in a compressed format. It also resamples the image to the desired resolutions. Image sizes as large as 768x576 are possible this way, but they give no improvement in image resolution.Because of the mentioned color pattern and image compression, the real image resolution is rather low (178x144 for Red an Blue channels, 178 x 288 for Green).
The software drivers offer a vast array of different setting to play with. Unfortunately, most of them are of little use for astronomical imaging.
The contrast setting controls the image black level. When set to minimum, all the dynamic range is displayed, revealing for example Jupiter’s satellites. The planet will be hopelessly overexposed.
Set to maximum only the brightest parts of the image are displayed. The image is much better this way, and generally this setting is left like this.
The color intensity control has a more complicated effect. Besides controlling the image saturation it can also, when set to maximum, give an extra gain and contrast to the image. It also affects the way the camera’s co-processor deals with the on chip color pattern. With low saturation settings this co-processor will try to recover some of the lost resolution on sharp edges, applying a form of sharpening.
Maximum saturation gives a more direct reading of each pixel. The red, green and blue channels correspond now to three low-resolution images.
The camera controls the image’s white level (electronic gain). In reality what happens is that the camera will always set it’s gain to maximum when targeted at small objects surrounded by a black background. This is very bad for astronomical images, as objects tend to be completely overexposed. To prevent it you can reduce the exposure time.
The camera offers three speeds. The slowest corresponds to 1/50 second, being the other two of unknown length. As your electronic gain will always be very high, the noise in the image will be very high.
There is no direct way of controlling the color balance, as it is determined directly by the camera.
It’s possible to edit a settings file (Vvlcpia.ini) in your windows directory and manually specify the gain for the three color channels.
A good option is to set all the channels to the same value.
 This is a great replacement for the Black and White Quickcam, having a similar light sensitivity and much less noise.
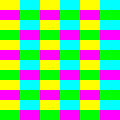
It caries a small CCD with a resolution of 362*582, with the pixels covered with color filters. Unlike most cameras that use RGB filters, the VC uses GCMY filters. This is very good because the amount of light transmitted by each filter is twice of that coming through an RGB set. The filters are arranged in a YC/MG - YC/GM pattern.
The software gives a maximum resolution of 352*288 meaning that it works in a 1x2 binning mode.
As the pixels measure 8.2 x 3.8µm this transforms them into 8.2 x 7.6 almost square RGB pixels. Yet the green channel only has a resolution of 176*288 pixels, which translates into a 2x2 binning. Red and Blue appear to have 352*144, meaning a 1*4 binning.
The color control is based on 2 sliders: the first controls the Cyan - Magenta level and the second the Yellow - Green. Color reproduction is very accurate.
 The Hardware
 The Starlight MX516 is an affordable 16 bits CCD camera. It's based on a Sony ICX055AL HyperHAD chip that measures 4.9mm (horizontal) x 3.6mm (vertical).
Possible resolutions are:
The pixels aren’t square, having an x/y ratio of 1.73 on the standard modes and 0.86 on the hires mode. Two approaches are possible to correct this:
You can increase the vertical resolution by interpolation, and your final images will have resolutions of 167 x 125, 255 x 188, 500 x 375 and 773 x 580.
But this increase in image size gives no extra resolution to the images.
On the other hand, you can reduce the horizontal resolution to match the vertical. Some information is lost but as the pixels are averaged together any noise present in the image becomes much less apparent.
On this case the resolutions will be: 129 x 97, 193 x 145, 387 x 290 and 500 x 375.
A third solution is to resample the images to a compromise resolution, where the x-axis suffers little reduction and the y-axis little expansion. I prefer this technique and resample to 400 x 300.
Original resolution |
Reduced Resolution |
Interpolated resolution |
Compromise resolution |
167 x 97 |
129 x 97 |
167 x 125 |
133 x 100 |
255 x 145 |
193 x 145 |
255 x 188 |
200 x 150 |
500 x 290 |
387 x 290 |
500 x 375 |
400 x 300 |
500 x 580 |
500 x 375 |
773 x 580 |
640 x 480 |
Right after I turn the camera on some condensation sometimes forms over the CCD, but it dissipates completely in 1-2 minutes, and as such is not a problem.
With extremely underexposed images all stars will show a black 'shadow' to their left and look somewhat fussy. Increasing exposure times eliminates this effects and gives a clear and noise free image.
With certain control software interference is visible on the images, usually in the form of white dots or short lines. Closing all other software running on the machine eliminates this problem. My guess is that the source of the problem is hard disk access. If the software has an option the control the speed of the image download set it to minimum. If there's also an option to “Disable Interrupts” set it to “yes”, as it also reduces interference noise.
I've measured the image transfer times for a 500 x 290 image through the parallel port to be 20 seconds with a Pentium MMX at 166 Mhz.
This translates to 7250 pixels per second or roughly 14 kb /s.
Now I use the USB interface, that cuts time down to 4 sec for a 500 x 290 image. This is an essential extra to get good results out of this camera.
My first attempts at planetary imaging with this camera where somewhat disappointing.
The images tended to look washed out, overexposed and with a vertical 'trails' coming down from the brightest objects. I understood that I was suffering from the fact that the camera has mechanical shutter.
As such, the pixels keep recording incoming light during image transfer. The solution is very simple. Just cover the telescope during image download. Images will greatly improve with this old trick (it was common practice in the days of film Astrophotos, as a way to eliminate vibrations transmitted to the scope by the photo camera's mechanical shutters).
Now that I use the USB interface all this problems are gone! The camera gives good planetary images if color filters are used and the images are properly exposed.
The Mx516 performs very well with wide-angle photo lenses. With short 30-second exposures faint nebulosity can be captured even from light polluted skies.
A f/2.8 50mm lens gives a 3 x 1.5º field; a f/3 28mm a 5 x 3º field.
At prime focus of an 8’’ SCT each pixel covers about 1 arc second at standard binning (500 x 290). This is too little, because turbulence almost never allows recording that amount of detail in long exposures, and the use of a focal reducer is a must. Even so, the use of 2 x 4 binning (255 x 145) solves part of the problem, cutting exposure time in half and giving perfect ‘point sized’ stars. Nevertheless the field of view remains small.
So a focal reducer is a must. I built one out of a old 0.9'' eyepiece and my images got much better!
I strongly recommend this camera to any amateur seeking a very good compromise between price and quality. Even so the information provided in the user's manual is limited, and the software frustrating to use. It only allows images to be taken at 1 x 2 binning (500 x 290) and always reads the full area of the CCD.
In my personal opinion AstroArt offers an excellent control over the camera, including transferring just part of the CCD and all the binning modes.
I've also tried Maxim DL but it seems to introduce some noise in the images, with is very strange in my opinion.
Problems
Advantages
 This camera is a "clone" of the Phillips Vesta Pro and TouCam models. It features the same CCD and similar electronics. This means that even the raw mode modifications will work with this camera. The only difference seems to be the software drivers and a higher level of noise and interference patterns.
The green channel has a resolution of 320 x 480 pixels (or 640 x 240...). Red and Blue are 320 x 240.
Using raw mode modifications the user can determine the way in wich this channel information is used and decoded by the camera.
For example, it's possible to implement hardware 2 x 2 binning disregarding any color information (grayscale 320 x 240 images). As this is done in the hardware before the signal gets digitized and compressed, the gain in sensitivity is very great.
In a similar fashion, you can read only the information from the red or blue pixels on the matrix (320 x 240) as grayscale luminance, thus having a smaller compression factor than regular color information.
The software allows for several capture resolutions and color modes. The 640 x 480 mode is only effective bellow 5 fps to avoid usb compression. Using YUV mode instead of RGB is a good option, because of the reduced color resolution of the CCD matrix.
The 320 x 240 RGB mode can be used up to 30 fps with good results. It's my preferred mode, because I work at f/30 and my seeing is less than ideal. This way I get better temporal sampling and more images to chose from.
This camera displays diagonal noise patters when working bellow 20 fps. Depending on the amount of gain used this effect can disappear with stacking or, ir in the other hand, be amplified.
To be safe, I usually work in 320 x 240 RGB mode at 20fps, recording 60 sec. AVIs. I've set the hardware sharpness parameters (using macros and raw mode type modifications) to a high level in order to get the maximum of details on to the 320 x 240 image. It works, and the images come almost already processed out of the camera!
Cameras
Lens and Telescopes