sebseacteam
-
Compteur de contenus
6 615 -
Inscription
-
Dernière visite
-
Jours gagnés
16 -
Last Connexion
Soon available - 80178
Tout ce qui a été posté par sebseacteam
-
Mars - C8 - Player One Neptune-C II IMX464 - 19/07/2022
sebseacteam a posté un sujet dans Astrophotographie
Bonjour, Bonne conditions dans le Nord en ce mardi 19/07/2022. Après avoir rendu visite à Saturne, direction la bille rouge, qui grandit de semaine en semaine. Toujours le C8 à la manoeuvre, avec la Player One Neptune-C II, ADC ZWO, barlow Antares 1.5x Puis avec l'Asi290mm + filtres LRGB L R G B RGB -
Hello, Le 19 Juillet dernier avait lieu la rencontre entre la lune et Jupiter. Prise avec la lunette 80ED, Asi294mc pro, réducteur 0.6x 3 photos pour avoir du champ autour. Un crop à 100% sur Jupiter: Magnifique spectacle au lever du jour.
-
Doublon
-
Saturne - C8 - Player One Neptune-C II IMX464 - 19/07/2022
sebseacteam a répondu à un sujet de sebseacteam dans Astrophotographie
Salut Daniel, oui c'est exactement ça. L'Antares n'est pas télécentrique. L'ADC va induire un tirage conséquent. Pour l'ajustement de l'ADC j'ai l'habitude depuis le temps que je l'utilise. L'ajout de la Barlow augmente légèrement l'angle des tirettes mais à cette hauteur c'est vraiment raisonnable. Mais l'effet de l'ADC est bien visible. -
Saturne et Jupiter 17 juillet Cassegrain Kepler ça a chauffé
sebseacteam a répondu à un sujet de Jean-Paul OGER dans Astrophotographie
Somptueux 👍 -
Saturne - C8 - Player One Neptune-C II IMX464 - 19/07/2022
sebseacteam a répondu à un sujet de sebseacteam dans Astrophotographie
Merci Alain C'était du sport en effet. Au programme de bon matin: -Saturne couleur + filtres LRGB -Mars couleur + filtres LRGB -Jupiter couleur + filtres LRGB -conjonction Lune-Jupiter Salut Thierry, t'as vu j'ai remis en route le planétaire Merci rené, sympa -
Une belle Varoise, cuvée 2022 (M83)
sebseacteam a répondu à un sujet de COM423 dans Astrophotographie
Salut, Des explications ici sur le fonctionnement du script GHS de Pixinsight. A transposer à Siril. J'ai appris des trucs https://remoteastrophotography.com/2022/04/generalized-hyperbolic-stretch-script-for-pixinsight-version-2-1 Extrait: Using the GHS Script I use the sample observation of Messier 51 in this section, so you can follow along if you like. Start by opening all four files for the M51 observation using PixInsight. Create the combined RGB image using the ChannelCombination process, and then close the R, G, and B images since we don’t need them anymore. Next, use the BackgroundNeutralization and ColorCalibration processes with their default settings to resolve the color image’s blue color cast. You don’t need to do anything to the luminance image because it’s already aligned with the color image. Start the GHS script (select Scripts – Utilities – GeneralizedHyperbolicStretch) – a large window opens on your PixInsight desktop. The window has four primary sections: At the top is the Histogram display where you’ll apply and evaluate your settings Below the Histogram is the parameters section, where you make adjustments To the right is the Preview window that shows you what your image looks like after applying the parameters you selected At the bottom of the window are the Apply (green checkmark) button, close button (red X), undo/redo buttons, log window, preferences, documentation, GHS website link, and the reset button The first thing you need to do is select the Target View, so you can set the image you’ll be working on. Select the M51_lum image. If you had applied the STF to the image, the script asks if you wish to remove the STF; answer Yes that you wish to remove the STF. The preview image shows a very dark image and this is expected because the histogram function is at its default, which maps pixels one to one. The first thing we’ll have to do is select the Symmetry Point (SP) value – this tells the script where to apply the stretch function. Do the following: Use the Zoom slider to zoom into the histogram until you’re able to see the spike in the histogram at about the halfway point in the histogram (for me the value is about 17). Your screen should look something like this: Place your mouse pointer at the beginning of the rise of the histogram and click to place a blue marker line. Your screen should look something like this: The green arrow points to approximately where to place the blue line, and the highlighted X value provides you with an idea of exactly where I placed the line. If you make a mistake, just click elsewhere to move the blue line. The blue line is just a readout value that sets the X and Y values below the histogram. Note the value of X, highlighted in yellow on the preceding screenshot Enter the value of X in the box labeled Symmetry Point (SP), shown in yellow in the following screenshot. Alternately, to copy the value from your selected point on the graph, click the Send value to SP button. The Symmetry Point is the point where the stretch will occour. By placing the symmetry point near the beginning of the histogram, we are focusing our efforts on the most significant part of the image. Reset the Zoom back to the default of 1 by clicking the left-pointing arrow next to the Zoom bar below the histogram Set the value of Local stretch intensity (b) to 8 The local stretch intensity defines how much stretch will be applied to the selected region. Higher values are more intense and lower values are gentler. Drag the Stretch factor (ln(D+1)) to about 3.3 so that the spike in the histogram appears just beyond the 25% mark and the preview shows M51. This is what my screen looks like: Click the green checkmark at the bottom of the window to commit the stretch to your image. The preview image turns white because it is applying your selected stretch a second time. You can resolve this by clicking the Reset button at the bottom of the window. Close the script window The script asks if you wish to save your log before closing. The log is a text file that saves the settings you used when the script was running. You could use this information later to repeat your steps, but for now, answer No to the question. Next, create the color image by using ChannelCombination to combine the R, G, and B images. You may have already done this earlier so you can skip this step if you already have the combined RGB image. The resulting image has a blue cast to it, which you can resolve by using the BackgroundNeutralization and ColorCalibration processes at their default settings. You’ll note that the background is uneven and you can improve that using AutomaticBackgroundExtractor at its default values, except for the correction method, which you set to Subtract; you can put checkmarks next to Discard background model and Replace target image. Note the name of the RGB image Start the GHS script, select the color image from step 13, and remove the STF if you had applied it Repeat steps 1-5 for the color image The Symmetry Point (SP) is 0.00758, the Stretch factor for the color image is about 3.8, and the Local stretch intensity (b) is 1.0 Click the green checkmark at the bottom of the window to commit the change Reset the script so that the preview window is no longer white Next, I’d like to improve the contrast around NGC 5195 (the upper galaxy of M51) to bring out the nebulosity a little more in the color image. To improve the contrast, we need to find the approximate value of the pixels in the region. We do that by clicking the region in the preview window, which places a readout square where you clicked. The readout square is a little too large, so adjust its size to about 20 using the slider next to the Readout size or enter the value in the box. In the big white box is the mean value of the pixel you selected. In my case, it is 0.30374 as shown in the following screenshot: The pixel I have selected has a value of 0. 30374 (from the nebulosity in NGC 5195) – your number may differ, depending on where you clicked. Click the Send value to SP button next to the number from the preceding step Enter or select 1.0 in the Local stretch intensity (b) box Slide the Stretch factor box to the right until you get to a value of about 1.7 The stretch is affecting pixel values around the 0.30374 value you found earlier and is adding contrast to just those pixels. Click the green checkmark to commit the change to the image and then click the Reset button at the bottom of the script window Next, we’ll improve the saturation of the color image to bring out more color. Below the Histogram window, click the radio button next to Sat for saturation. Set the Stretch factor to 1.0 and note the increase in saturation. Click the green checkmark to commit the change to the image and close the script window (answer No to Do you want to save your log before leaving) Use the LRGBCombination process to blend in the M51_Lum image The background is a little light, so we can use the HistogramTransformation process to clip the shadows. Do the following: Open HistogramTransformation and select the combined image in the dropdown. Open the real-time preview and click the button shown in the following screenshot: If your image is a little dark, reset the HT process and drag the dark point arrow (the one on the left), to the beginning of the hump on the histogram graph as shown: Close the real-time preview and apply the HistogramTransformation process to the color image Optionally, use the AutoIntegrate.js script to reduce noise in the image (under Extra Processing, select Noise reduction, set it to at least 5, and apply after selecting the combined image) This is your final image – there is much more color in it and there’s contrast in the surrounding nebulosity around NGC 5195. Le site de l'auteur du script: Mike Cranfield https://ghsastro.co.uk/ tuto ici https://www.dropbox.com/s/god5605o0luccbi/TAICSlides.pdf?dl=0 On retrouve les mêmes infos dans la version Siril, ça doit être applicable. Pas fini de faire joujou avec des curseurs moi du coup -
Top les couleurs
-
Jupiter 18 juillet - le C9.25 veut être un C11 quand il sera grand!
sebseacteam a répondu à un sujet de Daniel B dans Astrophotographie
Ha oui top tout ça. Par ici aussi début de semaine c'était bien comme tout -
Jupiter - On sauve les meubles...
sebseacteam a répondu à un sujet de Olivier Meeckers dans Astrophotographie
ça se prend volontiers -
2022-07-16 ....Je n'y comprend plus rien ...... au seeing...expliquez moi
sebseacteam a répondu à un sujet de Bernard_Bayle dans Astrophotographie
Hello. Séance planétaire bien plaisante ce matin. Comme prévu sur Ventusky, flux perpendiculaires à 3000m et 9000m, avec des vitesses raisonnables, 30 et 50km/h Conditions stables à l'arrivée pour Saturne, Jupiter et Mars. Turbulence lente et peu prononcée. Le C8 a bien bossé. Mais que le temps passe vite entre 4h et 5H30... Incroyable. Traitement plus tard 😊 -
Une belle Varoise, cuvée 2022 (M83)
sebseacteam a répondu à un sujet de COM423 dans Astrophotographie
J'utilise déjà le même genre d'algo dans Pixinsight avec le scrip GHS: https://github.com/mikec1485/GHS tu pars de ton image linéaire. Et tu montes par étapes. D'après ce que j'ai compris, les 2 premiers vont ensembles, et le 2é est à baisser pour les passes suivantes. Genre: 1e passe facteur étirement 5 intensité locale 5 Point noir à ajuster pour retrouver le fond de ciel sombre mais pas trop 2e passe facteur étirement 2 intensité locale 0.5 Point noir à ajuster pour retrouver le fond de ciel sombre mais pas trop Souvent avec 2 passes c'est suffisant. La THG permet de garder les étoiles bien fines tout en révélant la galaxie ou la nébuleuse. Infos ici https://siril.org/fr/download/2022-06-28-siril-1.0.3/ Après je ne sais pas trop encore dans quel ordre il est préférable d'utiliser les 3 outils de montée d'histo: Asinh THG Transfo histogramme J'essaie plusieurs versions / combinaisons et je poursuis le post traitement. ça dépend des cibles en fait mais ça fait le job. Peut être que la team Siril (Cyril, Vincent, Cécile) pourrait nous en dire plus s'ils passent dans le secteur -
La version tortue de Japet devant Saturne
sebseacteam a répondu à un sujet de jldauvergne dans Astrophotographie
La tortue fait d'excellentes choses -
Une belle Varoise, cuvée 2022 (M83)
sebseacteam a répondu à un sujet de COM423 dans Astrophotographie
Oui même phénomène avec mon C8 en ce moment: décalage de la couleur par rapport à la luminosité et surtout halos bleus autour des étoiles brillantes, qui s'atténue bien avec des scripts de Photoshop. Si je fais la montée d'histogramme avec : -Asinh 300 -histogramme transformation alors ça décale si je ne fais que Histogramme Transformation alors pas de décalage mais peu de couleurs alors qu'avec Asinh en premier je dois limite désaturer un peu J'ai essayé aussi Transformation hyperbolique uniquement et ça a l'air d'être entre les 2, pas trop de décalage et de la couleur quand même. Sujet à creuser. -
Bien belle en effet 😊
-
ARP 84 - NGC5394/5395 - Galaxie du Héron - C8 - Asi294mc Pro - 28/06/2022
sebseacteam a posté un sujet dans Astrophotographie
Bonsoir, Une cible pas facile ce soir à vous présenter mais bien singulière, 2 galaxies en intéraction. NGC 5394 est une galaxie spirale barrée située dans la constellation des Chiens de chasse à environ 157 millions d'années-lumière de la Voie lactée. NGC 5394 a été découvert par l'astronome germano-britannique William Herschel en 1787. NGC 5395 est une galaxie spirale située dans la constellation des Chiens de chasse à environ 158 millions d'années-lumière de la Voie lactée. NGC 5395 a été découvert par l'astronome germano-britannique William Herschel en 1787. NGC 5394 et NGC 5395 forment une paire de galaxies en interaction gravitationnelle qui figure dans l'atlas des galaxies particulières de Halton Arp sous la cote Arp 84. Arp note que NGC 5495 est une spirale avec une compagne de haute luminosité de surface à l'extrémité de l'un de ses bras. (Source Wikipédia: https://fr.wikipedia.org/wiki/NGC_5394 https://fr.wikipedia.org/wiki/NGC_5395 ) Les infos: Celestron C8 (203x2000) + réducteur Meade f6.3 Asi294mc pro + filtre IRcut. monture HEQ5 Rowan autoguidage lunette 70x400, Asi290mm / PHD2 acquisition NINA 74 x120s Gain 120 -10°C Traitement Sirilic, Siril, PS. Une brute de 120s -
ARP 84 - NGC5394/5395 - Galaxie du Héron - C8 - Asi294mc Pro - 28/06/2022
sebseacteam a répondu à un sujet de sebseacteam dans Astrophotographie
Salut Thierry. Non pas du tout, rdv demain matin justement 😋 Ça me fait ça quand je l'Asinh puis histogramme. Ça décale les couches par endroit. Pas trop compris. Pour l' algorithme je sais pas, vais regarder. -
Et pour finir la nuit dernière
sebseacteam a répondu à un sujet de Christophe H dans Astrophotographie
Quelle activité !!! post très complet bravo -
Jupiter au Mewlon 250 avec un très bon seeing
sebseacteam a répondu à un sujet de DDuchesneau dans Astrophotographie
Superbe cette série et animation -
Jupiter - Seeing capricieux
sebseacteam a répondu à un sujet de Olivier Meeckers dans Astrophotographie
Superbe Olivier 👍 -
M57 et sa double corolles!
sebseacteam a répondu à un sujet de Martin Bernier dans Astrophotographie
Très chouette Martin 😊 Pas souvent que l'on voit la corolle externe. -
Jupiter et Saturne au balcon, conditions presque de l'espace
sebseacteam a répondu à un sujet de jldauvergne dans Astrophotographie
Extraordinaire. Les années précédentes il fallait attendre après l'opposition pour commencer à avoir des images extra. Là c'est pendant la 1e période. Chapeau JL! -
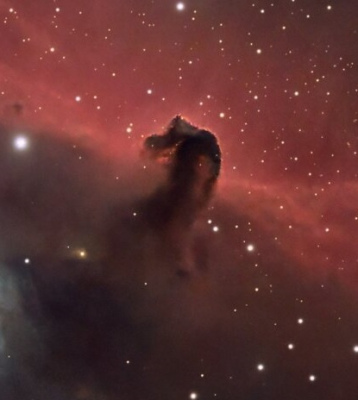
Une version Siril/Photoshop en partant de ton image partagée:
-
M101 - Galaxie du Moulinet - C8 - Asi294mc Pro - 15/07/2022
sebseacteam a posté un sujet dans Astrophotographie
Bonsoir, Après avoir rendu visite à cette célèbre galaxie au mois de Mars dernier avec la 80ED, place au C8 cette fois ci, avant qu'elle ne tire sa révérence. Les infos: Celestron C8 (203x2000) + réducteur Meade f6.3 Asi294mc pro + filtre IRcut. monture HEQ5 Rowan autoguidage lunette 70x400, Asi290mm / PHD2 acquisition NINA 90 x180s Gain 120 -10°C Traitement Sirilic, Siril, PS. Une brute de 180s- 6 réponses
-
- 11
-

-
M51 - Galaxie du Tourbillon - C8 - Asi294mc Pro - 14/07/2022
sebseacteam a posté un sujet dans Astrophotographie
Hello, Encore une tournée des classiques, avec le C8. J'avais déjà fait M51 avec la 80ED, place au C8, maintenant qu'il a compris comment fonctionne le ciel profond... Chopée le 14/07/2022. Les infos: Celestron C8 (203x2000) + réducteur Meade f6.3 Asi294mc pro + filtre IRcut. monture HEQ5 Rowan autoguidage lunette 70x400, Asi290mm / PHD2 acquisition NINA 76 x120s Gain 120 -10°C Traitement Sirilic, Siril, PS. Une brute de 120s Un peu de géographie: