|
|
|
Composites by Examples
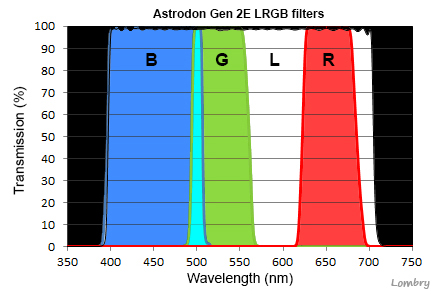
The first color picture ever made was taken in the 19th century by the british physicist James C. Maxwell using tricolor images, long before the invention of color film. In the past, when films were till in use, one used the tricolor technique with the sharpest film available at that time, the famous Technical Pan (but today Kodak withdrawed it due to the expansion of digital cameras), which was more contrasty with a finer grain than any other color film like Kodak PPF or even Fuji Velvia, both famous for their resolution and color saturation. In the shadow of famous pioneers in digital astrophotography like Bill Fletcher or Chris Vaughn, remember some advice to get good color composites. A large part of this technique remains valid with CCD cameras and DSLRs. RGB imaging is the combination of 3 monochrom channels, Red (R), Green (G) and Blue( B) of the same object, using specific colored filters according to the spectral response of the film or CCD/CMOS sensor. In the past we used the Kodak TP 2415, a panchromatic film in conjunction with 3 deep-colored filters to isolate "fundamentals" channels that were recorded separately. These filters were respectively a Kodak 25A or Schott Wratten W25 for the red light, a Kodak 58 or W61 for the green light and a Kodak 47 or W47B for the blue light. All them present a low transmission. Remember the passband of common RGB filters : Blue (B) = 410 - 510 nm, Green (G) = 490 - 595 nm, Red (R) = 605 - 720 nm, IR-blocking = 650 - 1200+ nm and the clear glass is transparent between 350 - 1200 nm. After Kodak and True Technology which products are today withdrawed, new companies provide to amateurs dedicated RGB filters. Nowadays Astrodon, Astronomik, Astro-Shop, Diffraction Limited (formely Cyanogen, the publisher of the famous "MaxIm DL" imaging software), Lumicon, Optolong, and Hutech among other sellers or manufacturers provide such filters. But as we see below, not all filters display the same transmission while all transmit over 90% or even 97% of light depending on models and brands.
But take care and check the spectral transmission curves of these filters and their quality before buying them. Indeed, sometimes in low-cost models an unattended spike appears at some wavelengths; the B-filter from Astro-Shop for example displays a H-alpha transmission ! (it can be useful, but not in this specific case)... The quality of these filters is also varying from one brand to another as their price that can be multiplied by 3 or more from one brand to another. Other factors contribute to the way images are recording. There are the sensor (film, CCD or CMOS) sensitivity and the f/ratio of the scope. If you do not take care of these parameters you will fail in deep-sky astrophotography, no more no less. The f/ratio : The exposure time depends on how "fast" is your scope to take a qualifier that photographers know well. For a similar diameter, a f/1.5 aperture is 28.44 times faster than a f/8 - (8/1.5)2. Here are for example various exposures time according the f/ratio of your scope to record the faintest nebulosities of M45 :
The film sensitivity (conventional photography) : In the past, the second main issue was the film reciprocity failure for long exposures. For a f/8 scope for example the longest color exposition is around 135 minutes in a very dark area. Under a red filter you can extend it to 180 minutes but not longer. Indeed, according to your optical system and the local light pollution, the former TP2415 presented a failure to the reciprocity law for expositions longer than about 180 minutes. Over that time, a slow fog began to densify on the film suppressing the finest details you tediously recorded, what is not exactly the result you are expecting. Today this film is no more available. If you are till using films in astrophotography, this failure for the longest exposures is a limit to find in situ, according to your seeing and optical parameters. You understand that these exposures being very long, they cannot satisfy of a poor tiny tripod sensible to the blow of the wind or unaccurate polar alignment. To prevent disappointment of this nature a sturdy equatorial mount with an accurate guiding system is mandatory. These constraints do not mean that you have to invest in very expensive systems, and you will find browsing this web wonderful color composites taken with relatively small scopes (5 or 8" SCT) but most astrophotographers replaced the original tripod or the equatorial wedge with a heavier and more accurate german mount (e.g. Losmandy). Once the pictures is recorded, the second step is the pre-processing to calibrate and normalise the pictures as explained earlier. It was valid for films and remains with CCDs or DSLRs. This step can by tedious if there are errors to substract before registering the pictures so they can be combined and post-processed. The last step is the stacking itself, aligning with accuracy the 3 independent channels and adding each of them under its colored mask (R, G or B) in respect with the time exposure of the originals. The result is a color (RGB) picture which hue and saturation are much more intense than using an ordinary color film due to the color separation.
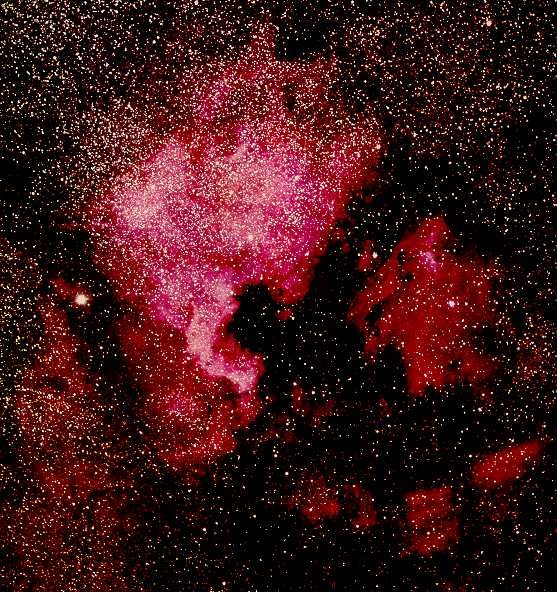
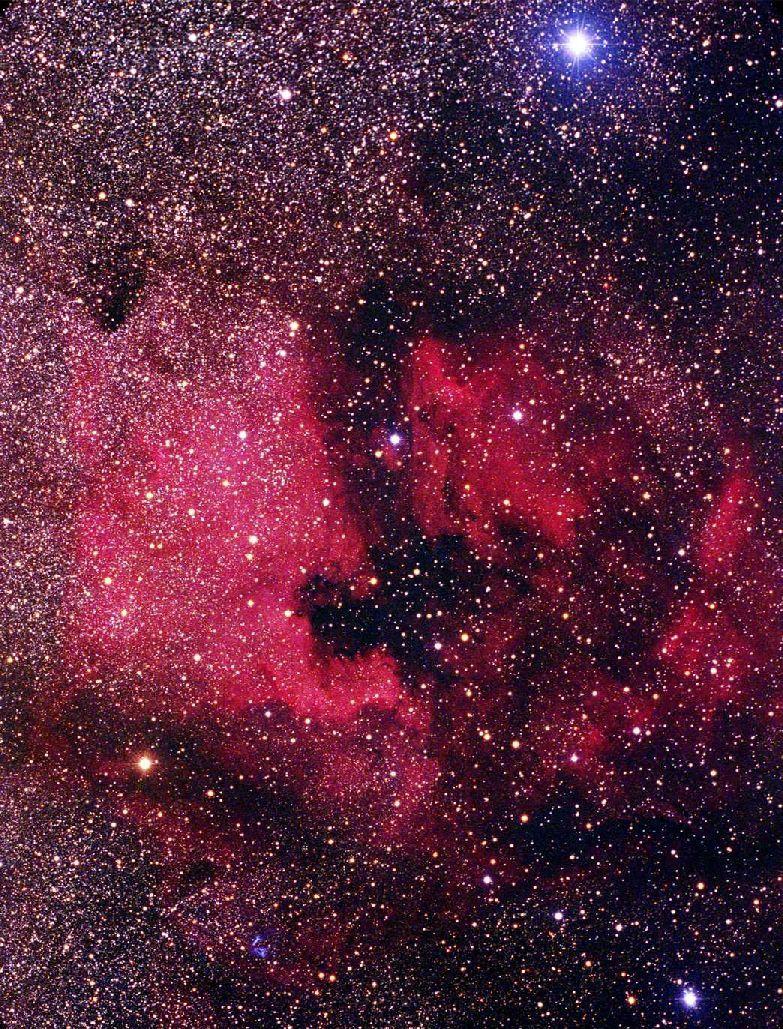
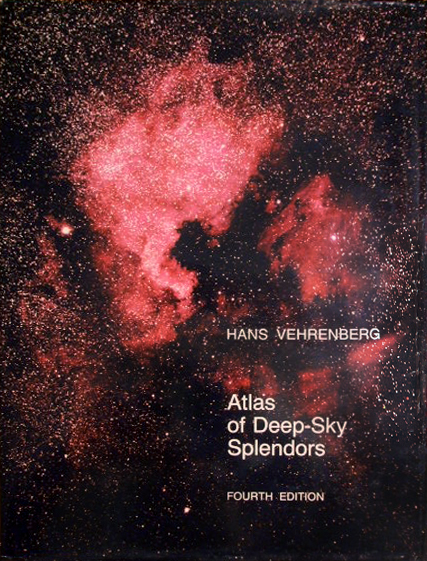
In the past, another way to proceed was like Dr Hans Vehrenberg from Germany did to create the marvelous images published in his famous "Atlas of Deep-Sky Splendors" (Sky Publishing, 4th edition, 1978). The technique required to use the 103a serie of spectroscopic films (not more produced) with Schott Wratten colored filters : - The 103a-0 is only blue sensitive, 200 ISO and uses a W2B (light yellow) filter to cut all UV light - The 103a-G is green and yellow sensitive, 350 ISO and uses a W12 (deep yellow) filter to stop all the blue light - The 103a-E is red sensitive, 400 ISO and uses a W92 (deep red) filter to isolate the red light. As such, emulsions were not hypered at that time and the f/ratio of the scope being quite slow, the exposure time was about 45 minutes to 1 hour on a C14 f/6.3 under each filter. To create the composite, the three monochrom RGB images were respectively printed under W47B, W61 and W25 filters, knowing the exposure time under the red filter is 20% longer than under the other ones. This technique was used until the years 1980's. For comparison purposes, one generation separates the two pictures of North America nebula, NGC 7000 in Cygnus displayed below. Using hypered Kodak PJM-2 color film (400 ISO, replaced by the Kodak Ektapress PJ-400 until 2003 then withdrawed) and a W1A filter (UV), Mike Treacy used a 200 mm f/1.5 Schmidt Camera and only 5 minutes of unguided exposure to get the picture at right ! But remember that the two scopes have not the same light power : the 14" catches 3 times more light than the 8" but is 16 times slower to record the same details, what is in favor of the fast Schmidt Camera. Till today, even using a 100 mm f/6 refractor or a 300 mm astrograph at f/3 equipped with CCD means, skilled amateurs are used to spend more than 1 hour (per channel or for a color image) to record this chaotic nebula in high resolution (see e.g. images recorded by Robert Gendler, Adam Block with Tim Puckett or Richard Beauregard). Knowing this, the picture recorded by Mike Treacy is a true performance but his very fast scope played also a major role in this result. Next chapter |
||||||||||||||||||||||||||||||||||||||||||||||||||||||
|
|
|||||||||||||||||||||||||||||||||||||||||||||||||||||||
