by Christian Buil
The Solar Explorer - October 25, 2023
by Christian Buil
The Solar Explorer - October 25, 2023
Ressources

Contents :
1 - Introduction
2 - To go fast!
3 - What makes Sol’Ex
4 - Optics
4.1 - Slits
4.2 - Lenses
4.3 - Gratings
5 - Mechanics
6 - Accessories
7 - Mechanical accessories for « Sol'Ex discovery »
8 - Softwares
9 - Video channel, discussion lists, forums
Part1: introduction
This page shows you where you can buy the components of the Sol'Ex (in kit form), especially those you can't make yourself (optical components, certain mechanical elements). You'll find STL files for 3D printing of the mechanical structure, as well as solutions for assembling your Sol'Ex even if you don't own a 3D printer, or if you prefer to buy a pre-assembled system kit.
The characteristics of key components are also described.
This is also where you'll find links to forums and discussion lists where you can get further help if you need it, and where you can exchange and publish your results.
Part 2: to go fast!
If you're in a hurry or impatient, remember that Sol'Ex is an observation instrument made up of optical elements, a mechanical structure and a few accessories, such as a low-cost planetary camera for recording images of the Sun.
All optical components are distributed in kit form by Shelyak instruments.

This company can deliver worldwide.
The set of components supplied by Shelyak guarantees optimum operation, but some elements can be purchased independently from other locations. The limits of this exercise are explained below.
The mechanical structure of Sol'Ex, based on 3D printing technology, which offers the qualities of lightness, versatility, performance and low cost, can be ordered as a pre-assembled, well-engineered mechanical kit from Asur3DPrint.
This company can deliver worldwide (although the site is currently in English, you can communicate in English).
Azur3DPrint can supply on request both the very first version of the Sol'Ex kit, known as the "historical" version, or V1, and an updated kit, faithful to the initial concept (many parts are interchangeable), but which brings substantial aesthetic and usage improvements. This is Azur3DPrint's V2 kit, which the author of these lines has validated.
Other companies are free to propose their own version of the Sol'Ex kit (provided they specify the original source) and, of course, you can always print the historic Sol'Ex version yourself, whose STL files are publicly available (see below) - which is also a great experience and the very essence of the Sol'Ex project.
In terms of additional accessories, we're talking about a current focusing system and a CMOS camera (we'll go into more detail later on about the type of model preferred). These are all available from your favorite astronomy retailer.
You'll also need software to read the camera and another to process the data. In both cases, you'll find free, high-performance solutions (including Valérie Desnoux's INTI software for automated processing of your observations).
Part 3: What makes Sol'Ex
To set up a Sol'Ex and use it properly, you need to know what it's made of. We recommend that you read on. The system comprises four units:
1. A small number of optical components (2 lenses, a diffraction grating, a narrow slit). To help you, and if you wish, these optical components are available in kit form from Shelyak Instruments, a partner in the Sol'Ex project.
2. A set of 3D-printable parts, which you can make yourself, with the help of friends or using a service provider. The STL files required for printing are given below. Azur3DPrint, a partner in the Sol'Ex project, can supply all the pre-printed and pre-assembled parts of the mechanical structure (the mechanical inserts, for example, are already assembled). The appearance is that of a mechanical kit.
3. A set of "accessory" components that are important for the operation of Sol'Ex. This includes an electronic camera, preferably a model designed for small-format planetary observation. In addition, you'll need to add a helical-type focusing device, the reference for which is given below. Finally, you'll need to attenuate the solar flux using a highly absorbent filter or a Herschel helioscope. You'll also need an instrument for solar observation, usually a small telescope, but we'll see that more modest equipment can be used. Depending on the equipment you already have, you'll need to consider these additional purchases to finalize your Sol'Ex.
4. Software that acquires the data at the time of observation, e.g. SharpCap, FireCapture, free of charge, and software that processes the data to produce the image of the solar disk at the desired wavelength, such as Valérie Desnoux's INTI software, also free of charge.
Part4 : Optic
As explained in the "Theory" section of this documentation, the Sol'Ex instrument requires four elements to operate:
⁃ A narrow slit onto which a sharp image of the Sun is projected using your telescope. The function of this slit is twofold: (1) to isolate a slice of the Sun, the width of which defines the angular resolution of your instrument, i.e. the fineness of details perceived on the disk (in arc seconds, for example), (2) to isolate a slice of the light spectrum, i.e. the fineness of details perceived in this spectrum (in wavelength units, such as the nanometer or angstrom), acting as a more or less narrow spectral filter.
⁃ A collimating lens, whose function is to make the rays coming from a given point in the narrow entrance slit parallel. This parallelism is essential for obtaining a correct spectral image of the Sun and determines the appropriate use of the grating by diffraction.
⁃ The diffraction grating, which in the manner of a glass prism, achieves angular dispersion of the spectrum (the angles of the rays are associated with the wavelengths at the grating's output).
⁃ An objective lens that forms a sharp image of the spectrum in the plane of an electronic detector (your camera), i.e. a sharp image of the input slit, but spread out in wavelength (the spectrum is made up of a succession of monochromatic images of the slit).
The view opposite shows these four elements. All these components are available as a kit from Shelyak Instruments.
4.1 - Slit
The slit takes the form of a thin sheet of glass, one side of which is coated with a layer of chromium in which the shape of the slit itself is drawn, using a photolithography technique. The slot is 10 microns wide and 4.5 mm high. This choice results from the search for optimum spatial and spectral resolution (with a width of 10 microns) and consideration of the instrumental field (with a height of 4.5 mm).
The slit is supplied glued into a metal part at an angle of 30° to the average direction of arrival of the rays coming from your telescope. This slit can be used both for solar imaging, as in the case of Sol'Ex, and for imaging the spectrum of stars and galaxies (see the "Stars" section of the documentation). The latter function requires the image of the object whose spectrum is being imaged to be viewed via a pointing/guiding device, which explains the origin of the 30° angle (which does not affect solar observation).
The slit is an optical component, and therefore fragile, especially the face at the bottom of the circular hole in the metal part. While the opposite flat face can be easily cleaned with absorbent cotton (never with cleaning paper, a scouring calamity), it is imperative to avoid any contact with the protected face at the bottom of its housing, as well as leaving it exposed unprotected for long periods, as dust particles can accumulate on its surface, which would be difficult, if not impossible, to remove.
The slot supplied by Shelyak is of very high quality, which contributes greatly to the Sol'Ex's ease of use and performance: just imagine that it's only 10 microns wide, and straightness defects are 20 to 50 times smaller, unless dust has accidentally settled in its narrow opening.
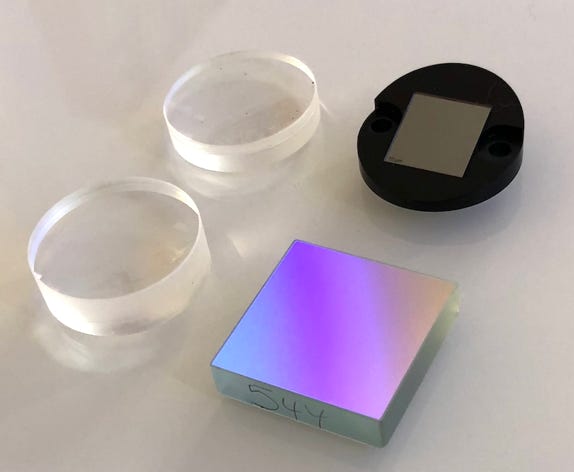
4.2 - Lenses
The lenses are achromatic doublets with anti-reflective MgF2 coating on their outer surfaces, specially designed and manufactured for Sol'Ex (and Star'Ex).
The collimator lens has a focal length of 80 mm and a diameter of around 25 mm. This lens is common to all configurations, whether you're doing solar observation (Sol'Ex) or spectral sky observation (Star'Ex). This rationalizes both investment and configuration (once this lens has been mounted and adjusted, you don't normally need to touch it, regardless of whether you're using Sol'Ex or Star'Ex). This choice is deliberate, to simplify the use of your device and enhance the value of your investment.
On the other hand, the characteristics of the objective lens depend on its intended use. It's not necessarily the same lens for solar and stellar observation, nor the same lens for spectrography in the visible or infrared part of the spectrum. These differences explain the different versions of optical kits offered by the Shelyak company.
For Sol'Ex, things are simplified, as there's only one choice to make. The focal length of this objective lens is 125 mm, with a diameter of around 25 mm. This choice is justified by spectrum sampling considerations (see the "Theory" section of the documentation).
A question that often comes up is: is it possible to obtain these lenses from suppliers other than Shelyak? Indeed, in the catalogs of optical component suppliers such as Edmund Optics or ThorLabs, we find components with quite similar geometric characteristics. Certain reasons of convenience and cost may lead us to ask this question.
The answer depends on an analysis of the optical performance obtained with the chosen component. In optics, it's not enough to choose a vaguely equivalent optical component to obtain a similar result. It's the result of optimization work, which makes it possible to achieve good quality and overall consistency (with compromises, for example).
The situation is different for Sol'Ex and Star'Ex. First, let's analyze the situation for Sol'Ex.
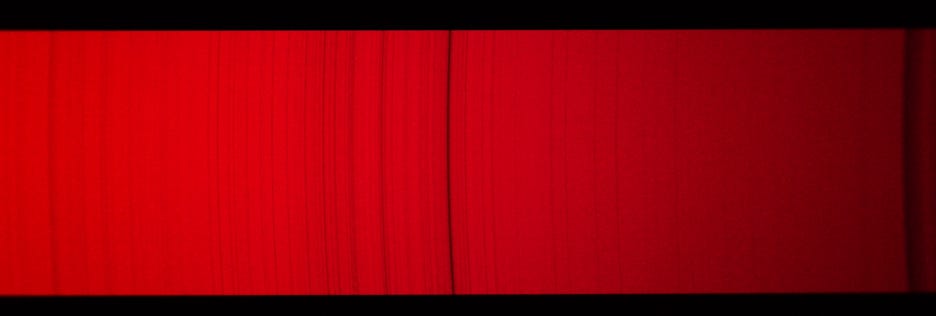
The figure below shows an image of the concentration of light rays emanating from two points of the slit in the plane of the detector (a "spot-diagram") for Sol'Ex and at a wavelength of 6563 Å (the Halpha line). Two points in the field are considered, a field angle of 0° (the center of the solar disk) and a field angle of 0.26° (the edge of the solar disk). It is assumed that the observation is carried out using Sol'Ex with an astronomical telescope of 72 mm diameter and 420 mm focal length (typically SkyWatcher's EVOSTAR 72ED model). In this optical simulation, the telescope is assumed to be optically perfect.
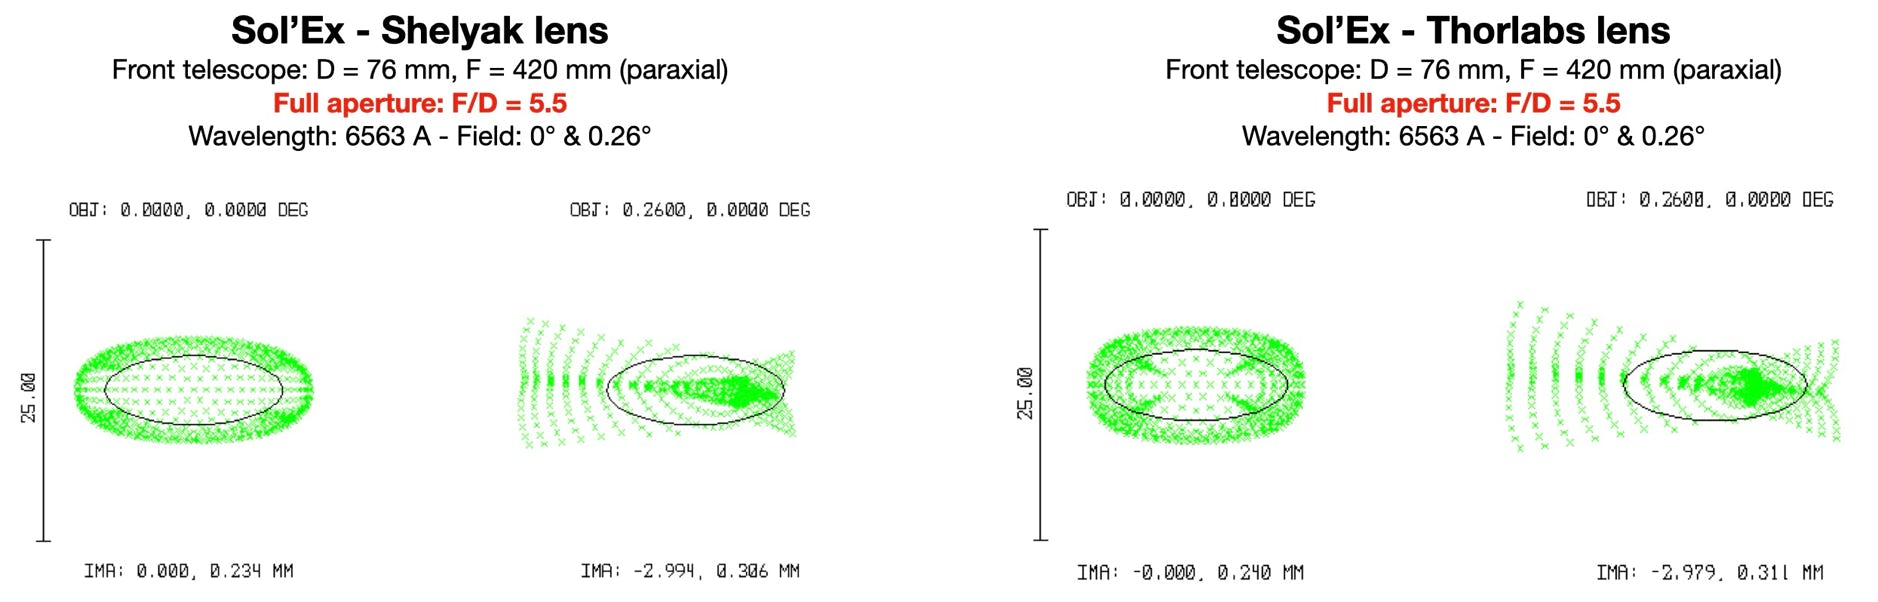
The vertical bar indicates the scale (25 microns long). The oval represents the diffraction spot contour for the wavelength in question. On the left, you can see the quality of the image produced by Shelyak's optical elements, while on the right, you can see the quality of the image obtained with the geometrically similar components available in ThorLabs' catalog.
The part numbers of the ThorLabs replacement components considered are AC254-080-A for the collimator and AC254-125-A for the objective.
What conclusions can we draw from this analysis? There is virtually no difference between the Shelyak solution (calculated by the author of these lines) and the ThorLabs solution. From a purely technical point of view, the two solutions can be considered equivalent. Of course, in the balance between supply and cost issues, although this is beyond the scope of the present discussion. On the other hand, we mustn't overlook the overall coherence, as we shall now see.
Let's not forget that the Sol'Ex project is a coherent, sustainable and flexible project. The Sol'Ex optics have been calculated by the author with an eye also to the Sol'Ex extension, which is Star'Ex, an aspect deemed very important. There is thus a strong continuity and link between these applications based on a common foundation, making it easy to switch from one to the other and learn from the experiences of both sides. This is the very essence of the project as intended by its initiator.
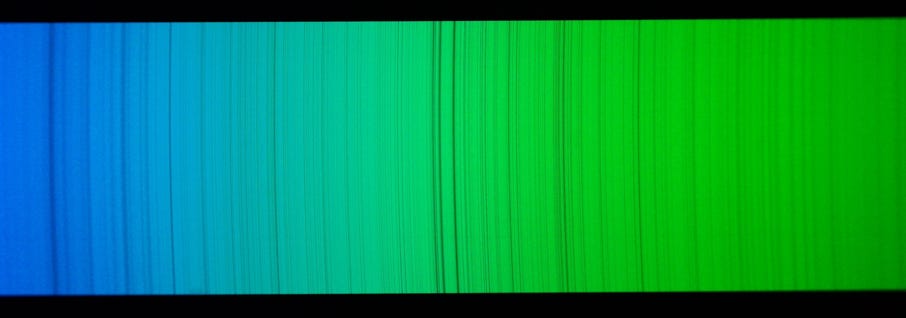
Let's now carry out the same performance comparison for Star'Ex in its "low-resolution" version (capturing the entire visible spectrum at once):
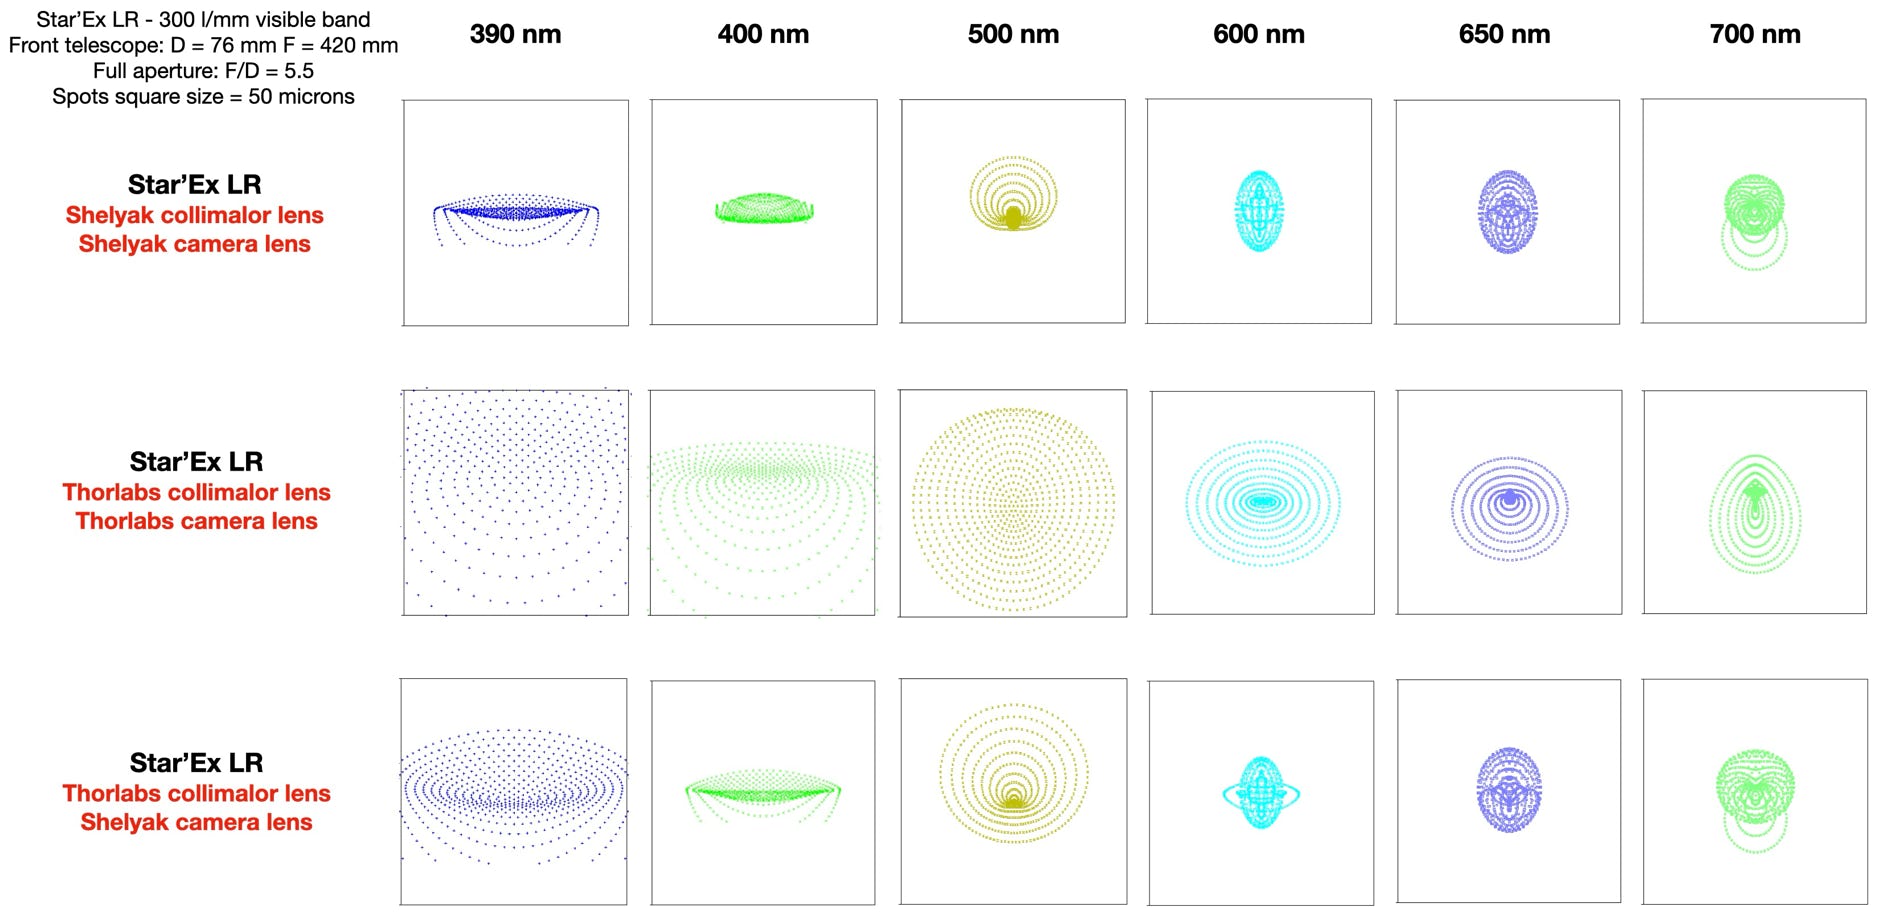
The image spots are calculated for several wavelengths ranging from 390 nm (ultraviolet) to 700 nm (deep red). The camera is opened to f/5.5 and assumed to be optically perfect, so only Star'Ex's own performance is analyzed here.
For the Shelyak configuration, these are the elements offered by this company in the "Star'Ex low-resolution" kit. As mentioned above, the collimator lens is the same as for Sol'Ex. However, the objective lens differs. It has a focal length of 80 mm and has been specially optimized for the application by the author.
For a ThorLabs configuration, there are two possibilities: use only ThorLabs lenses (2 AC254-080-A lenses) or mix and match with a Shelyak 80 mm collimator and a Thorlabs 80 mm camera lens.
In all situations, the Shelyak kit proves superior, and sometimes very clearly so, especially in the ultraviolet. Even the mixed solution proved superior to the Shelyak version. This last point shows that the development of the Sol'Ex/Star'Ex optics by the author is the result of a global approach (which technically requires a certain amount of thought and projection). It shows that the optimization of the Sol'Ex/Star'Ex collimator has been the subject of particular care, which is not necessarily apparent when we focus solely on the Sol'Ex case.
To sum up and fully answer the question, while the purely Sol'Ex application clearly gives you a choice when it comes to sourcing lenses, you need to analyze the overall coherence if you want your investment to be used for numerous applications, to move from one to the other (for example, it's very easy to transform a Sol'Ex into a Lab'Ex to measure the optical transmission of the filters in your possession yourself, but to ensure performance, you need to choose optics that can live together, in this case the Shelyak kits).
Image spots are calculated for several wavelengths, from 390 nm (ultraviolet) to 700 nm (deep red). The imaging instrument is opened to f/5.5 and assumed to be optically perfect, allowing us to analyze only the intrinsic performance of Star'Ex.
In the Shelyak configuration, these are the elements included in the "Star'Ex low resolution" kit offered by this company. As previously mentioned, the collimator lens is the same as for Sol'Ex. However, the objective lens differs. It has a focal length of 80 mm and has been specially optimized for this application by the author.
For the ThorLabs configuration, two situations present themselves: exclusive use of this company's lenses (2 AC254-080-A lenses) or a combination with an 80 mm collimator from Shelyak and an 80 mm camera lens from Thorlabs.
In all situations, the Shelyak kit proves superior, sometimes very significantly so, especially in the ultraviolet. Even the mixed solution was inferior to the Shelyak version. This shows that the author's optimization of Sol'Ex/Star'Ex optics is the result of a global approach. For example, the Sol'Ex/Star'Ex collimator has been optimized with particular care for the entire project, which is not immediately apparent when looking at the Sol'Ex alone. The same uniformity of performance is impossible with lenses taken from the shelves of a component supplier.
In short, to fully answer the question, while the purely Sol'Ex system offers flexible sourcing choices for lenses, it's essential to analyze overall consistency if you want your investment to serve many applications and over time, switching easily from one to another. For example, it's easy to convert a Sol'Ex into a Lab'Ex to measure the optical transmission of the filters you own, but to guarantee optimum performance, it's better to choose lenses designed to work together, as is the case with Shelyak kits.
4.3 - Grating
The diffraction grating used in Sol'Ex is a 25 mm x 25 mm component, 6 mm thick. It is engraved using a holographic technique, with a density of 2400 lines/mm.
It's essential to note that the engraved face of this grating is extremely fragile, and must never be touched or rubbed, even with a very soft brush, even if you're wearing gloves. But don't panic. The method for handling the grating is detailed in the video "Sol'Ex assembly in 30 minutes", which we remind you is a must-see.
Please note that the grating is engraved on a square surface, so you need to be aware of the orientation of the component, and how to recognize the plane of spectral dispersion (see video). In addition, the engraved side (which is the shiniest and covered with a thin layer of aluminum) must be clearly marked, and mounted outwards in relation to the component's 3D support. This information is also explained in the video "Sol'Ex assembly and adjustment in 30 minutes", mentioned at the top of this page.
The Thorlabs GH25-24V grating is fully equivalent to the grating included in Shelyak's Sol'Ex optical kit.
Part 5: Mechanics
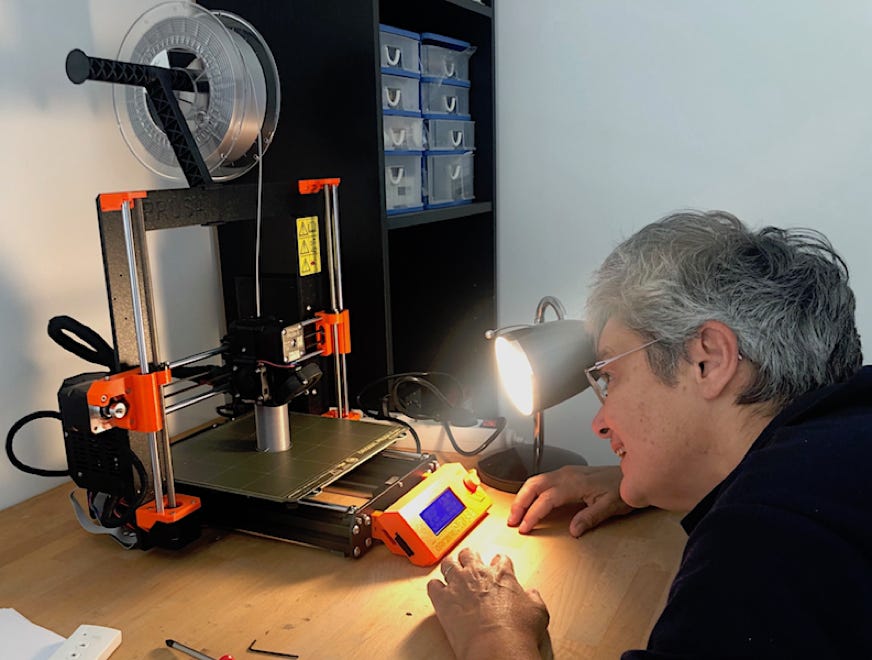
The mechanical design of Sol'Ex is based essentially on 3D printing.
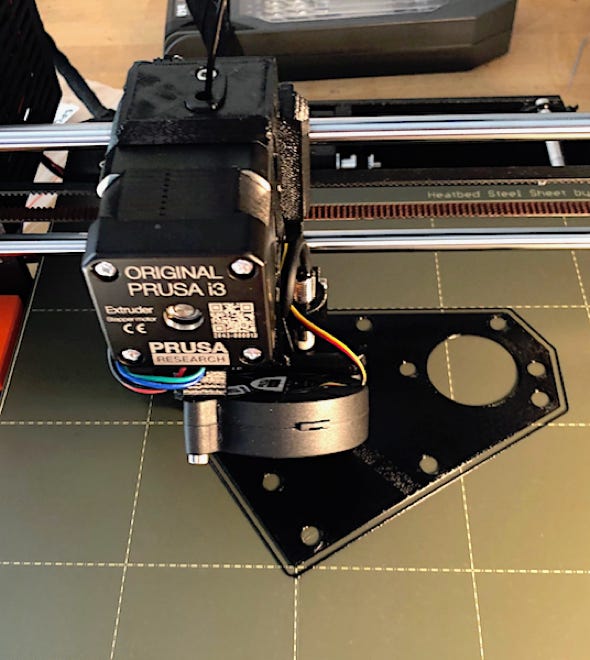
The CAD for the original version was produced using OpenScad software, ensuring that the number of parts was limited and easy to print. The prototypes were produced using a PRUSA I3 MK3S+ printer.
:The selected printing filament is black PETG. It's essential to stick with this choice, as this material is easy to use and resists heat well. It's important to note that the black color is crucial to reduce unwanted internal reflections. What's more, most wires of this type are opaque to light, including near-infrared light. We recommend the use of quality black PETG, for example from brands such as REAL or SUNLU. However, some non-critical parts can be printed in full color to make the overall look more attractive, such as the grating holder.
Some users have printed Sol'Ex with carbon-filled PETG to improve overall rigidity. This initiative is commendable, but it's important to note that it requires the use of a special nozzle that won't degrade due to carbon abrasion. What's more, the gain in stability over standard PETG is quite minimal once the instrument is properly operated, without prolonged exposure to the sun's rays.
Most parts are made with 15 or 20% "gyroid" filling, 0.2 mm accuracy and 2 layers for the walls, which is adequate. However, there are a few exceptions:
- Collimator and camera tubes are recommended to be printed with 3 layers.
- Threaded parts should be printed locally to an accuracy of 0.15 mm. You can use a PRUSA slicer option to adjust the print fineness, in this case limited to the threaded part of the lens tube, as shown in green in the figure opposite.
The following image shows the components in stylized form.


All the STL files for the original Sol'Ex version (V1 historical) are grouped together in a ZIP archive, along with their nomenclature numbers. You can download all these files at once by clicking here: stl_solex_v2.

Of course, you can also modify parts or add color. This flexibility is offered by the choice of 3D printing for the project. For example, here's Xavier Dupond's vernier, which makes it easier to locate spectral lines. The corresponding STL files can be downloaded here: https://github.com/DupontXavier/Accessoire-SolEx-Vernier. You can also download the wavelength marker drawing by clicking here.
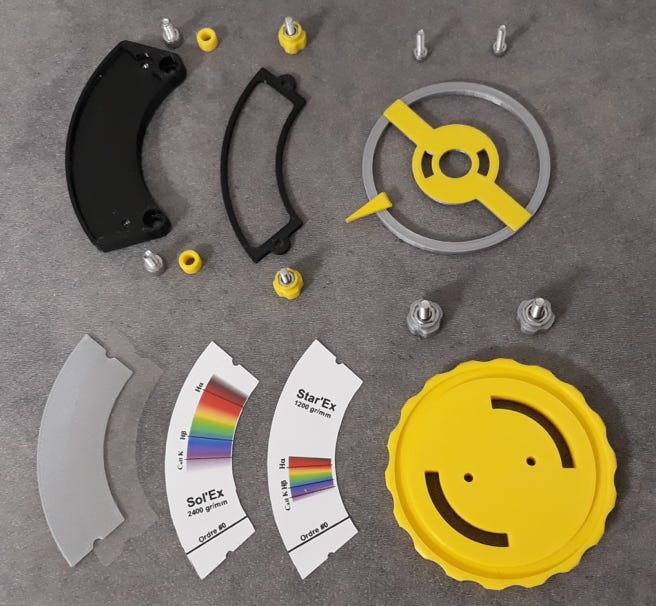

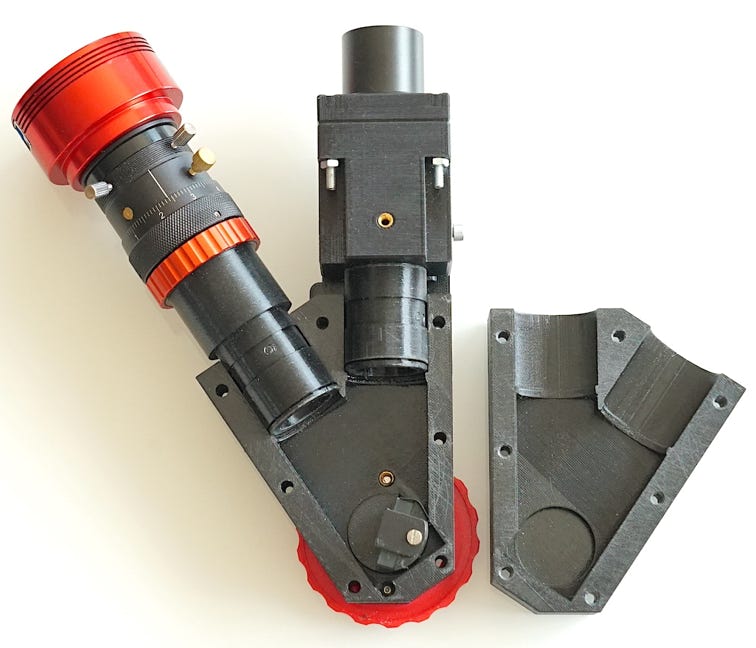
Above, the basic elements of Sol'Ex, right, a view of Sol'Ex once assembled in its basic version, known as "V1".
If you can't print Sol'Ex yourself, or if you'd rather avoid this step for lack of time or motivation, don't worry. You can purchase all the parts in the form of a kit from Azur3DPrint. This kit features a new design by Vincent Duchène, which remains faithful to the original Sol'Ex layout while improving ergonomics and, perhaps most importantly, increasing ease of adjustment. The Azur3DPrint version of Sol'Ex, known as "version 2", comes with all inserts already mounted and pre-assembled.
This mechanical kit is an excellent choice for those who don't wish to print the parts themselves, or who wish to benefit from a fine finish among the best in 3D printing. See the "Resources" section of this documentation.

In the image above, you can see a Sol'Ex based on an Azur3D print mounted at the focus of an Askar FRA300 refractor.
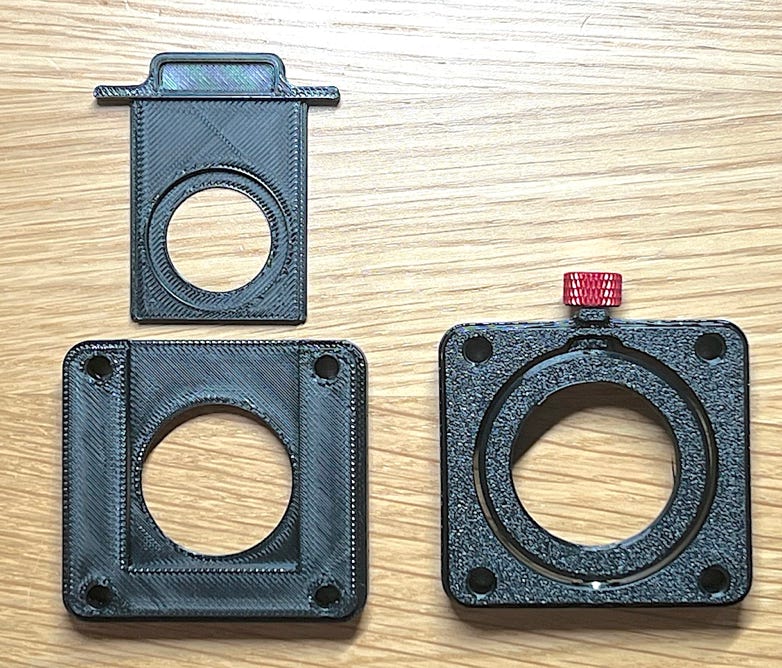
Azur3DPrint can also supply a range of Sol'Ex-specific accessories, such as filter holders for observing the sun's magnetic field or corona, and a Kodak pitch attachment for easy use in Sunscan mode (see part 1 of this page).
Part 6: Accessories
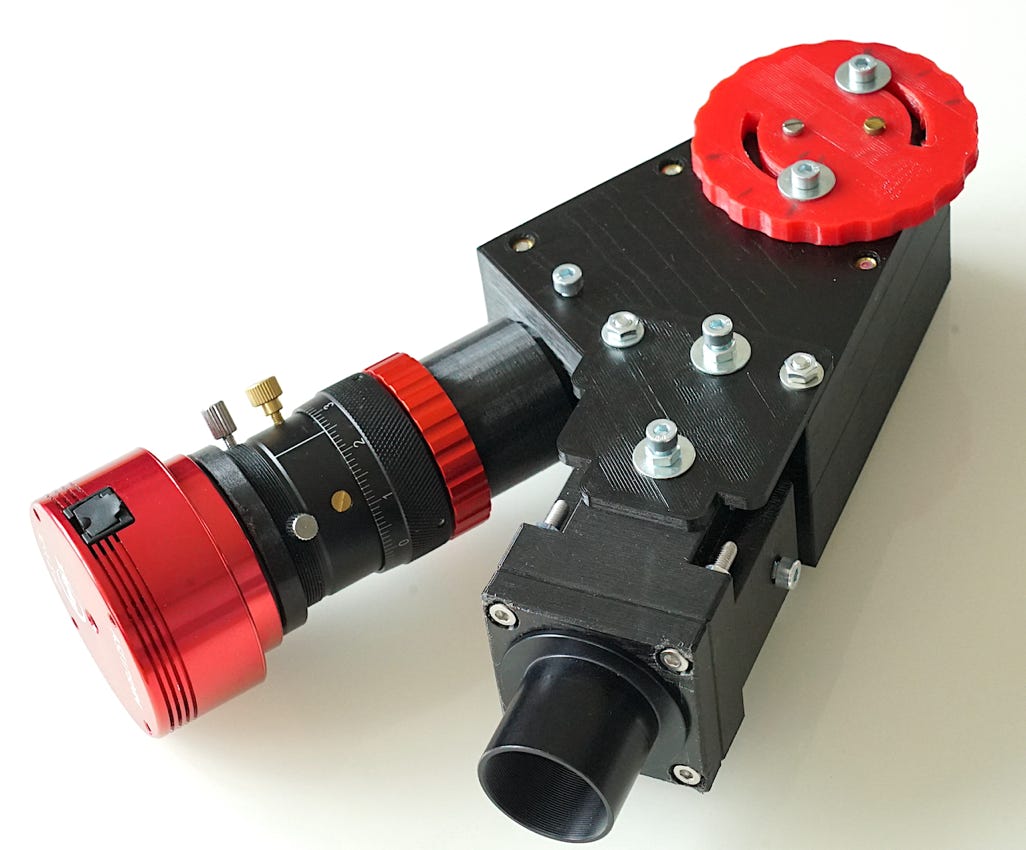
In addition to the 3D-printed and optical elements described above, the Sol'Ex's use is greatly facilitated by the addition of a precise helical focusing device for the camera. There are several brands to choose from, but please note that the Sol'Ex quotation is based on the ZWO model, a photograph of which is shown opposite. For this reason, and in view of its quality, this product is highly recommended. Note that the SVBony helical focusing system is also compatible.
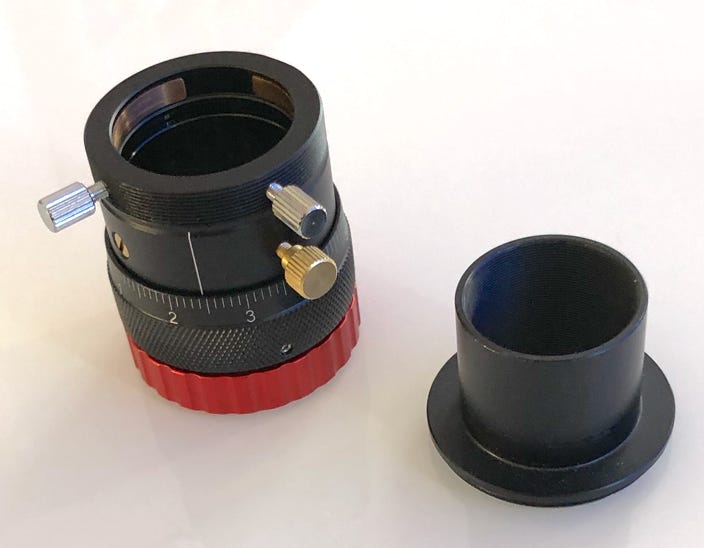
The photograph below shows the overall appearance of the Sol'Ex "Version 1" equipped with the ZWO helical focusing device for the camera.
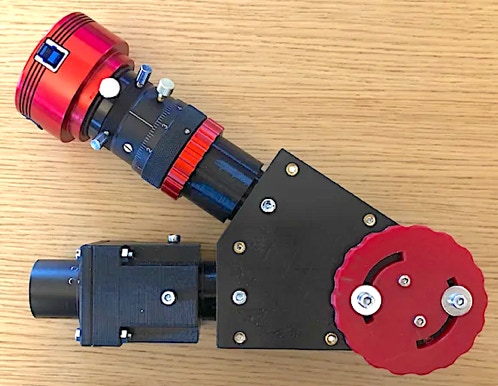
An essential accessory: the camera. You may already have a satisfactory model if you're into planetary imaging, for example, but if not, you'll need to invest to complete your Sol'Ex.
When choosing a camera, it's best to select one with a small-format black and white CMOS sensor. The range is varied, and it's easy to get lost among the available options. However, models equipped with a Sony IMX178MM sensor are well suited to Sol'Ex and are popular with users. For example, you can opt for the ASI178MM camera from ZWO or the QHY-5III-178mono from QHYCCD.
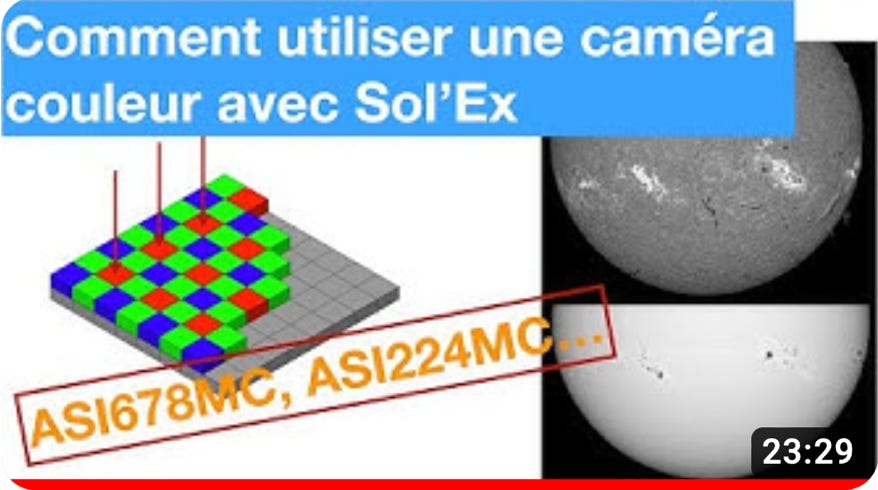
If you own a camera with a color sensor, you can use it with Sol'Ex by making a few arrangements. You can use it, for example, to familiarize yourself with the instrument, without necessarily spending extra money. To find out more about using color cameras with Sol'Ex, watch this film:
The choice of camera model can also be influenced by the desire to capture the complete image of the solar disk in a single pass (a single "scan"), without truncation. The alternative is to reconstruct the complete image of the solar disk a posteriori using a stitching technique, although this method can be tedious. However, it does offer the advantage of providing more detailed images of the solar disk, as the focal length of the telescope can be increased.
To capture the entire solar disk in a single shot, the focal length of the telescope to be used depends on the size of the sensor or the length of the slit (4.5 mm). Given the orientation of the sensor with respect to the solar spectrum in order to maximize image readout speed, it's the size of the long side of the detector that should be considered, which is of course advantageous.
However, even with a large detector, the maximum focal length beyond which the solar disk can no longer be fully captured is determined by the limited size of the Sol'Ex entrance slit height, which in this case is 4.5 mm. This dimension defines the maximum observable field (remember that the solar disk is viewed at an angle of around 0.5 degrees). For further details, please consult the "Theory" section of this documentation.
Here are a few situations with common cameras and the maximum telescope focal lengths involved.
The example of an ASI178MM camera
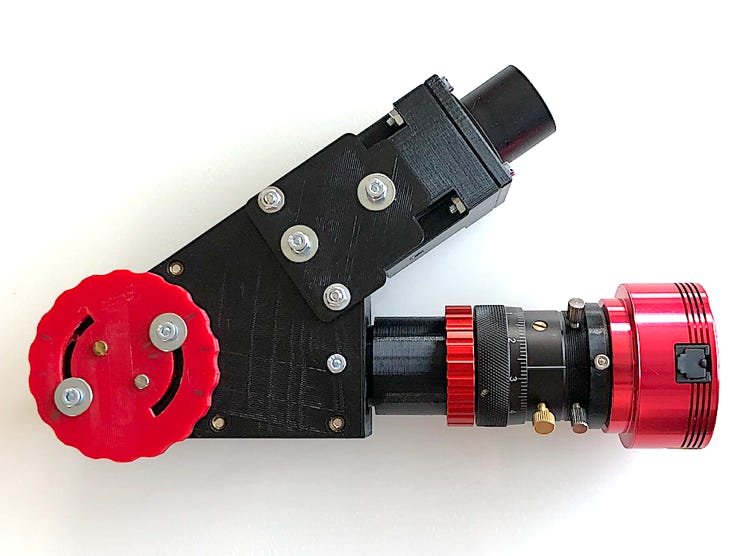
Image size: 3896 pixels x 2080 pixels - Pixel size: 2.4 microns
Spectral sampling (blnning 1x1): 0.0626 A/pixel
Maximum telescope focal length to observe the entire solar disk in one pass: 480 mm (limited by slit width).
The example of an ASI290 Mini or ASI462MM
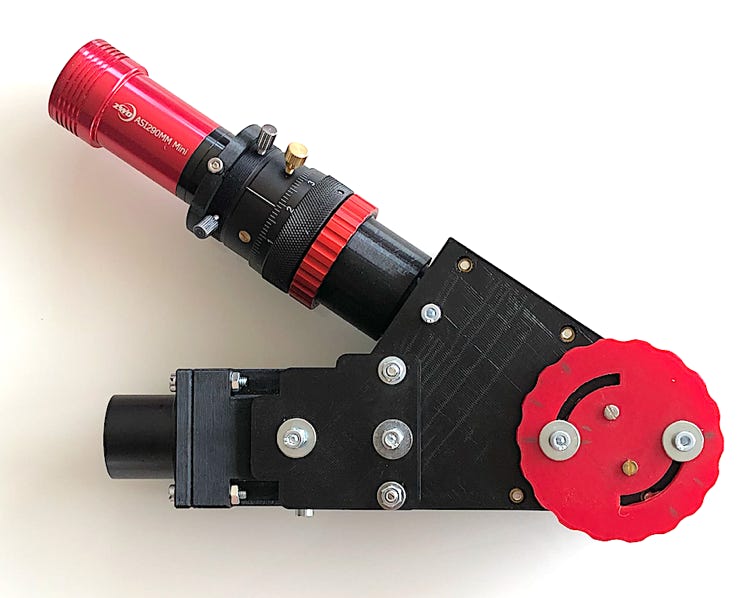
Image size: 1936 pixels x 1096 pixels - Pixel size: 2.9 microns
Spectral sampling (blnning 1x1): 0.0756 A/pixel
Maximum telescope focal length to observe the entire solar disk in one pass: 380 mm (limited by sensor width).
Note: the use of miniature stick cameras may require 3D machining of an extension tube to focus the spectrum. Here's the STL file for such an extended tube (the thread is M28.5 x 0.5): tube_allonge_m28.stl.

The example of an ASI174 mini camera
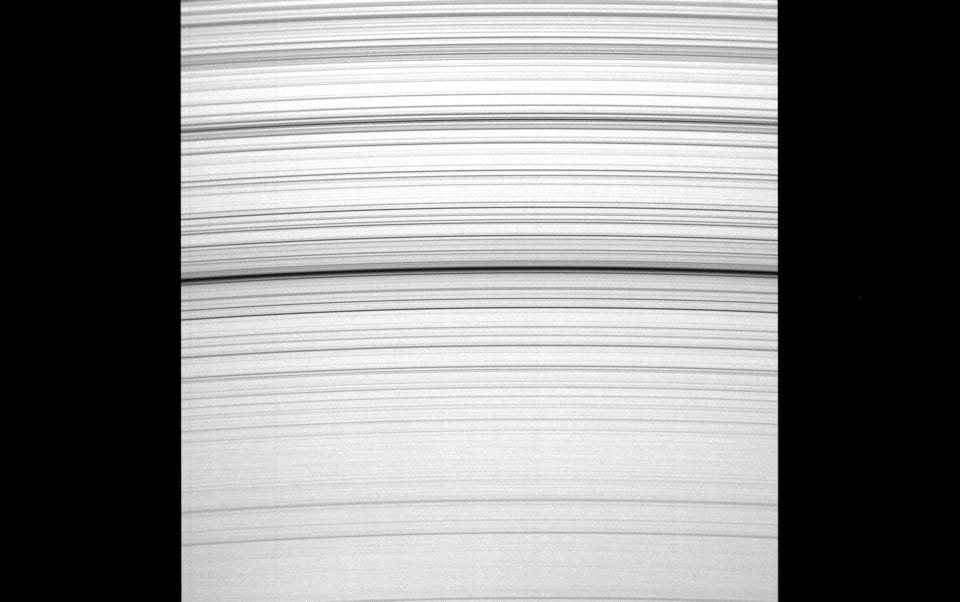
Image size: 1936 pixels x 1216 pixels - Pixel size: 5.86 microns
Spectral sampling (in 1x1 blnning): 0.1450 A/pixel
Maximum telescope focal length to observe the entire solar disk in one pass: 480 mm (limited by sensor width).
The example of an ASI183MM Pro camera
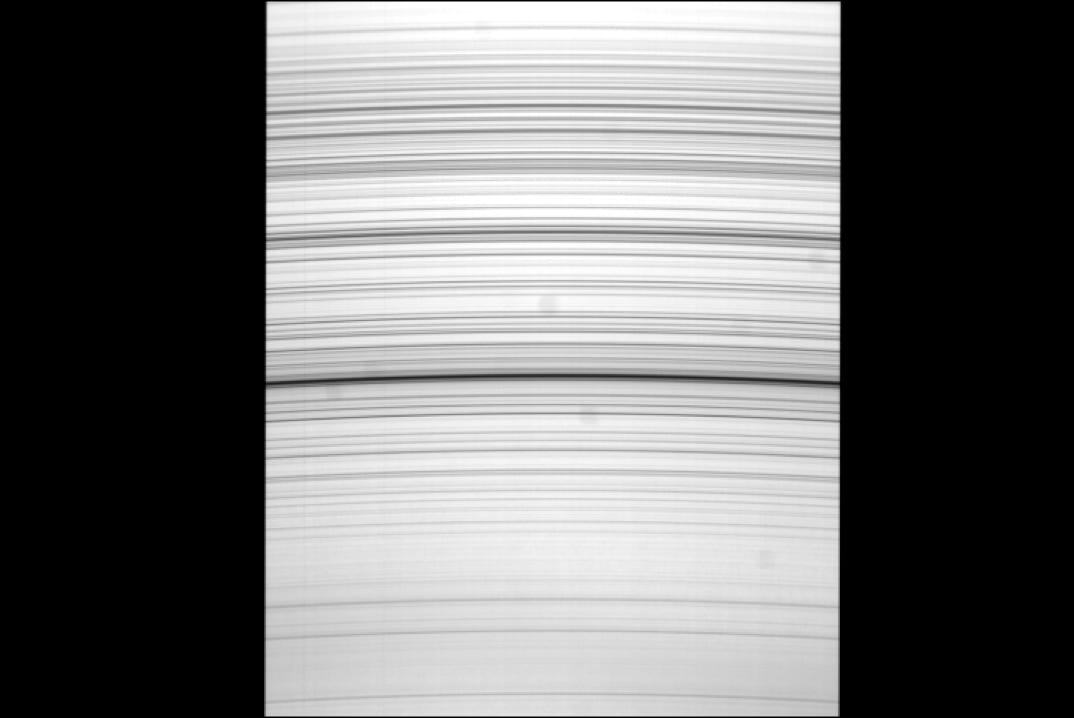
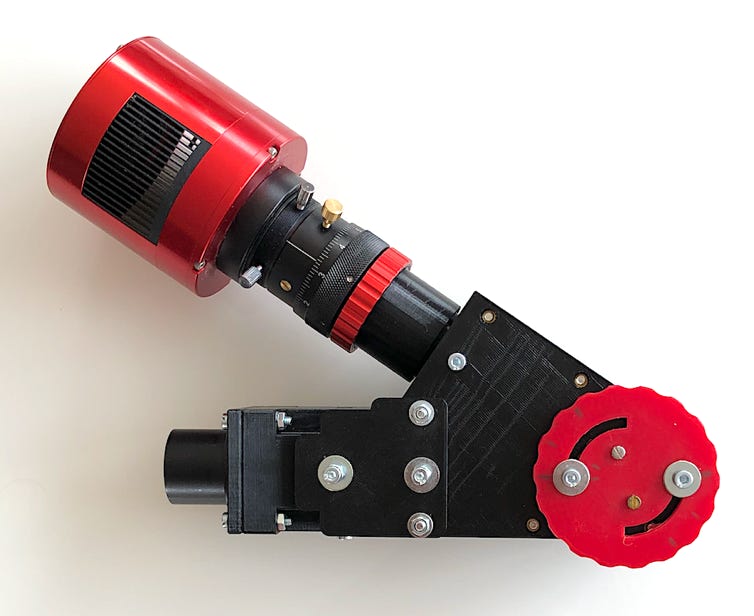
Image size: 5496 pixels x 3672 pixels - Pixel size: 2.4 microns
Spectral sampling (in 1x1 blnning): 0.0626 A/pixel
Maximum telescope focal length to observe the entire solar disk in one pass: 480 mm (limited by the slit width).
Finally, we'd like to mention the possibility of using a camera with Sol'Ex. Not a priori to acquire successive views enabling reconstruction of the solar disk, but for its undeniable interest in teaching spectrography to a less informed public (color image of the spectrum, display on a large screen via an HDMI socket, familiar and autonomous device...). Let's take the Sony A7s APN as an example (a T2 adapter to Sony NEX type "E" mount is required). In this case, with the "V1 mechanical version" of Sol'Ex, the historic Sol'Ex, a special lens tube has to be made. Click here for the corresponding STL file: kit_APN. With the "Azur3DPrint V2 mechanical version", the necessary interface is already included in the kit supplied.

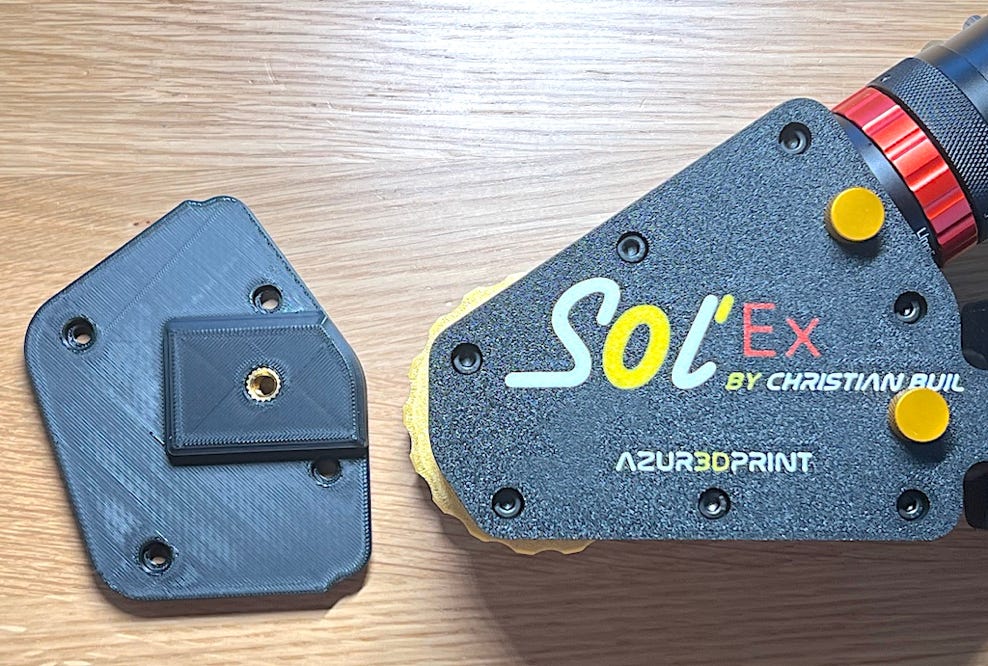
Part 7: Mechanical complement for ‘Sol'Ex discovery’
Attach Sol'Ex to a photo stand, carry it in one hand and place it in front of your house or on the balcony. In just a few minutes, you'll be able to observe solar flares and protuberances, fulfilling the promise of "Sol'Ex Découverte". You can view demonstration videos in section 2 of this page.
In the option presented here (although other choices are possible), the equipment used at the front of Sol'Ex is a widely used telescope finder tube (SkyWatcher or Kepler 50 mm). This affordable tube offers quality optics and a simple, effective focusing system.
Click here to download the mechanical parts (4 pieces) to be 3D printed for working in "Sunscan" mode in no time.

At the time of writing, the Sol'Ex photo mount is only available for the V2 version of the mechanical kit designed by Azur3DPrint and from this company. You are of course free to design your own equivalent interface for both the V1 kit (historical) and the V2 kit (Azur3DPrint).
Part 8: Softwares
While Sol'Ex is made up of hardware components such as printed parts and lenses, it should not be forgotten that the software completes the package. As a result, the raw data collected by Sol'Ex are far from being presentable solar images. A great deal of digital processing is required.
The project simply wouldn't exist without software capable of performing complex operations automatically, without the need for user intervention. This is where the INTI software, developed by Valérie Desnoux, comes in, and we'll talk more about it in the "Observation" page.
For acquisitions, well-known software for capturing fast data streams, such as SharpCap, FireCapture and ASIcap, do the job very well.
Part 9: Video channels, discussion lists, forums
A large part of the author's YouTube channel, Astro-Spectro, is dedicated to the Sol'Ex/Star'Ex project, with a large number of videos available on technique, tips, observation and results. Don't hesitate to visit it and subscribe, as it's updated regularly!

And don't hesitate to join the Sol'Ex group on Facebook, with hundreds of participants:

A must, the Sol'Ex groups.io discussion list (speak French and English) where you can ask all your questions, open to beginners and experienced observers alike. If you're looking for tips and tricks to share, this is the place. It's an absolute must if you want to know everything about the project:
Sol'Ex users very often publish their results on the excellent forum Astrosurf forum, here again do not hesitate to register (Astrosurf also hosts this site, many thanks to the Astrosurf team and especially Jean-Philippe Cazard who does a wonderful job):

Copyright (C) 2020-2023 Christian Buil
Web : www.astrosurf.com/buil