|
|
|
Infrared and ultraviolet photography
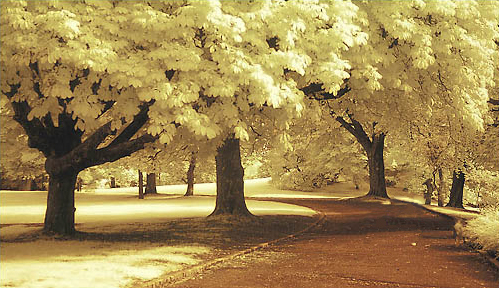
Beyond the visible spectrum (I) Manufacturers of cameras (it includes DSLR's, bridges, compacts and videocams) do not much publicity about the spectral sensitivity of their sensors, considering that all photographers work in the visible spectrum from 400 to about 650 nm. The reason is simple. Lenses are specially designed from glasses offering a high and low dispersion to transmit a maximum of light in the visible spectrum and focus all wavelengths at the same focal point. If the optical system lack of quality or is not protected one notes a loss of contrast (about 4% per air-glass surface) and nice chromatic aberrations around bright objects. Astronomers particulary well know that issue when using achromatic refractors. Sensitivity to infrared In fact all photosensitive sensors based on silicium are "naturally" sensitive to a much wider radiation spectrum that extents between about 200 nm and 1200 nm as explains this document from Olympus. The extension of the CCD' sensors spectral sensibility is similar to the one of CMOS's or Foveon's but can vary from one manufacturer to another (among other factors, it depends on microlenses, Bayer matrix, etc). The Panasonic GH1 (CMOS) for example appears to be more sensitive to IR (and UV) than the Nikon D200 (CCD). If cameras recorded all the spectrum to which their sensor is sensitive, not only colors would be false, but although the quality of optics images would be somewhat blurry and in some conditions would display uneasthetic reflections. To limit the sensitivity of cameras to sole visible spectrum, all manufacturers placed in front of their sensor a low-pass filter, also named IR blocking, hot mirror or IR Cut Filter, aka ICF (see that video from Canon on YouTube). This filter is a dielectric mirror, in fact a dichroic filter transparent to the light but blocking the transmission of any radiation over 720 or 750 nm depending on manufacturers. It is also an easy way to reduce at low cost the chromatic aberration at the ends of the visible spectrum. In addition, this filtering system includes an anti-aliasing and anti-dust system. However, near-infrared photography precisely uses these wavelengths, and specially between 590 nm and ~1000 nm. For the ease of writing, in this document, except other mention, when we will deal of "IR" understand the "near IR" window.
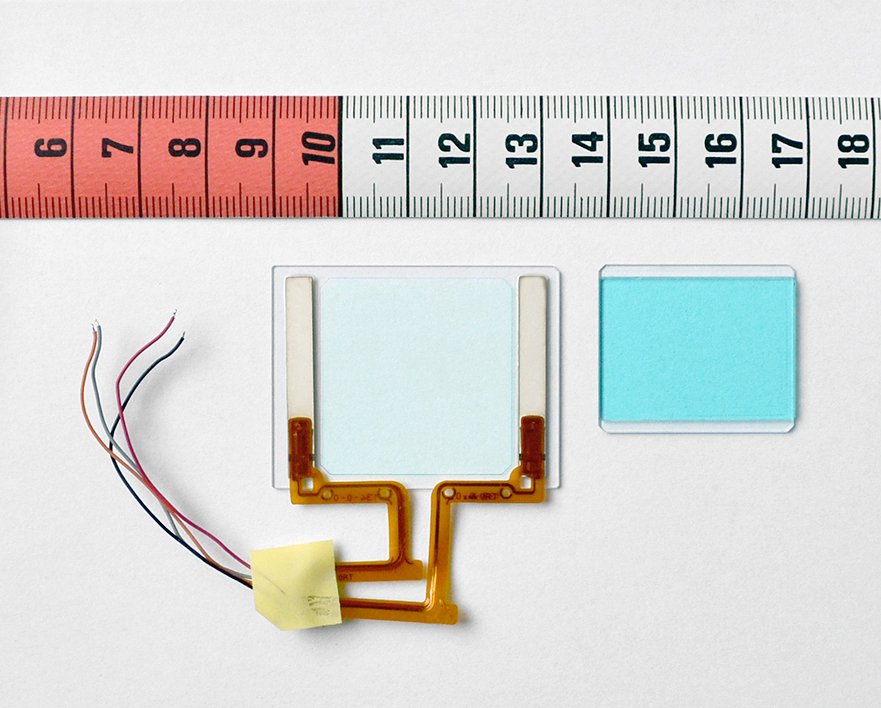
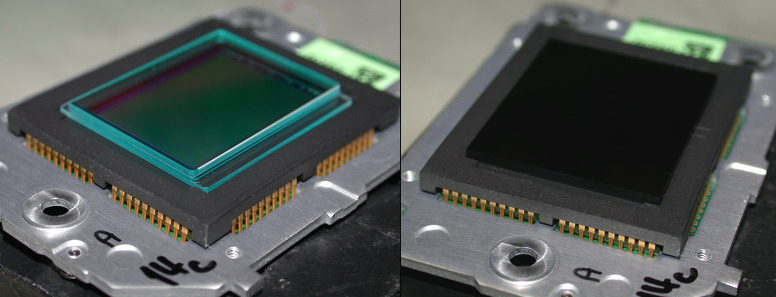
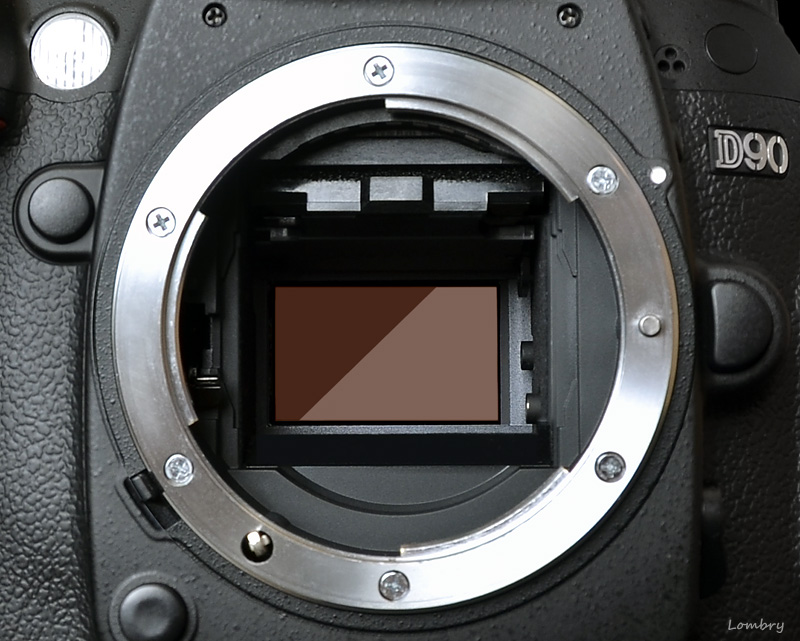
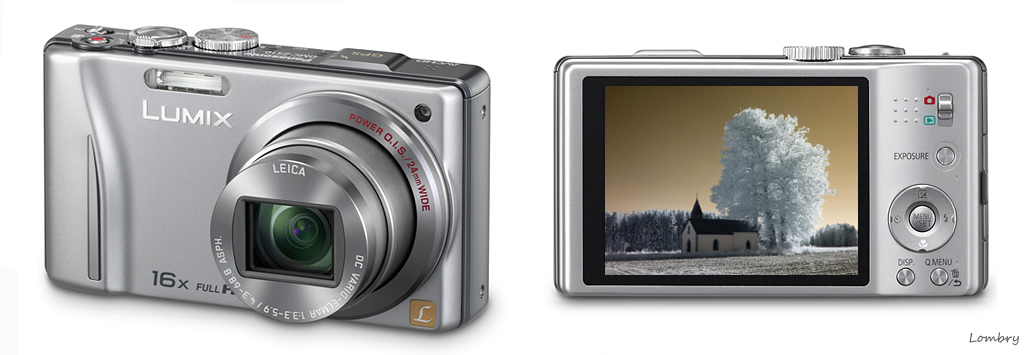
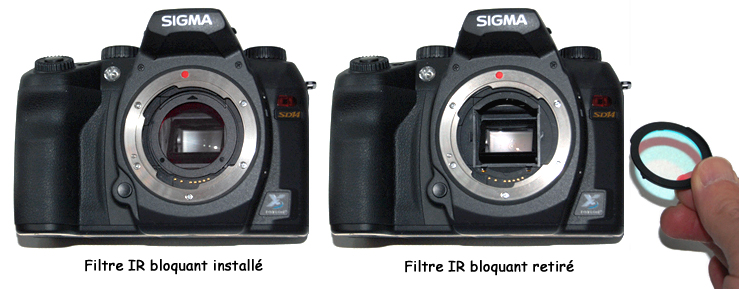
About the examination of masterpieces and thermography The near-infrared radiation can also be used to examine the deepest painting layers thanks to a technique named IR reflectography. This technique uses the IR part of the spectrum between 1000 and 2500 nm, thus practically outside the spectrum available to IR DSLR and compact cameras, most manufacturers selling dedicated cameras to that usage. For more details about this very specific application, check Art Test and Sensors websites as well as the Fitzwilliam Museum at Hamilton Kerr Institute (UK) and the French governement website, Centre de Recherche et de Restauration des Musées de France. As for thermal infrared applications, they require special sensors sensitive between 6200 and 13400 nm that today can be adapted at lower cost on the latest generation of smartphones (see the FLIR device). Note that with a temperature of 37°C, according to Wien's law the human body emits a thermal radiation at 9343 nm (λmax = 0.00288/(273.15+37)). These applications are out of the scope of DSLRs. Removing the IR blocking filter of a camera On the market there are only two manufacturers offering DSLR's able from factory to record near-infrared radiation : Sigma and Fujifilm. The Sigma SD14 released in 2006 is based on a Foveon X3 sensor (14 Mpixels). Engineers found the trick in placing the IR blocking filter in front of the reflex mirror. As shows this picture, it is only needed to push on the base of the ring supporting the filter to extract it and shooting in IR. DSLR's Fujifilm FinePix S3 Pro UVIR (2006), Fujifilm IS-1 (2007) and Fujifim IS Pro (2007) also show and sensitivity extended to 1000 nm. On all other models of DSLR's, including compact cameras, the IR blocking filter is placed on the sensor. In this case, the sole solution is to apply the procedure described by Jim Chen on LifePixel website. It consists in opening the body with a small cruxiform screwdrive to remove this IR blocking filter. It represents a very delicate work that practically requests to dismantle the body. Once the camera is dismanteled, one recognizes easily the IR blocking filter : it is transparent to light, protected with a dielectric coating giving it a turquoise or cyan color. Here is for example the procedure to follow to remove the IR blocking filter of a Canon EOS 30D, Canon EOS 350D, Canon EOS 5D, a Fujifilm Finepix S700 and a Nikon D100. Being given that the IR blocking filter (interdependent with the anti-aliasing filter) shows some thickness (1.2-2.7 mm), it must be replaced with a glass showing exactly the same size and the same refraction index so that the TTL measuring system and the autofocus continue to work. Otherwise a recalibration is needed. We will come back on this subject.
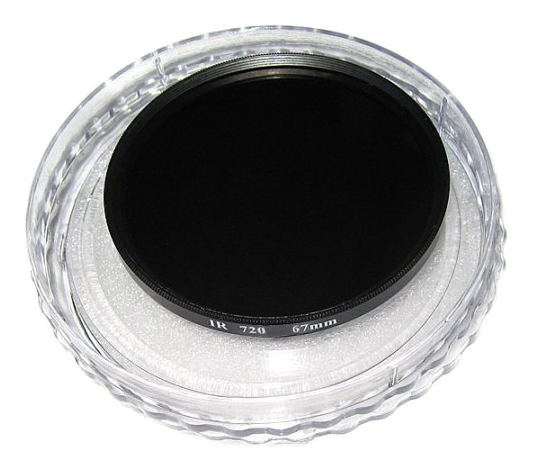
Specifications of the replacement glass depend on the applications. Usually it is one of the next models : - a clear glass transparent from 240 nm (λ50 at 280 nm) to 4600 nm like Schott WG280. In this case we can easily isolate the IR radiation in adding an infrared filter in front of the camera lens. - an IR filter showing a half-bandwidth from 630 or 665 nm called "High-Red pass" or from 715 or 830 nm. All are transparent up to 1050, 1200 nm or even 4800 nm depending on models. In this case, the camera is dedicated to IR imaging and can no more be used for conventional photography in white light without a new modification. - a "hot mirror" filter like Astrodon Inside dedicated to Canon DSLR's that is transparent to visible light between 400 and 700 nm but blocking the near IR from 720 nm. There is also the Hot mirror 0° filter transparent from 400 to 800 nm but that also shows a peak of about 7% between 1150-1200 nm. It is not recommended for the astrophotography because the IR peak increases the sky brightness. It is not really suited to IR imaging either because its transmission in the near IR is too low. It is without saying that this replacement glass or filter must be adapted to your camera. If the glass is too thick, you could not close the frame, and too thin, the element will no stay in place. So, if you order an internal Schott filter, it is better that it is delivered at the exact size of the IR blocking filter. Otherwise the technician will have to cut or polish it to the right size with a diamond saw or will have to install some hold to maintain it, a job that requests accuracy and not at the level of all photo workshops. Once the modification performed, one reassembles the camera, one closes it, and nobody knows. Only difference, your camera is now sensitive to the near IR and from now on see the world under a totaly different lighting. The defiltering (unmodding) and/or the installation of an internal filter costs between 250-300 € (~300 $) depending on the camera and the company, to which you need to add the possible delivery charges and tax. What company can perform this IR modification ? In principle, any photo workshop working "à l'ancienne" and even any good local photographer could be able to perform that operation that last less than one hour. But in the field, most shopkeepers have never dismantled a camera and even professionals hesitate to make this modification. You can request to the support team of your camera manufacturer to perform this modification at your expenses but some have already refused. Some shopkeepers or small workshops including specialists in astronomy material accept to unfilter Canon bodies and sale clip filters for Canon's. However, in Europe very few shopkeepers accept to unfilter DSLR's of other brands. If you cannot find a specialist and do not want to perform that delicate modification yourself, here is a non-exhaustive list of european and american companies ensuring that service. In France, Richard Galli from EOS for Astro (a partner of Pierro Astro) located in Turckheim (department 68) is an Astrodon distributor. Richard can perform the IR conversion of most DSLR's for 250-300 €. He also sales new unfiltered Canon DSLR's or equipped with the Astrodon Inside filter, sales filters and other accessories. He works with various manufacturers including Schott. Advantage compared to his competitors, based on the buyer's invoice, Richard Galli takes at his charge the manufacturer warranty and offers a 4-month guarantee on his work. Thanks Richard !
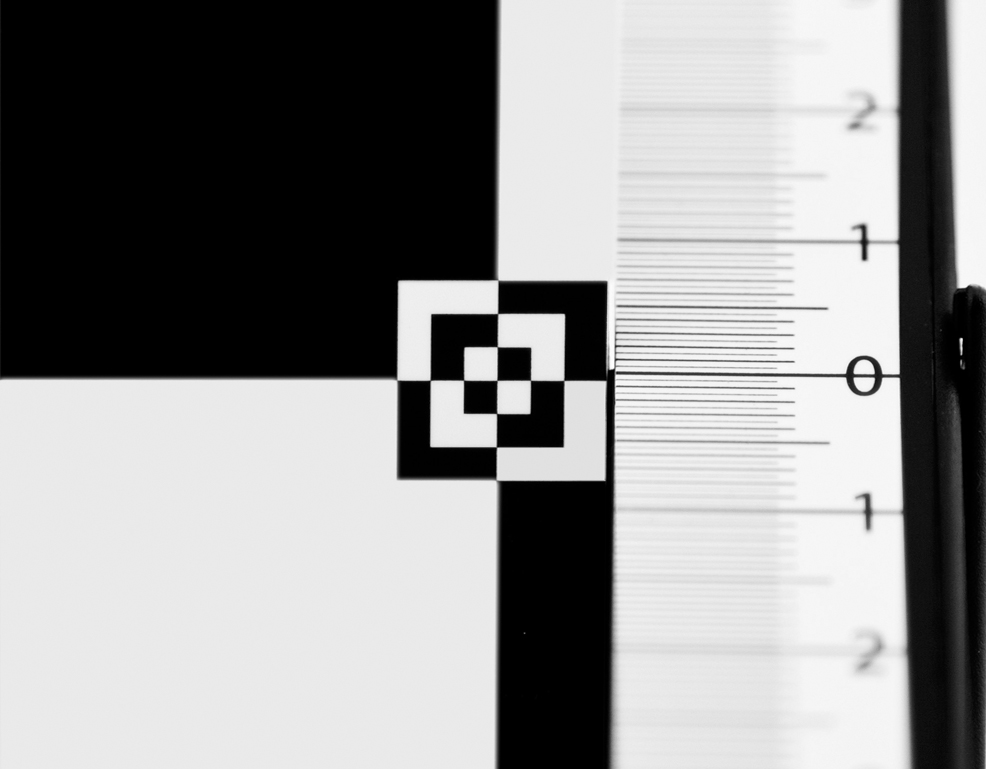
In Germany, Optic Makario is a Carl Zeiss dealer that can unfilter DSLR's and videocams of various brands, to install an internal EFO IR filter and take the manufacturer warranty at their charge. They also ensure various maintenance works. The company Baader Planetarium also ensures this service for all DSLR's in APS-C format. In the United Kingdom, ACS ensures the unfiltering of Canon, Nikon and other DSLR's, he can install an internal Schott filter and offers a 6-month guarantee on his work. The modification cost about 380 € vat and delivery charges included to continental Europe. The English company DSLR Astro Mod also unfilters various Canon and Nikon DSLR's. In Canada (Québec), the Atelier Jacques Guyon can also unfilter DSLR's or remplace the internal hot mirror with an IR filter from LifePixel. In the U.S.A., Kalori Vision modifies any DSLRs and compact cameras (Panasonic TZ18 aka TS8, FH27, Canon PowerShot G12, etc) for IR imaging, including for full spectrum. They also sell hot mirror filters (internal or external) to allow full spectrum cameras to take normal pictures again. Their prices are competitive. Some skilful US amateurs like Gary Honis and Hap Griffin ensure similar works for Canon DSLR's. At last, name the two larger US companies specialised in this field. LifePixel performs that unfiltering work or install an internal filter for 175 to 275 $ depending on the model (cf. this link), and also sell unfiltered DSLR's and compacts (cf. this llink). These cameras having been modified, they are no more covered by the manufacturer warranty. LifePixel also sales hot mirrors for Canon, Fujifilm and Nikon DSLR's. At last, MaxMax sells new unfiltered compacts and DSLR's (even without UV and anti-aliasing filter) or equipped with a "High-Red" or an IR internal filter as well as X-Nite external filters (see below) and some accessories. Here also, these cameras are not more covered by the manufacturer warranty. Note that to LifePixel and MaxMax the unfiltering is performed in a clean white room (Class 100 or ISO 5) using ionized air and antistatic work surfaces. Technicians of US both compagnies are very qualified but do not necessary use Schott filters nor do they guarantee their work, the overseas delivery of filters or unfiltered cameras is very expensive due to charges and possible importation taxe (charges are 87 $ for a filter, 230 $ for a compact digicam) but they do their work in perfect conditions and quickly. The recalibration Any photographer has probably noted that in focusing on the eyes of a person, on the image the focusing was sharp on the nooze or on the ears. This problem called "front or back focus" is related to a miscalibration of the autofocus for that specific lens. The autofocus calibration is essential because of the right refraction of the beam depends on the accuracy of the focusing; if the refraction index of the glass is not correct (par ex. n=1.517 pour le Schott BK7), rays will not focus in the same plane on the sensor and images will be blurred. The adjustment must be accurate to a fraction of millimeter and is not identical in visible ligh and in IR and from a lens to another.
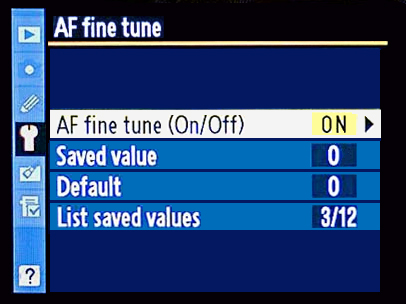
Even is the glass is clear or the internal IR filter replacing the low-pass filter shows the same refraction index or the same tickness and the former filter, the camera must be calibrated again according to the working wavelength and the lens used. Knowing that some photographers use also their unfiltered camera for white light photography, technicians calibrate the autofocus for a wavelength of 500 nm. However, this wavelength is not suited to infrared photography. If your camera is dedicated to IR photography, you must request that the calibration be performed at the wavelength of your most used filter (e.g. at 665 nm) with the most used lens. Theoretically, the adjustement to perform to get a correct focusing is calculated according to the refraction index of the glass used (n) and the thickness difference (dT) between the original filter and the replacement one according to the relation : Adjustement = (n -1) / n * dT. But it is not enough. Indeed, one also needs to take into account the autofocus B/F focus adjustment. In the case of a Nikon D90 using an internal Schott RG665 IR filter (2 ±0.1 mm thick) and a Nikkor 16-85 mm AF-S lens, the adjustment is 0.04 mm. In the field, this adjustment can be performed in picturing a chart standing vertically or tilted at 45° in relation to the sensor plane. Then one one needs to adjust either automatically the autofocus via the DSLR menus or manually in adjusting physically a screw (using a japanese screwdriver) located inside the darkroom of the DSLR. This recalibration is always needed to get sharp images at the focusing distance and all the more if you dedicate your camera to IR photography. By lack of calibration, your images will be sharp in the visible spectrum but risk to be slightly fuzzy in IR, without speaking about the microfocusing issue. If you camera needs a manual recalibration, if your shopkeeper does not want to perform it, you can ask to the support service of your brand to perform this job. When the adjustment is important, this servicing will be performed under cover of the warranty. But they can refuse it if they consider that the adjustement is not needed... In this case, knowing that most unfiltered cameras are no more protected by the warranty, remains to perform the calibration yourself. Here is for example the procedures to recalibrate automatically the autofocus via the menus of a Nikon D3X, a Nikon D300 or a Canon EOS, and manually on a Nikon D90 and a Nikon D70. To
read : Calibrate your Lens & Camera for Perfect
Focus (Nikon) AF adjustement of a Canon EOS using the LensCal Calibration chart - Focus test chart (PDF)
The calibration adjustment via the menus is only available of DSLR's of last generation of mid and high-ends, among which : - Canon EOS 50D, 7D, 5D Mk II, 1D Mk III, 1Ds Mk III, 5D Mk III, 1D Mk IV, 1D IV, 1Dx, 1 Dc - Nikon D7000, D7100, D300, D300s, D700, D800, D800E, D810, D4, D4s, D3, D3s, D3x, Df - Olympus E-30, E-620, E-5 - Pentax K-5, K-7D, K-20D, K-30, K200D, K-2000/K-m, 645, K-x - Sony A900, A850, A77. On all other models, the calibration must be performed manually. Specifications of red and infrared filters From a technical perspective, one always give the bandpass of a filter at mid height of its maximum intensity or 50% of transmission. It is the reason for which we speak of half-bandwidth (λ50) and that most catalogs while in the usual language we speak of bandpass. Even some professionals gave up the half-bandwidth term has it gave rise to confusion in the mind of amateurs. For our concern, we will use the term bandpass in this article when speaking of generalities. The main red and IR filters available on the market are next (in orange the most used filters by amateurs) :
What filter to use and where to buy it ? About circular filters to screw on the lens, select a filter of optical quality in colored glass (e.g. Schott or B+W also manufactured in Schott glass and sold by Schneider Kreuznach) rather than polymer/gelatin (Kodak Wratten) or resin (Cokin), much softer materials than glass. Select also a filter with a double-threaded ring (back/front). There are slim filters (usually 2 mm thick without the ring) and even adapted to wide-angle lenses to prevent vignetting. Do not focus on the transmission percentage but rather on the cut wavelength and the wavelength at which it shows its maximum transmission. Indeed, it is essential that its transmission curve be maximum (>80%) in the spectral band that you want to use, constant (without deep) and in a band as extended as possible. Remind you that sensor is very sensitive, and even 10% of transmission are enough to record an image, even if the exposure time will be much longer. One or another filter will be more suited depending on the DSLR's sensor, the subject (warm or cold light, subject bright or dark, under the son of in the shadow, the type and health of the vegetation, etc) and light conditions (light intensity, direct or indirect radiation, etc). One cannot say a priori that an IR filter will give better result than another. The sole factor that could determine your choice is the price : for example, a Kodak Wratten W87 filter is three times more expensive than a Hoya R-72, but the first cut all (visible) light.
The ideal should be to use at least two infrared filters of optical quality : one IR filter slightly transparent to visible light (l50 between 630-665 nm) to be able to modify colors by image processing, and an IR filter blocking all the visible spectrum, transparent from about 750 nm if you search for maximum of contrast in B/W without too much penalizing the exposure time. Among the enterprises selling filters by Internet, name in Europe and France Amazon, Apolobamba, Digit-Photo, Foto Huppert, Optic Makario et in the U.S.A. Adorama, MaxMax, Robert Cairns Company or UQG Optics. Check also online shops dedicated to photography or astrophotography like Baader Planetarium as well as links listed at the end of the 4th page. Note that the quality, specifications and thus the prices of these filters vary from a brand to another. Selecting the internal IR filter Most companies unfiltering DSLR's and installing generic internal IR filters (replacing the IR blocking) receive their stock filters from a handful of dealers including Pro Camera Repair in the States (who sale on eBay) as well as to wholesalers importing japanese and chinese products. One can presume that it is the same for generic lens filters sold by small brands and online shops.
In fact, most of them sale filters "similar" to Schott, Hoya or Kodak filters but that are not; they do not show exactly the same bandwidth nor the same transmission. So, some IR filters loss their transparency at 1050 nm whereas a Schott for example remains transparent up to 2800 nm. On the other hand, their price is higher that the filter of the referenced brand but they justify their good faith in claiming that filters in Shott glass are more expensive ! If it is not a robbery, there is in all cases a trickery on the product quality. All amateurs of optics know Schott company. In fact only Schott (and B+W) can use the reference "RG" that is protected by copyright. In any case a shopkeeper not accredited by Schott is not allowed to sale filters under e.g. the "RG665" reference. To bypass this interdiction, some unscupulous vendors do not hesistate to display in their web pages "transmission specifications similar to RG665 filter" or "similar to Hoya R72 filter". It is obvious that in this case these filters are not manufactured by Schott or Hoya who have almost the monopoly in their sector. These generic filters or belonging to the resaler's brand show a lower quality than filters of major companies. To be sure that your filter was well manufactured by Schott, when ordering a filter you can request to the dealer to provide you the melt data sheet. It is a certificate of authenticity that he must give you on request and free of charge. In principle Schott does not sale individual filters nor to private users, but trust my experience you will have no difficulty to get them either to the HQ in Germany or France or to one of their many dealers like Galvoptics in the U.K. or Robert Cairns Company in the U.S.A. That said, all suppliers of unmounted filters will ask you the exact sizes of the filter that you want. But for the manufacturer of your DSLR, these data are confidential and even the support team will not give them to you. Only solution : as you have to dismantle your DSLR to replace the IR blocking filter, do measure its exact sizes and tickness and send these data to Schott or one of its dealers who will please you in sending you the requested filter within two weeks. Note that Schott filters have polished edges. To read : To buy or not from overseas ?
Round and square filters Schott or B+W filters are usually sold in square format, as clip filter, in 24 mm of diameter or suited to 31.75 mm eyepieces. It is very difficult to find circular "long pass IR" filters from 49 to 82 mm equipped with a threaded ring. Hopefully, Foto Huppert in Germany offers all Schott and (B+W) filters between 24 and 67 mm or even 77 mm in diameter for most common filters (Cf. their menu "Der ultimative B+W Filter-Shop", section "Spezial-und Infrarot-Filter"), including internal IR filters for most DSLR brands. Their prices are very competitive. The U.S. optical company Robert Cairns Company (RCC) sales Schott filters made-sur-measure, square or circular, internal or external, without minimum quantity. They are provided without ring but one can order to RCC threaded rings in different sizes. Otherwise it is easy to get one on Internet or to buy any filter and to use its threaded ring. Without to forget that if Schott can cut its filters sur measure, they can also sale circular IR filters without ring for lenses. Performances of anti-reflection coatings A filter in BK7 glass uncoated against reflections transmits between 95.6 and 96.2% of incident radiation between 300 and 1200 nm. This ratio is reduced to 89.8% for softer glasses or low-end ones (reflection up to 5.1% per air-glass surface). Coated with a single MgF2 layer, the same glass transmits 98.6% of light at 550 nm but drops to less than 96% at the ends of the spectrum (<450 nm and >1100 nm). Only the MRC multilayer (applied to some polarizing filters, see below) transmits more than 99% of light but only between 400 and 650 nm because it is without effect in UV and IR. The MgF2 multilayer is the only one efficient between 400 and 1200 nm (>96% of transmission) with a maximum transmission of 99.9% at 650 nm.
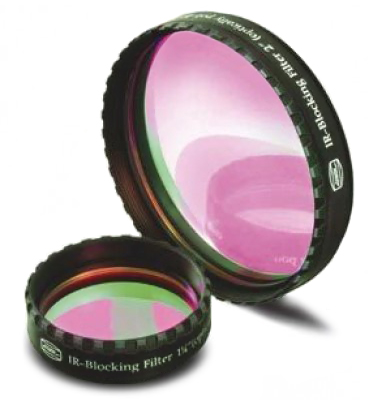
All these coatings loss their efficiency in the near infrared. Not only reflections increase over 600 nm but the coating can generate interferences and ruin the image quality, mainly at daylight. Infrared filters, they are internal or external are almost never coated. Manufacturers can of course protect IR filters but for small orders this coating is really very expensive (500 $ for a single-coated double side to RCC, 600 € to Schott), the coating offers a poor efficiency between 600 and 900 nm and is useless beyond while the delivery is postponed to one or two months. The price of IR filters The price of an IR filter in resin is about 30 € for a diameter of 67 mm. If you want to convert yourself a camera to IR, and do not need of the highest optical grade, it is the cheapest solution. Equipped with the right tools you can easily cut this kind of filter at the right sizing. The price of a 67 mm IR filter made of optical quality glass, to screw on the lens is about 80 € vat incl. for a diameter of 67 mm to Amazon.fr, 100 € vat incl. to Foto Huppert while a model of 77 mm in diameter can reach 200 €, and about 200$ to Robert Cairns Company. An IR blocking clip filter for Canon DSLR's cost about 110 € to Astronomik. An internal IR filter suited to DSLR's in DX format and uncoated, similar to RG665 ("Enhanced Color IR" model) but not in Schott glass cost between 180-230 $ to Lifepixel and 65£ to UQG Optics, plus delivery charges. To Robert Cairns Company an internal Schott RG665 filter cost 60 $ delivery included. The same filter is sold at 50 € to Schott France. But all charges included, il will cost you about 100 € vat incl., knowing that the price per unit and charges are regressive, depending on amounts; in fact for 1 € more, order two filters, you will get one free, notice to photo workshops ! Restoring the visible spectrum At the condition that the DSLR is not dedicated to IR photography (in replacing physically the low-pass filter with an IR filter), so if you have simply removed the internal IR blocking filter and replaced it with a clear glass, if now you want to restore its normal sensitivity spectrum, you can place on the lens a filter blocking UV and IR radiations (this time an IR blocking, IR cut or hot mirror). You have the choice between the three next filters among many other combinations while none of them is universal :
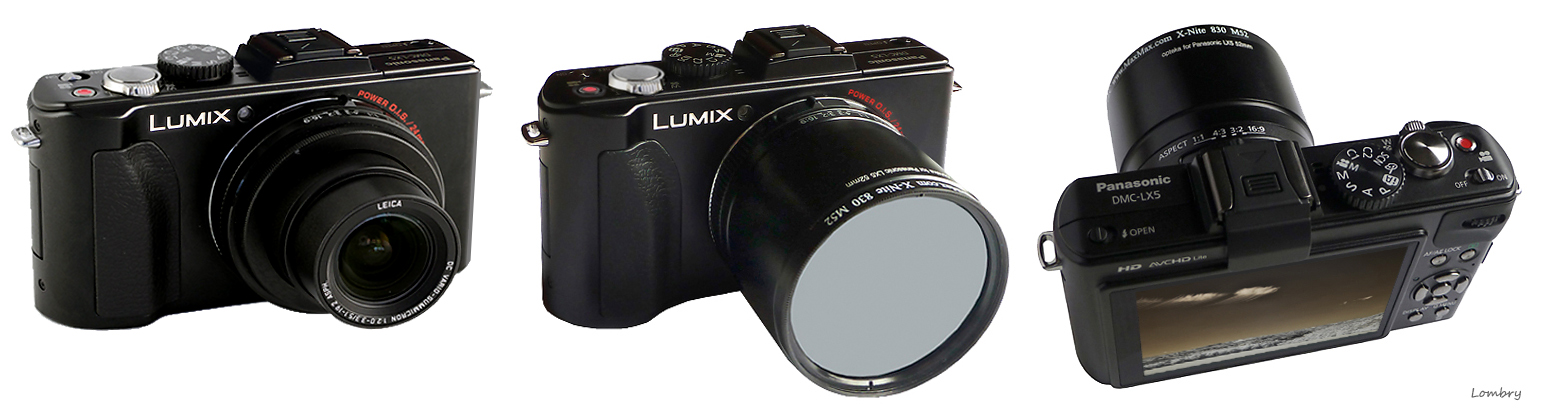
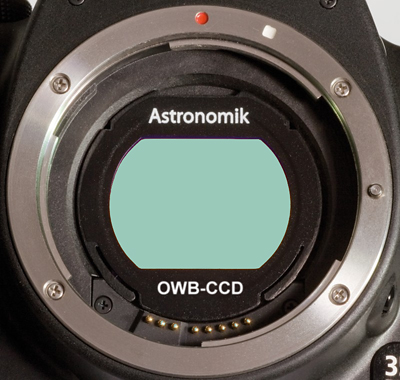
- The B+W 486 UV-IR filter from Schneider Kreuznach offers a bandpass higher than 50% between 390 and 690 nm and cut IR from 790 nm. However, the manufacturer does not recommend it for wide-angle lenses >60°. Indeed, for geometry reasons, under high incidence (beam highly tilted vs the normale), light generates interferences in the coating. - The OWB-CCD type 2 filter from Astronomik called "Original White Balance" offers a bandpass higher than 50% between 418 and 630 nm (transparent between 400 and 700 nm). However, it is a clip filter dedicated to the darkroom of some Canon EOS models unfiltered to IR. If you used a fully unfiltered Canon DSLR, you will have to combine it with an anti-UV filter (see below). Without this filter, the UV excess could affect the image colors as well as the focusing and contast. - The X-Nite CC1 filter from MaxMax or the one sold by other dealers (Kalori Vision, LifePixel, etc) offers a bandpass higher than 50% between 330 and 620 nm, thus shifted to UV, with a maximum transmission of 97% at 500 nm, and blocking all IR radiation from 790 nm. More versatile than the two previous, the X-Nite CC1 filter and others "hot mirror" filters are available in various sizes and external models are equipped with a threaded ring.
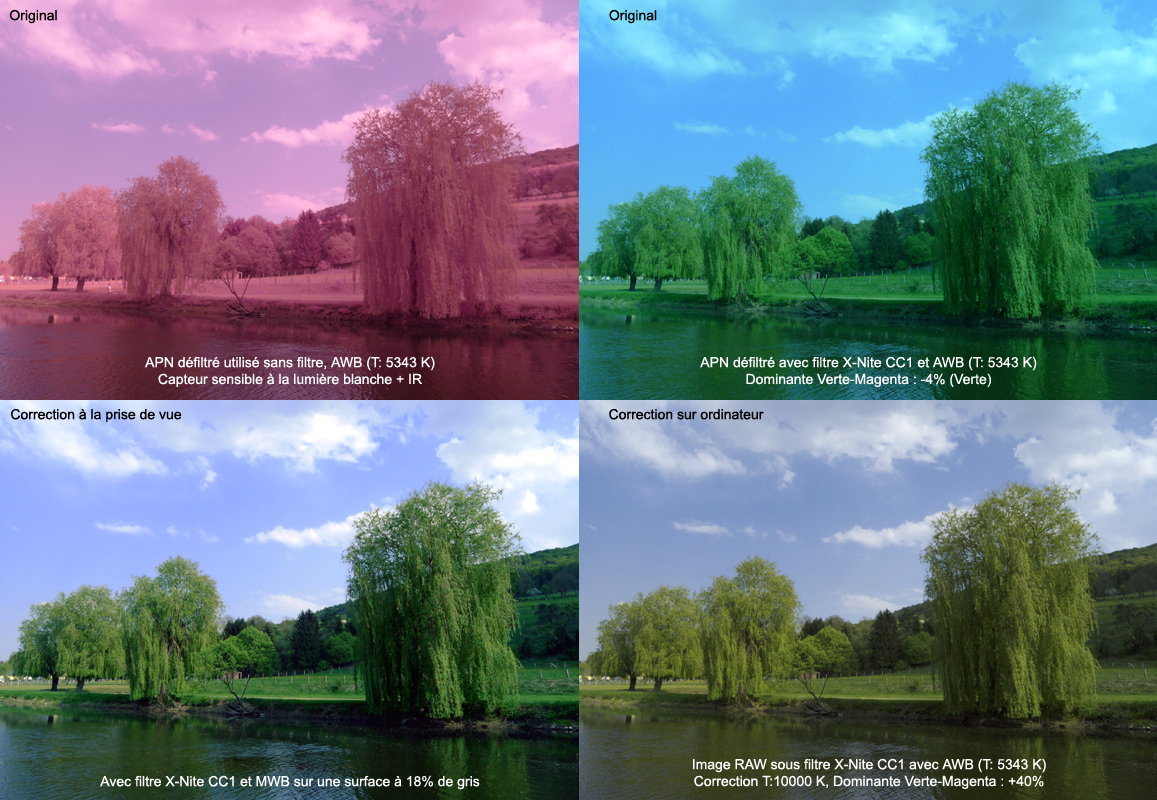
As once can see above and at left, the X-Nite CC1 filter shows a cyan color. With some cameras, using the automatic white balance (AWB) pictures will show an uneasthetic cyan dominance. So in using this filter, it is recommended to perform a manual white balance on a 18%-gray or on a white surface. The cyan dominance can however be corrected by image processing on computer. There are various methods that you work with picturess recorded in JPEG format or, if your camera support it, in RAW format. For images in JPEG format, the simplest is to use the "U-point" technlogy available in the last generation of imaging software, or the "Auto Levels" or "Auto Color" function of Adobe Photoshop among others that will adjust automatically the color and brightness curves of RGB channels. That said, for an expert, nothing is worth a manual color correction (e.g. via the Photoshop menu Image > Ajustments > Color Balance) or a color remplacement (e.g. via the Photoshop menu Image > Ajustements > Replace Color). At last, if you work with pictures in RAW format - the easier to postprocess, see end of 3d page - you have till more freedom as you can easily modify all shooting parameters. For example, working with the last version of Nikon Capture NX to be sure to have the last raw converters, you can use the "U-point" technology to modify a specific color or an area and get the right balance or effect in a few keystrokes. If you prefer using Photoshop, the recent versions (from 2009 with PS9 or CS2) include support of the RAW format of all cameras. Using the "eyedropper", you can modify the tonality of a color, and optionally the luminance or one of another specific channel. Watch these excellent video tutorials from Life Pixel and Imre Z. Balint on how to proceed. At last, you can also increase the image color temperature to 10000 K, and add 40% magenta (complementary color of green) as one can see on the mosaic displayed above left. The polarizing filter In addition to the IR filter it is interesting to use a polarizing filter, an optical accessory made of two polarizing blades.
Usually the light travels is space in a defined direction and is thus not polarized in relation with the wave plane. But under some conditions (collisions with air molecules, in the few nanometers of a surface thickness), the light can be partially reflected and changes of direction. In this case, the light is polarized; one of its two components generates glints. The phenomenon does not occur on a mirror nor on a metal surface (but well on metal surface covered with painting). In adjusting the rotation of one of the two polarizing blades, under a determined angle (Brewster angle), one can reduce or suppress the polarized wave, and thus reduce or remove glints on non metal surface (glass, plastic, painting, water surface, ice, sky, etc), the effect being the most important under an angle of 90° in respect with the light source. In concrete terms, any light shifted of a quarter of wavelength is filtered. The skylight is also partially polarized. The phenomenon is increased at sunset at 90° from the Sun. For the sea, rivers, lakes or icy surfaces, the polarisation is made in the vertical plane. In removing glints and other reflections, the polarizing filter reveals surface details, increases the color saturation, darken the sky, reduce dry haze at the horizon, for short it increases colors and contrast, this last reducing the thermal noise on images. In the case of a compact or DSLR where the metering is made through the lens (TTL), it is the circular polarisation (at left or right) that interests us; both wave components have the same amplitude but one of them can be shifted up to 90° as one can see on the animation displayed at right. Note that there is no difference between effects generated by a filter having a linear or a circular polarization, except that the second one uses a 2d blade coated at l/4 so that the reflected light does not show a privilegied polarization plane. It is mandatory to not interfere with the TTL metering system and the autofocus of DSLR's and videocams.
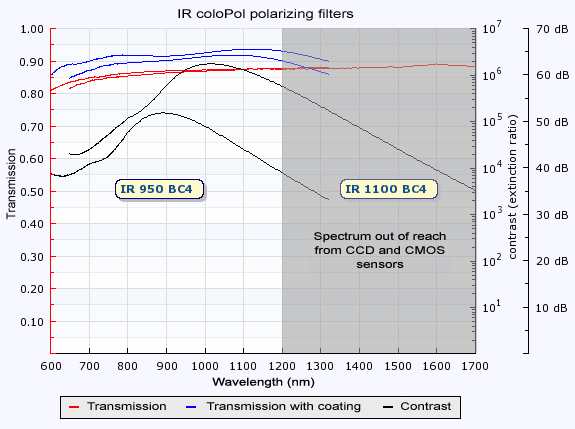
Some polarizing filters are suited to IR radiation, showing a contrast 10 to 20 dB higher over 800 nm, specially linear models made of soda-lime and nanoparticles sold by Codixx (manufacturing on request for DSLR's compatible with a linear polarisation). There is no polarizing filter suited for both visible spectrum and IR radiation. There are well polarizers able to filter light at three wavelengths of the spectrum in combining 3 or 4 polaroids blades, but no online shop offers these products. But endly, we do not really need of such a filter. Indeed, we will see about color IR photography that to get some colored effects we need to record partially the visible spectrum. In this case it is necessary to use a classic polarizer, suited to white light.
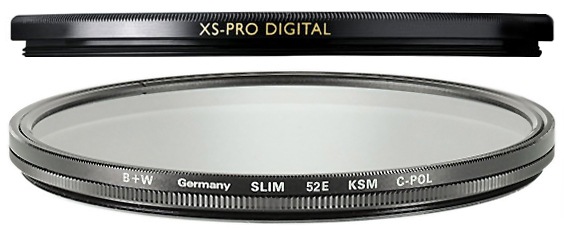
Of course if we use a filtre opaque to light, one will lost partly the efficiency of the classic polarizer including about 20 dB of contrast compared to a polarizing filter suited to near-IR. Among the most used polarizing filters name Singh-Ray Gold-N-Blue, Hoya HD polarizer and the excellent B+W Käsemann F-Pro Slim MRC also available to Foto-Huppert in Germany and at Amazon (XS model). Advantages of the polarizer are however paid off by a slight lost of luminosity. By nature, a polarizing filter transmits between 80 and 95% of light depending on the density and the wavelength while a multicoating increases its transmission of about 4% per surface. This end in a exposure compensation of +1 EV for the Käsemann but that can reach +2.8 EV for competitors' models where the exposure duration has to be doubled or even multiplied by 7 compared to a picture recorded without filter. This compensation depends on the filter density and the level of polarization attenuation. The price of a quality polarizing filter is about 70 € for a 52 mm in diameter, a B+W Käsemann Slim MRC of 67 mm cost between 110 and 140 €, the highest price for a classic polarizing filter of 77 mm in diameter reaches 160 € and twice more for a B+W professional model. Now that we have the camera suited to IR photography and selected our filters, see the main parameters affecting the rendering of IR photographs and how to process this image on computer. Next chapter
|
|||||||||||||||||||||||||||||||||||||||||||||||||||||||||||||||||||||||||||||||||||||||||||||||||||||||||||||||||||||||||||||||||||||||||||||||||||||||||||||||||||||||||||||||||||||||||||||||||||||||||||||||||||||||||||||||||||||||||||||||||||||||||||||||||||||||||||||||||||||||||||


